Mailsac Enhances Free Tier: Introduces One Free Private Address for Improved Privacy and Advanced Email Testing Capabilities

We’re delighted to announce a significant enhancement to our free tier plan, specifically tailored to meet the needs of Quality Assurance (QA) teams and automated testers. Effective immediately, all free Mailsac users will have access to one free private address, enabling them to maintain confidentiality during email testing and ensure privacy for sensitive testing communications.

The addition of the free private address empowers QA teams and automated testers with an extra layer of control over their email testing activities. With the free private address, they can separate and safeguard their testing correspondence, ensuring the confidentiality of valuable testing data. By seamlessly managing both public and private email addresses within a single Mailsac account, QA teams and automated testers can streamline their workflow and simplify the management of their testing environments.

“At Mailsac, we understand the critical importance of data privacy and confidentiality in the testing process. We are excited to offer QA teams and automated testers the advantage of one free private address to enhance their email testing capabilities,” stated Michael Mayer, managing executive at Mailsac. “This enhancement is a testament to our commitment to empowering professionals in the QA field with robust email solutions that prioritize privacy and security.”

In addition to the free private address, Mailsac’s free tier plan includes a comprehensive range of features designed to cater to the unique needs of QA teams and automated testers. These features include rolling message storage space, customizable email addresses, and reliable email forwarding and routing capabilities. The ability to forward emails to various testing integrations environments, via Slack, webhooks, websockets, and other Mailsac addresses, facilitates seamless communication and collaboration within a company’s testing ecosystem. Furthermore, Mailsac provides a robust REST API, enabling QA teams and automated testers to check and manage email messages with ease during their testing cycles.

To benefit from enhanced privacy, advanced email testing capabilities, and a comprehensive range of features, QA teams and automated testers can sign up for Mailsac’s free tier plan at https://mailsac.com/pricing. The inclusion of the free private address and the expanded email testing options demonstrate Mailsac’s commitment to meeting the specific requirements of QA professionals, enabling them to conduct thorough and secure email testing.

About Mailsac: Mailsac is the leading provider of secure and flexible email testing services, catering to the needs of individuals, small businesses, and organizations worldwide. With a strong emphasis on user privacy and data protection, Mailsac empowers QA teams and automated testers to conduct rigorous and secure email testing while maintaining control over their digital identities. From the free tier plan to enterprise offerings, Mailsac delivers unmatched email solutions and exceptional customer support.

For media inquiries, please contact: Michael Mayer Email: [email protected]

Removal of Google Analytics Tracking from all Mailsac websites, effective immediately

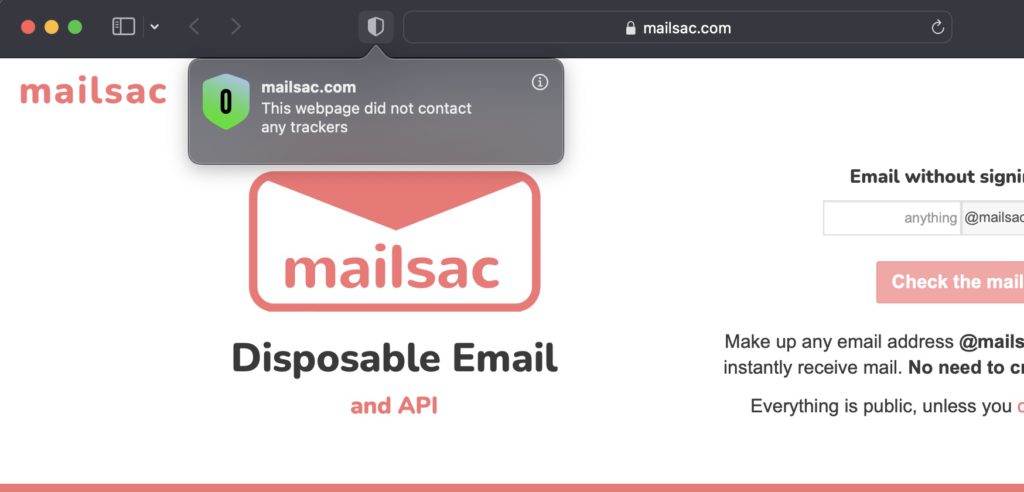
Google Analytics (GA), the ubiquitous web analytics service provided by Google, has been removed from all Mailsac properties. GA is used to see which pages people visit, how frequently users return to a website, and where they were referred from.

Despite Google Analytics being the de facto tracking service on the internet – mostly because it is entirely free – we decided it was not a good fit for our users.

Frequently, disposable email services are used as a way to avoid spam and tracking. But the free GA product by Google is actually an information gathering honeypot, extremely lucrative for them. By some estimates, GA is on 65% of the top 1 million most popular sites on the internet.

It is worth noting that Mailsac does not use Facebook analytics, nor any other 3rd party trackers. We do leverage the privacy-focused – and paid – Cloudflare Analytics, which is included with our DNS and caching service. We also track minimal usage metrics on the server side of Mailsac.com, for billing purposes.

Mailsac was created over 10 years ago with the goal of providing a reliable disposable email platform for software testers. We serve no advertisements, sell no data to 3rd parties. We rely on users to pay us for providing a good service. From the time of Mailsac’s creation – until recently – we did leverage Google Analytics as a tool to understand website load. As a “free” product, GA helped keep costs down and worked well. We have come to understand that “free” meant we effectively shared our users browsing habits with Google, for the purpose of serving ads. So we no longer do that.

Screenshot of mailsac.com on 2022-04-28 in Safari showing zero trackers

Deprecation of Outbound SMTP Service

Outbound SMTP service will no longer be supported by Mailsac.

What Does this Mean for Me?

Mail will no longer be able to sent from Mailsac addresses or custom domains using the outbound Mailsac SMTP service.

If you are sending from the REST API, compose email form, or Unified Inbox we encourage you to seek out other SMTP sending services. Mailsac has always supported direct SMTP from anywhere, without a mail relay, as well.

Reasons for the Change

Email delivery is not an easy problem at scale.

Our customers, especially quality assurance teams, are using Mailsac as a receive-only service.

The likelihood that Mailsac’s outbound messages are delivered to the intended inbox has been trending lower over time, despite increased effort.

We made the decision to focus our efforts on improving our core product – disposable inbound email for testing.

Recommended Providers of Outbound SMTP Service


Maintenance Notice: Database Upgrade

Date and Time

Friday May 6th from 13:00 through 14:30 UTC

Expected Downtime

There may be intermittent service interruption while database failover happens (60-120 seconds)

Reason for the Change

Mailsac is upgrading to a larger database cluster to ensure service availability during peak load.

Customer Changes

No customer changes are required.

Self-Hosted Mailsac UI

This tutorial references code published at https://github.com/mailsac/mailsac-self-hosted-ui

The Mailsac Self-Hosted Temporary Email User Interface is available in a GitHub repository. This project provides a self-hosted user interface for viewing disposable email. It uses mailsac.com as the backend email service.

Mailsac.com Limitations

Mailsac already offers disposable email without a need to sign up for an account. What need does this application meet that Mailsac doesn’t already provide?

Mailsac has limitations on what can be viewed without signing up for an account. Only the latest email in a public mailbox can be viewed without signing in. Mail in a private domain cannot be viewed without signing in with an account that has permissions to the private domain.

Use Cases

There are two use cases that customer’s have brought to our attention that Mailsac’s service doesn’t satisfy. Both stem from a requirement to allow users read-only access to an inbox without the requirement of creating a Mailsac account.

Class Room Use Case

An instructor may want students, who are young in age and don’t have an email address, to sign up for an account with a web service used in the class. The Mailsac Self-Hosted Temporary Email User Interface application provides a simplified interface for students to view email sent to a private mailsac hosted domain without the need to sign up for a mailsac account or email address.

Acceptance Tester Use Case

As part of the sofware development lifecycle there is a need to have software tested by users. Temporary email has long been beneficial to testing. The Mailsac Self-Hosted Temporary Email User Interface makes this easier. Users can test applications using email addresses in a Mailsac hosted private domain without the need to sign up for a Mailsac account. Furthermore, because the application is self-hosted companies can use a reverse proxy to enforce IP allow lists or put the application behind basic authentication.

Running the Mailsac Self-Hosted Email User Interface

Local

With NodeJS installed this application can be run with the following commands.

npm install && npm run build
MAILSAC_KEY=YOUR_MAILSAC_API_KEY npm run start

You will need to generate a Mailsac API key. To generate or manage API Keys use the API Keys page.

The application is now running and can be accessed via a web browser at http://localhost:3000 .

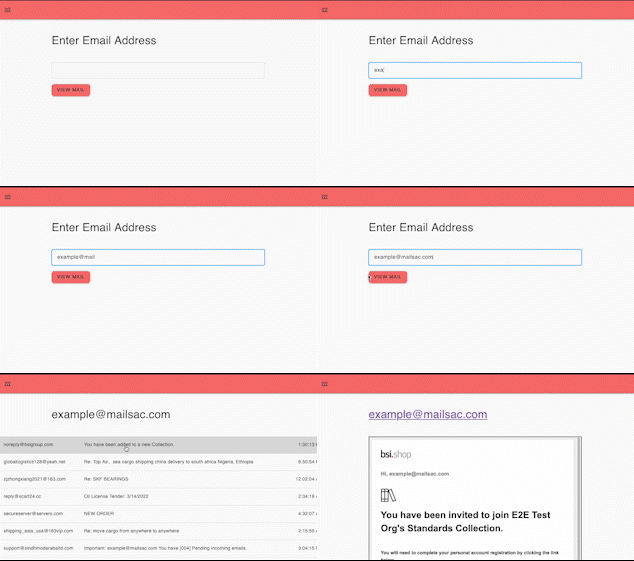
Any public or private Mailsac hosted address the API key has access to can be viewed by entering the email address in the text box and selecting “view mail”.

Screenshot of Application with no domain defined

Domain Option

You can prepopulate the domain by using the NEXT_PUBLIC_MAILSAC_CUSTOM_DOMAIN environment variable.

NEXT_PUBLIC_MAILSAC_CUSTOM_DOMAIN=example.mailsac.com npm run build
MAILSAC_KEY=YOUR_MAILSAC_API_KEY npm run start
Screenshot of pre-populated domain

Vercel Hosted

Vercel is a platform as a service provider. Their service makes running your own Next.js application easy.

The Vercel Getting Started guide is easy to follow.

  1. Fork this repo.
  2. Sign up for a Vercel account
  3. Grant Vercel permissions to read all your repos or choose to grant permission on the forked repo
  4. Import forked repository into Vercel
Screenshot showing import of forked repo
  1. Configure MAILSAC_KEY environment variable
Screenshot of environment variables

  1. Deploy application
Screenshot showing deployment success

After a successful deployment you can click on the image of the application to be taken to the live application.

NOTE There is currently no authentication on this application. Anyone with the URL will be able to view emails and domains associated with the Mailsac API key that was used. Operations will be tracked in the Mailsac account in which the API key is associated with.

You are free to deploy this app however you like. Please keep the attribution to Mailsac.

Maintenance Notice: DNS Provider Change

Date and Time

Saturday April 2nd from 13:30 through 17:30 UTC

Expected Downtime

No downtime is expected.

Reasons for the Change

Mailsac is changing DNS providers to Cloudflare to provide a more resilient SaaS offering.

Customer Changes

No customer changes are required. If you implemented IP based ACLs at the VLAN or border firewall, it is possible these rules may need to be updated. Cloudflare publishes a list of their IP addresses.

Updates

Saturday April 2nd 14:33 UTC
DNS has been switched over to use Cloudflare. All validation tests have been completed. We will continue to monitor for issues.

Email Integration Tests Using Java

Mailsac provides a REST API to fetch and read email. The REST API also allows you to reserve an email address that can forward messages to another mailsac email address, Slack, WebSocket, or webhook

This article describes how to integrate with Mailsac using Java and the JUnit testing framework. The JavaMail API will be used to send email via SMTP.

What is JUnit?

JUnit is a unit testing framework for the Java programming language. The latest version of the framework, JUnit 5, requires Java 8 or above. It supports testing using a command-line interface, build automation tools, and IDEs.

JUnit can be used to test individual components of code to ensure that each unit is performing as intended.

Setting Up the Environment

Depending on the environment, there are multiple ways to run tests. Testing using the command and JUnit are included in this example.

Testing Using Command-Line

Running tests from the command-line requires the ConsoleLauncher application(junit-platform-console-standalone-1.7.2.jar). JUnit ConsoleLauncher is published in the Maven Central repository under the junit-platform-console-standalone directory.

  1. Navigate to the Maven Central directory
  2. Download junit-platform-console-standalone-1.7.2.jar.
  3. Create a directory for the project: mkdir mailsac-tests.
  4. Move the jar file you downloaded into the directory mailsac-tests.
  5. Create a directory inside mailsac-testsmkdir test.

    Note: mailsac-tests/test will contain your source code.

JUnit Testing Introduction

This code example shows basic usage of the JUnit testing framework.

Inside the directory mailsac-tests/test, create a java file: touch TestClass.java.

Add the following code snippet to ./mailsac-tests/test/TestClass.java

import static org.junit.jupiter.api.Assertions.assertTrue;
import static org.junit.jupiter.api.Assertions.assertEquals;
import org.junit.jupiter.api.DisplayName;
import org.junit.jupiter.api.Test;

@DisplayName("tests truth")
class TestClass {

    @Test
    @DisplayName("true equals true")
    void trueEqualsTrue() {
        // The assertTrue method asserts that the supplied condition is true.
        // static void assertTrue(condition)
        assertTrue(true);
    }

    @Test
    @DisplayName("false equals false")
    void falseEqualsFalse() {
        // The assertEquals method asserts that expected and actual are equal.
        // static void assertEquals(expected, actual)
        assertEquals(false, false);
    }

}

@Test Denotes that a method is a test.

@DisplayName Declares a custom display name for the test class or test method.

Refer to JUnit annotations and JUnit Assertions for further reading.

Running JUnit Tests From The Command-Line

  1. Inside the directory mailsac-tests, compile the test:javac -verbose -cp junit-platform-console-standalone-1.7.2.jar -d test test/TestClass.java.
  2. Then run:java -jar junit-platform-console-standalone-1.7.2.jar --class-path test --scan-class-path.

The output should appear similar to this:

╷
├─ JUnit Jupiter ✔
│  └─ tests truth ✔
│     ├─ false equals false ✔
│     └─ true equals true ✔
└─ JUnit Vintage ✔

Test run finished after 92 ms
[         3 containers found      ]
[         0 containers skipped    ]
[         3 containers started    ]
[         0 containers aborted    ]
[         3 containers successful ]
[         0 containers failed     ]
[         2 tests found           ]
[         0 tests skipped         ]
[         2 tests started         ]
[         0 tests aborted         ]
[         2 tests successful      ]
[         0 tests failed          ]

The first section of output shows the name of the unit test (tests truth) and the test names (true equals true and false equals false). The checkmark next to the test name indicates it was successful.

The second section of output shows a summary of the test results.

Testing Using Build Tools

Testing from build automation tools, like Maven, is another option. In many ways, using build tools is the best option. For instance, they provide a standard directory layout that encourages industry standard naming conventions.

Maven abstracts many underlying mechanisms allowing developers to run a single command for validating, compiling, testing, packaging, verifying, installing, and deploying code.

This section will describe how to set up Maven for building, managing, and testing a project.

  1. Navigate to the Apache Maven download page and follow the installation instructions. If you have Homebrew you can install Maven using the command: brew install maven.
  2. After installing Maven, run on the command-line to initialize the directory mailsac-integration-test-java as a maven managed project:
mvn archetype:generate \
    -DgroupId=com.mailsac.api \
    -DartifactId=mailsac-integration-test-java \
    -DarchetypeArtifactId=maven-archetype-quickstart \
    -DarchetypeVersion=1.4 \
    -DinteractiveMode=false
  1. Navigate into the directory: cd mailsac-integration-test-java
  2. Update the <dependencies> and <build> sections of pom.xml with the following xml.
<!-- ... -->
<dependencies>
  <dependency>
    <groupId>org.junit.jupiter</groupId>
    <artifactId>junit-jupiter-api</artifactId>
    <version>5.7.2</version>
    <scope>test</scope>
  </dependency>
  <dependency>
    <groupId>org.junit.jupiter</groupId>
    <artifactId>junit-jupiter-engine</artifactId>
    <version>5.7.2</version>
    <scope>test</scope>
  </dependency>
</dependencies>
<!-- ... -->
<build>
  <pluginManagement>
    <!-- ... -->
    <plugins>
      <plugin>
        <artifactId>maven-surefire-plugin</artifactId>
        <version>2.22.2</version>
      </plugin>
      <plugin>
        <artifactId>maven-failsafe-plugin</artifactId>
        <version>2.22.2</version>
      </plugin>
    </plugins>
    <!-- ... -->
  </pluginManagement>
</build>
<!-- ... -->
  1. Edit the AppTest.java file: $EDITOR src/test/java/com/mailsac/api/AppTest.java
package com.mailsac.api;

import static org.junit.jupiter.api.Assertions.assertTrue;
import static org.junit.jupiter.api.Assertions.assertEquals;
import org.junit.jupiter.api.Test;

class TestClass {

    @Test
    void trueEqualsTrue() {
        // The assertTrue method asserts that the supplied condition is true.
        // static void assertTrue(condition)
        assertTrue(true);
    }

    @Test
    void falseEqualsFalse() {
        // The assertEquals method asserts that expected and actual are equal.
        // static void assertEquals(expected, actual)
        assertEquals(false, false);
    }

}
  1. In the directory mailsac-integration-test-java, run mvn clean package. This command deletes the folder target , packages the project into a new target folder, and runs a unit test.
  2. Tests can be manually run using the command mvn test in the mailsac-integration-test-java directory.The output should appear similar to:
[INFO] -------------------------------------------------------
[INFO]  T E S T S
[INFO] -------------------------------------------------------
[INFO] Running com.mailsac.api.TestClass
[INFO] Tests run: 2, Failures: 0, Errors: 0, Skipped: 0, Time elapsed: 0.029 s - in com.mailsac.api.TestClass
[INFO] 
[INFO] Results:
[INFO] 
[INFO] Tests run: 2, Failures: 0, Errors: 0, Skipped: 0

Mailsac Java Integration Test

This section describes how to leverage Mailsac and JUnit to test mail delivery. Emails will be sent to Mailsac using SMTP and email delivery will be validated with JUnit.

There are 3 additional libraries that will be used:

Integration Test Example

  1. With Maven, add the following dependencies to pom.xml
    If you are not using Maven include the JAR files in the classpath:

https://mvnrepository.com/artifact/com.mashape.unirest/unirest-java/1.4.9

https://mvnrepository.com/artifact/com.sun.mail/javax.mail/1.6.2

https://mvnrepository.com/artifact/com.fasterxml.jackson.core/jackson-databind/2.12.5

<!-- ... -->
<dependencies>
  <!-- ... -->
  <dependency>
    <groupId>com.mashape.unirest</groupId>
    <artifactId>unirest-java</artifactId>
    <version>1.4.9</version>
  </dependency>
  <dependency>
    <groupId>com.sun.mail</groupId>
    <artifactId>javax.mail</artifactId>
    <version>1.6.2</version>
  </dependency>
  <dependency>
    <groupId>com.fasterxml.jackson.core</groupId>
    <artifactId>jackson-databind</artifactId>
    <version>2.12.5</version>
  </dependency>
</dependencies>
<!-- ... -->
  1. Edit the AppTest.java file: $EDITOR src/test/java/com/mailsac/api/AppTest.java

    Import the required modules
package com.mailsac.api;

import com.fasterxml.jackson.core.JsonProcessingException;
import com.fasterxml.jackson.databind.JsonNode;
import com.fasterxml.jackson.databind.ObjectMapper;
import com.mashape.unirest.http.HttpResponse;
import com.mashape.unirest.http.Unirest;
import com.mashape.unirest.http.exceptions.UnirestException;
import org.junit.jupiter.api.AfterEach;
import org.junit.jupiter.api.BeforeAll;
import org.junit.jupiter.api.BeforeEach;
import org.junit.jupiter.api.Test;

import javax.mail.Message;
import javax.mail.MessagingException;
import javax.mail.Session;
import javax.mail.internet.InternetAddress;
import javax.mail.internet.MimeMessage;
import java.io.IOException;
import java.io.UnsupportedEncodingException;
import java.util.Date;
import java.util.Properties;

import static org.junit.jupiter.api.Assertions.assertTrue;
import static org.junit.jupiter.api.Assertions.fail;
  1. Acquire a Mailsac API key and configure SMTP sending. Export these parameters as environment variables:
export MAILSAC_API_KEY=your_mailsac_key;
export [email protected]
export SMTP_USERNAME=your_smtp_username
export SMTP_PASSWORD=your_smtp_password
export SMTP_HOST=smtp.example.com
public class AppTest {
    // MAILSAC_API_KEY environment variable. Generated by mailsac. See
    // https://mailsac.com/api-keys
    static String mailsacAPIKey = "";
    // MAILSAC_TO_ADDRESS environment variable. Who you're sending an email to.
    static String mailsacToAddress = "";
    // SMTP_FROM_ADDRESS environment variable. Necessary if you are sending
    // through out.mailsac.com (unlikely - you most likely will replace
    // sendMail() below.
    static String fromAddress = "";
    // SMTP_USERNAME environment variable. Required for authenticated SMTP sending
    static String smtpUserName = "";
    // SMTP_PASSWORD environment variable. Required for authenticated SMTP sending
    static String smtpPassword = "";
    // SMTP_HOST environment variable. Hostname of your SMTP server
    static String smtpHost = "";
    // SMTP_PORT environment variable. Port used for SMTP sending
    static int smtpPort = 587;

    @BeforeAll
    static void setup() throws Exception {
        mailsacAPIKey = System.getenv().get("MAILSAC_API_KEY");
        mailsacToAddress = System.getenv().get("MAILSAC_TO_ADDRESS");
        fromAddress = System.getenv().get("SMTP_FROM_ADDRESS");
        smtpUserName = System.getenv().get("SMTP_USERNAME");
        smtpPassword = System.getenv().get("SMTP_PASSWORD");
        smtpHost = System.getenv().get("SMTP_HOST");
        if (System.getenv().get("SMTP_PORT") != null) {
            Integer.parseInt(System.getenv().get("SMTP_PORT"));
        }
        if (mailsacAPIKey == null || mailsacToAddress == null || fromAddress == null) {
            throw new Exception("Missing environment variable setup!");
        }
        if (smtpUserName == null || smtpPassword == null || smtpHost == null) {
            throw new Exception("Missing SMTP environment variables");
        }
        System.out.println(mailsacAPIKey);
        System.out.println(mailsacToAddress);
        System.out.println(fromAddress);
    }
}
  1. Add a purgeInbox() method which makes a DELETE request to api/addresses/{email}/messages/(messageId}.

    This section of code should be added to the existing AppTest class.
public class AppTest {
  //...
 @BeforeEach
 @AfterEach
 // purgeInbox cleans up all messages in the inbox before and after running each
 // test,
 // so there is a clean state.
 void purgeInbox() throws UnirestException, JsonProcessingException {
     HttpResponse<String> response = Unirest
             .get(String.format("https://mailsac.com/api/addresses/%s/messages", mailsacToAddress))
             .header("Mailsac-Key", mailsacAPIKey)
             .asString();

     // Parse JSON
     ObjectMapper objectMapper = new ObjectMapper();
     Object[] messagesArray = objectMapper.readValue(response.getBody(), Object[].class);

     for (int i = 0; i < messagesArray.length; i++) {
         JsonNode m = objectMapper.convertValue(messagesArray[i], JsonNode.class);
         String id = m.get("_id").asText();
         System.out.printf("Purging inbox message %s\n", id);
         Unirest.delete(String.format("https://mailsac.com/api/addresses/%s/messages/%s", mailsacToAddress, id))
                 .header("Mailsac-Key", mailsacAPIKey)
                 .asString();
     }
 }
  //...
}
  1. Implement a sendMail() method which sends an email. This section will likely likely be different depending on your use case. For example, you may be sending emails via your web application or via an email campaign.
public class AppTest {
    //...
    static void sendMail(String subject, String textMessage, String htmlMessage)
            throws UnsupportedEncodingException, MessagingException {
        Session session = Session.getDefaultInstance(new Properties());
        javax.mail.Transport transport = session.getTransport("smtp");
        MimeMessage msg = new MimeMessage(session);

        // set message headers
        msg.addHeader("Content-type", "text/HTML; charset=UTF-8");
        msg.addHeader("format", "flowed");
        msg.addHeader("Content-Transfer-Encoding", "8bit");

        msg.setFrom(fromAddress);
        msg.setReplyTo(InternetAddress.parse(fromAddress));
        msg.setSubject(subject, "UTF-8");
        msg.setText(textMessage, "UTF-8");
        msg.setContent(htmlMessage, "text/html");

        msg.setSentDate(new Date());

        msg.setRecipients(Message.RecipientType.TO, mailsacToAddress);
        msg.saveChanges();
        System.out.println("Email message is ready to send");
        transport.connect(smtpHost, smtpPort, smtpUserName, smtpPassword);
        transport.sendMessage(msg, msg.getAllRecipients());

        System.out.println("Email sent successfully");
    }
    // ...
}
  1. Add test. Use a for loop to check if the message was received by scanning the recipient inbox periodically. If the recipient inbox is not empty, and a message was found, the test verifies the message content:

    This test uses the Mailsac API endpoint /api/addresses/{email}/messages which lists all messages in an inbox.
public class AppTest {
    //...
    @Test
    void checkEmailWithLink() throws MessagingException, UnirestException, IOException, InterruptedException {
        sendMail("Hello!", "Check out https://example.com", "Check out <a href='https://example.com'>My website</a>");
        // Check inbox for the message up to 10x, waiting 5 seconds between checks.
        found: {
            for (int i = 0; i < 10; i++) {
                // Send request to fetch a JSON array of email message objects from mailsac
                HttpResponse<String> response = Unirest
                        .get(String.format("https://mailsac.com/api/addresses/%s/messages", mailsacToAddress))
                        .header("Mailsac-Key", mailsacAPIKey)
                        .asString();

                // Parse JSON
                ObjectMapper objectMapper = new ObjectMapper();
                Object[] messagesArray = objectMapper.readValue(response.getBody(), Object[].class);

                System.out.printf("Fetched %d messages from Mailsac for address %s\n", messagesArray.length,
                        mailsacToAddress);
                eachMessage: {
                    for (int m = 0; m < messagesArray.length; m++) {
                        // Convert object into JSON to fetch a field
                        JsonNode thisMessage = objectMapper.convertValue(messagesArray[m], JsonNode.class);

                        // After a message is found, the JSON object is checked to see if the link was
                        // sent correctly
                        assertTrue(thisMessage.get("links").toString().contains("https://example.com"),
                                "Missing / Incorrect link in email");

                        System.out.printf("Message id %s contained the correct link\n",
                                thisMessage.get("_id").asText());

                        return; // end the tests
                    }
                }

                System.out.println("Message not found yet, waiting 5 secs");
                Thread.sleep(5000);
            }

            // Fail the test if we haven't reached assertTrue above
            fail("Never received expected message!");
        }
    }
    // ..
}
  1. At this point, the code is complete. Package the project: mvn clean package. This will also run a test.

    Subsequent changes to the source file do not require you to run mvn clean package again. Instead, run mvn test.

    The output should appear similar to this:
[INFO] -------------------------------------------------------
[INFO]  T E S T S
[INFO] -------------------------------------------------------
[INFO] Running com.mailsac.api.AppTest
[INFO] Tests run: 1, Failures: 0, Errors: 0, Skipped: 0, Time elapsed: 9.148 s s - in com.mailsac.api.AppTest
[INFO] 
[INFO] Results:
[INFO] 
[INFO] Tests run: 1, Failures: 0, Errors: 0, Skipped: 0

GitHub Repository

If you encounter any difficulties, git clone https://github.com/mailsac/mailsac-integration-test-java. Make edits as necessary, and run mvn package.

Alternatively, if your tests fail because of error codes when making requests to the Mailsac API, please refer to the API Specification for further reading.

Next Steps

The Mailsac API Specification has generated code examples in Java + Unirest for making requests. It also has code examples in other languages.

This example can be adjusted to get all private email addresses for an account and purge their inboxes if necessary.

Please visit our forums if you have any questions!
Inbound Mail 2021-11-25 Outage (Resolved) Postmortem

All times US Pacific Standard Time

Start of Outage

On the US holiday Thanksgiving, November 25th at approximately 17:20, an email address [email protected] began sending tens of thousands of simultaneous emails to Mailsac. By 17:28, various alerts were sent to the devops team. Primary inbound mail services were exhausted of memory and locked up or ready to fall over. Soon the failover services were overrun and inbound mail stopped working entirely.

Recovery Actions

The devops team sprang into action and took evasive maneuvers. Grafana dashboards, which show key indicators of service health, were slow to load or unresponsive. Logging infrastructure was still working and showed that the sender was using a Reply-To address of[email protected] yet the envelope and FROM header address were generated from unique subdomains per inbound email address which exploited a previously unknown workaround of Mailsac’s multi-tier throttling infrastructure. All of these messages came from sandbox Salesforce subdomains – at least 6 subdomains deep.

Once the root cause was discovered, the sender’s mail was blocked and additional resources were allocated to inbound mail services to allow more memory to build up while blocklists were propagating across the network of inbound mail services. By 17:40, inbound mail was coming back online, and by 17:44 most alerts had resolved.

Lessons Learned

We monitor and throttle inbound mail in several custom systems. The goal of these systems is to keep pressure off our primary datastore and API services, and provide insight into system load and identify bad actors. The monitoring systems looked mostly at the domain and/or subdomain. Unfortunately we did not anticipate a sender with unique subdomains per message. This caused tens of thousands of superfluous Prometheus metrics which led to three things to be overwhelmed:

  1. the metrics exporter inside the inbound mail server,
  2. the prometheus metrics server running out of memory, and
  3. grafana UI dashboard being non-responsive due to too many apparently unique senders.

All of the described issues have been fixed.

Non-Impacted Services

During the outage all other services remained up. The REST API, web sockets, outbound SMTP, SMTP capture, and more were unaffected.

We wanted to apologize to all of our paying customers. Mailsac is often integrated with automated tests in CI/CD systems. If our downtime also caused alerts for you, we’re very sorry about this! The root cause has been fixed and we’re continuing to monitor the situation.

Speed Up Integration Tests Using WebSockets

All the code shown in this article is published at https://github.com/mailsac/mailsac-integration-test-examples

Integration tests identify errors between systems. These tests can be slow to run because of the interactions between multiple systems.

Mailsac can facilitate integration testing between web apps and transactional email services.

This article explains how to use WebSockets to make your email integration tests faster and simpler than with REST API polling.

Explaining the differences: REST APIs vs WebSockets

A REST API call uses a HTTP request for creating, reading, updating, and deleting objects. The HTTP connection between the client and server is short lived. An example of this is the List Messages In Inbox endpoint. The endpoint will return JSON formatted information about email messages in a Mailsac Inbox. Each time a client checks for new messages a new HTTP connection will be used.

A WebSocket is a persistent connection between a client and server providing full-duplex communication. By reusing an established connection there is no need to poll the REST API for changes, instead data can be pushed to the client in real time. WebSockets often listen on port 80/443 but does not use HTTP, except for the initial connection handshake.

REST API Polling Examples

The examples below use the “old way” – hit the Mailsac REST API and “poll” the inbox for new messages.

Polling is reliable and familiar for API programmers.

However, this approach can result in significant delays between when the email was received by Mailsac and when the test checks for a new message. Every few seconds, you ask the server if there are new messages.

Using a Web Socket Instead of Polling

What if the server could notify you that there are new messages? That’s where WebSockets come in.

This code example uses Node.js and Mocha test framework. Portions of the code example are presented below.

Steps to Validate Email Contents Using a WebSocket

Here’s how you can get notified of a new email message:

  1. Establish a WebSocket connection with Mailsac
  2. Send an email using SMTP to a private Mailsac address
  3. Receive content of the email over the established WebSocket
  4. Validate the content of the email
  5. Send a second email using SMTP to a private Mailsac addrress
  6. Receive content of second email over the established WebSocket
  7. Validate the content of the second email
  8. Delete both email messages
  9. Close WebSocket connection

Test Configuration

This test requires several variables be defined. They can be set by editing the script or by setting environment variables.

const mailsacAPIKey = process.env.MAILSAC_API_KEY || ''; // Generated by mailsac. See https://mailsac.com/api-keys
const mailsacToAddress = process.env.MAILSAC_TO_ADDRESS || ''; // Mailsac email address where the email will be sent
const smtpUserName = process.env.SMTP_USER || ''; // Username for smtp server authentication
const smtpPassword = process.env.SMTP_PASSWORD || ''; // Password for smtp server authentication
const smtpHost = process.env.SMTP_HOST || ''; // hostname of the smtp server
const smtpPort = process.env.SMTP_PORT || 587; // port the smtp is listening on

Setup: Configure Mailsac Address for WebSocket Forwarding

The Mailsac address used in this example needs to have WebSocket forwarding enabled on it. Any messages sent to the email address will be forwarded by the Mailsac WebSocket server.

To enable WebSocket forwarding the Mailsac address must be private. Private addresses have additional features such as forwarding to Slack, forwarding to a Webhook, and forwarding to a WebSocket. Select the “Settings” button next to the email address you want to configure from Manage Owned Email Addresses. Select the check box to “Enabled forwarding all incoming email via web socket” and select “Save Settings”.

1. Establish WebSocket Connection

The NPM package ws is a WebSocket client used to connect to the Mailsac WebSocket service.

The Websocket connection to Mailsac is established on lines 12-14. The ws package will only reject a Promise if it fails to connect to the WebSocket server due to a network error. Wrapping the connection in a Promise allows for additional validations.

The Mailsac WebSocket server will send the message ({"status":200,"msg":"Listening","addresses":["[email protected]"]}) after the initial connection. In lines 16-26 the initial message is parsed and checked for value of the property status. The Promise is rejected if the initial status message is not received or does not have a status code of 200.

const mailsacAPIKey = process.env.MAILSAC_API_KEY || ''; // Generated by mailsac. See https://mailsac.com/api-keys
const mailsacToAddress = process.env.MAILSAC_TO_ADDRESS || ''; // Mailsac email address where the email will be sent

describe("send email to mailsac", function () {

  // Open websocket waiting for email. This websocket will be reused for tests in this file.
  before(() => {
    return new Promise((resolve, reject) => {
      ws = new WebSocket(
        `wss://sock.mailsac.com/incoming-messages?key=${mailsacAPIKey}&addresses=${mailsacToAddress}`
      );
      let wsMessage; // message response object
      ws.on("message", (msg) => {
        try {
          wsMessage = JSON.parse(msg);
        } catch {
          assert(wsMessage, "Failed to parse JSON from websocket message");
        }
        if (wsMessage.status != 200) {
          reject(new Error("connection error: " + wsMessage.error));
          return;
        }
        resolve(wsMessage);
      });
      ws.on("error", (err) => {
        reject(err);
      });
    });
  });
});

2. Send email using SMTP

The NPM package nodemailer is used to send a test email via SMTP.

The connection to the STMP server is configured in lines 4-10. Most SMTP servers will require authentication.

The email’s to, from, subject, and content are set in lines 14-18. The email will be sent to the address defined in the configuration at the beginning of the script or the environment variable MAILSAC_TO_ADDRESS. The email will include a link to the website https://example.com.

  it("sends email with link to example.com website", async () => {
    // create a transporter object using the default SMTP transport
    const transport = nodemailer.createTransport({
      host: smtpHost,
      port: smtpPort,
      auth: {
        user: smtpUserName,
        pass: smtpPassword,
      },
    });
    // send mail using the defined transport object
    const result = await transport.sendMail({
      from: smtpUserName, // sender address
      to: mailsacToAddress, // recipient address
      subject: "Hello!",
      text: "Check out https://example.com",
      html: "Check out <a href https://example.com>My website</a>",
    });
  });

3. Receive Message via WebSocket

Once the email arrives, Mailsac will send a JSON formatted version of the email on the WebSocket established earlier in this example. ws.on("message", (msg) => { ... } is a function that will run when new message is sent by the WebSocket server. The msg is parsed as JSON. Then the Promise will resolve if the message has a to property. The existence of the to property is checked to make sure the message sent by the WebSocket server was an email and not a status message. The await keyword will cause the test to wait until a message is sent over the WebSocket or the test times out.

const wsMessage = await new Promise((resolve) => {
  ws.on("message", (msg) => {
    const wsResponse = JSON.parse(msg);
    if (wsResponse.to) {
      resolve(wsResponse);
    }
  });
});

Example JSON formatted message

{

    "status": 200,
    "email": 

{

    "text": "string",
    "body": "string",
    "raw": "string",
    "headers": { },
    "_id": "m3phnJ2ag3example-0",
    "from": 

[

    {
        "name": "string",
        "address": "string"
    }

],
"to": 
[

    {
        "name": "string",
        "address": "string"
    }

],
"cc": 
[

    {
        "name": "string",
        "address": "string"
    }

],
"bcc": 
[

    {
        "name": "string",
        "address": "string"
    }

],
"subject": "string",
"savedBy": "string",
"originalInbox": "string",
"inbox": "[email protected]",
"domain": "example.com",
"received": "1985-04-12T23:20:50.52Z",
"size": 0,
"attachments": 
[

    "5ea9c924627e68f988c9c7ca44340892"

],
"ip": "string",
"via": "string",
"folder": "inbox",
"labels": 
[

    "string"

],
"read": true,
"rtls": true,
"links": 

        [
            "string"
        ],
        "spam": 0.345
    }

}

4. Validate Content of the Email

The assert package is used to validate the contents of the email. The subject and text properties are assigned to new variables. assert.equal(subject, "Hello!"); will cause an exception if subject is not equal to Hello!. The test framework Mocha will interpret this as a failure and the test will fail. Likewise, if the variable email_text is not Check out https://example.com the test will fail.

const subject = wsMessage.subject;
const email_text = wsMessage.text;
assert.equal(subject, "Hello!");
assert.equal(email_text, "Check out https://example.com");

5-7. Send Another Email and Validate Its Content

The reason to send a second email is to demonstrate that the Mailsac WebSocket connection can be reused. This second test will reuse the WebSocket connection established (variable name ws) in the before() block in step 1. The only difference between the first and second test is the content of the email.

// Sends a second email reusing the websocket.
it("sends email with link to unsubscribe.example.com website", async () => {
  const transport = nodemailer.createTransport({
    host: smtpHost,
    port: smtpPort,
    auth: {
      user: smtpUserName,
      pass: smtpPassword,
    },
  });
  const result = await transport.sendMail({
    from: smtpUserName, // sender address
    to: mailsacToAddress, // recipient address
    subject: "Unsubscribe",
    text: "Click the link to unsubscribe https://unsubscribe.example.com",
    html: "Check out <a href https://example.com>My website</a>",
  });

  console.log("Sent email with messageId: ", result.messageId);

  const wsMessage = await new Promise((resolve) => {
    ws.on("message", (msg) => {
      const wsResponse = JSON.parse(msg);
      if (wsResponse.to) {
        resolve(wsResponse);
      }
    });
  });

  assert(wsMessage, "Never received messages!");

  const subject = wsMessage.subject;
  const email_text = wsMessage.text;
  assert.equal(subject, "Unsubscribe");
  assert.equal(
    email_text,
    "Click the link to unsubscribe https://unsubscribe.example.com"
  );
});

8. Delete Emails to Prevent Leaky Tests

An after() block will run after the tests have completed. The REST API Endpoint – Delete All Messages In An In Inbox is called to delete the test emails. By deleting all the test emails, it prevents these emails from being fetched in another test, which could impact the results of another test. It is best practice to clean up tests after they ran.

The NPM package supertest is used to make the REST call to delete the messages. Virtually any HTTP client library could be used to do this. Feel free to use the HTTP client library you feel most comfortable with.

afte(() =>
  request("https://mailsac.com")
    .delete(`/api/addresses/${mailsacToAddress}/messages`)
    .set("Mailsac-Key", mailsacAPIKey)
    .expect(204)
);

9. Close WebSocket Connection

An after() block is used to close the WebSocket connection after all the tests have completed. It is best practice to close all connections on the termination of the test.

// close websocket after all tests finish
after(() => ws.close());

Next Steps

The use of WebSockets helps speed up tests and uses API calls more efficiently.

See the WebSocket Test Page to see a WebSocket in action in your browser. This page includes a basic code example usage ofoffor a WebSocket client and is a great starting point before divining into integration testing using WebSockets.

If you have questions about this example or the Mailsac WebSocket service please post on https://forum.mailsac.com

Deprecation of Mail Transfer Agent on mailsac.com Top Level Domain

What is changing?

Mailsac will no longer act as a mail transfer agent using the top level domain mail server mailsac.com. That means mail sent to the mail server mailsac.com on port 25 will no longer be accepted.

This change will go into effect on October 9th 2021.

Am I affected?

Almost certainly not. This is a legacy configuration that has not been published or referenced in any communication for several years. Our logs indicate this feature has not been used as far back as logs are stored.

Customers who setup a custom domain are sent instructions to use the mail servers in.mailsac.com and alt.mailsac.com during the initial configuration of their domain.

Instructions on our website for custom domains or the free hosting option instruct customers to use in.mailsac.com and alt.mailsac.com for their MX records. This has been the case for several years.

Why is this being deprecated?

Receiving mail using a mail transfer agent on the top level domain limits our ability to further scale our highly available mail services.

How can I verify I am not affected?

The DNS verification section of the docs can walk you through the process.

For those familiar with MX records, se the command line tool dig or a web based dig tool to verify your MX records are in.mailsac.com and alt.mailsac.com. If your MX records point to mailsac.com you will need to update them to use in.mailsac.com and alt.mailsac.com

dig example

Use the dig comand dig MX <domain_name> to view the MX records for a domain. In the answer section the hostnames in.mailsac.com and alt.mailsac.com should be listed.

Web based dig

The web based dig tool can be used to verify MX records for a domain. The MX records should show in.mailsac.com and alt.mailsac.com