All the code shown in this article is published at https://github.com/mailsac/mailsac-integration-test-examples
Integration tests identify errors between systems. These tests can be slow to run because of the interactions between multiple systems.
Mailsac can facilitate integration testing between web apps and transactional email services.
This article explains how to use WebSockets to make your email integration tests faster and simpler than with REST API polling.
Explaining the differences: REST APIs vs WebSockets
A REST API call uses a HTTP request for creating, reading, updating, and deleting objects. The HTTP connection between the client and server is short lived. An example of this is the List Messages In Inbox endpoint. The endpoint will return JSON formatted information about email messages in a Mailsac Inbox. Each time a client checks for new messages a new HTTP connection will be used.
A WebSocket is a persistent connection between a client and server providing full-duplex communication. By reusing an established connection there is no need to poll the REST API for changes, instead data can be pushed to the client in real time. WebSockets often listen on port 80/443 but does not use HTTP, except for the initial connection handshake.
REST API Polling Examples
The examples below use the “old way” – hit the Mailsac REST API and “poll” the inbox for new messages.
- Using Selenium To Test Account Email Signups
- Write Integration Tests Using Mailsac
- Delivery Confirmation Test
- Email Validation with Selenium
Polling is reliable and familiar for API programmers.
However, this approach can result in significant delays between when the email was received by Mailsac and when the test checks for a new message. Every few seconds, you ask the server if there are new messages.
Using a Web Socket Instead of Polling
What if the server could notify you that there are new messages? That’s where WebSockets come in.
This code example uses Node.js and Mocha test framework. Portions of the code example are presented below.
Steps to Validate Email Contents Using a WebSocket
Here’s how you can get notified of a new email message:
- Establish a WebSocket connection with Mailsac
- Send an email using SMTP to a private Mailsac address
- Receive content of the email over the established WebSocket
- Validate the content of the email
- Send a second email using SMTP to a private Mailsac addrress
- Receive content of second email over the established WebSocket
- Validate the content of the second email
- Delete both email messages
- Close WebSocket connection
Test Configuration
This test requires several variables be defined. They can be set by editing the script or by setting environment variables.
const mailsacAPIKey = process.env.MAILSAC_API_KEY || ''; // Generated by mailsac. See https://mailsac.com/api-keys
const mailsacToAddress = process.env.MAILSAC_TO_ADDRESS || ''; // Mailsac email address where the email will be sent
const smtpUserName = process.env.SMTP_USER || ''; // Username for smtp server authentication
const smtpPassword = process.env.SMTP_PASSWORD || ''; // Password for smtp server authentication
const smtpHost = process.env.SMTP_HOST || ''; // hostname of the smtp server
const smtpPort = process.env.SMTP_PORT || 587; // port the smtp is listening on
Setup: Configure Mailsac Address for WebSocket Forwarding
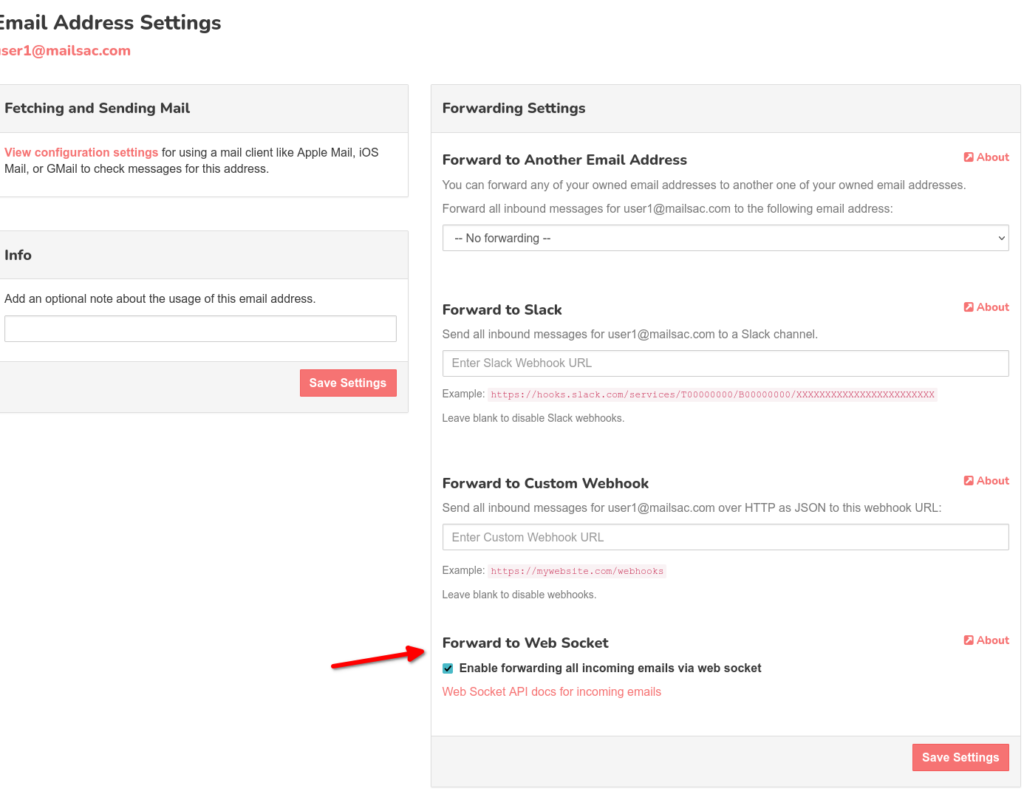
The Mailsac address used in this example needs to have WebSocket forwarding enabled on it. Any messages sent to the email address will be forwarded by the Mailsac WebSocket server.
To enable WebSocket forwarding the Mailsac address must be private. Private addresses have additional features such as forwarding to Slack, forwarding to a Webhook, and forwarding to a WebSocket. Select the “Settings” button next to the email address you want to configure from Manage Owned Email Addresses. Select the check box to “Enabled forwarding all incoming email via web socket” and select “Save Settings”.
1. Establish WebSocket Connection
The NPM package ws is a WebSocket client used to connect to the Mailsac WebSocket service.
The Websocket connection to Mailsac is established on lines 12-14. The ws package will only reject a Promise if it fails to connect to the WebSocket server due to a network error. Wrapping the connection in a Promise allows for additional validations.
The Mailsac WebSocket server will send the message ({"status":200,"msg":"Listening","addresses":["[email protected]"]}) after the initial connection. In lines 16-26 the initial message is parsed and checked for value of the property status. The Promise is rejected if the initial status message is not received or does not have a status code of 200.
const mailsacAPIKey = process.env.MAILSAC_API_KEY || ''; // Generated by mailsac. See https://mailsac.com/api-keys
const mailsacToAddress = process.env.MAILSAC_TO_ADDRESS || ''; // Mailsac email address where the email will be sent

describe("send email to mailsac", function () {

  // Open websocket waiting for email. This websocket will be reused for tests in this file.
  before(() => {
    return new Promise((resolve, reject) => {
      ws = new WebSocket(
        `wss://sock.mailsac.com/incoming-messages?key=${mailsacAPIKey}&addresses=${mailsacToAddress}`
      );
      let wsMessage; // message response object
      ws.on("message", (msg) => {
        try {
          wsMessage = JSON.parse(msg);
        } catch {
          assert(wsMessage, "Failed to parse JSON from websocket message");
        }
        if (wsMessage.status != 200) {
          reject(new Error("connection error: " + wsMessage.error));
          return;
        }
        resolve(wsMessage);
      });
      ws.on("error", (err) => {
        reject(err);
      });
    });
  });
});
2. Send email using SMTP
The NPM package nodemailer is used to send a test email via SMTP.
The connection to the STMP server is configured in lines 4-10. Most SMTP servers will require authentication.
The email’s to, from, subject, and content are set in lines 14-18. The email will be sent to the address defined in the configuration at the beginning of the script or the environment variable MAILSAC_TO_ADDRESS. The email will include a link to the website https://example.com.
  it("sends email with link to example.com website", async () => {
    // create a transporter object using the default SMTP transport
    const transport = nodemailer.createTransport({
      host: smtpHost,
      port: smtpPort,
      auth: {
        user: smtpUserName,
        pass: smtpPassword,
      },
    });
    // send mail using the defined transport object
    const result = await transport.sendMail({
      from: smtpUserName, // sender address
      to: mailsacToAddress, // recipient address
      subject: "Hello!",
      text: "Check out https://example.com",
      html: "Check out <a href https://example.com>My website</a>",
    });
  });
3. Receive Message via WebSocket
Once the email arrives, Mailsac will send a JSON formatted version of the email on the WebSocket established earlier in this example. ws.on("message", (msg) => { ... } is a function that will run when new message is sent by the WebSocket server. The msg is parsed as JSON. Then the Promise will resolve if the message has a to property. The existence of the to property is checked to make sure the message sent by the WebSocket server was an email and not a status message. The await keyword will cause the test to wait until a message is sent over the WebSocket or the test times out.
const wsMessage = await new Promise((resolve) => {
  ws.on("message", (msg) => {
    const wsResponse = JSON.parse(msg);
    if (wsResponse.to) {
      resolve(wsResponse);
    }
  });
});
Example JSON formatted message
{

    "status": 200,
    "email":

{

    "text": "string",
    "body": "string",
    "raw": "string",
    "headers": { },
    "_id": "m3phnJ2ag3example-0",
    "from":

[

    {
        "name": "string",
        "address": "string"
    }

],
"to":
[

    {
        "name": "string",
        "address": "string"
    }

],
"cc":
[

    {
        "name": "string",
        "address": "string"
    }

],
"bcc":
[

    {
        "name": "string",
        "address": "string"
    }

],
"subject": "string",
"savedBy": "string",
"originalInbox": "string",
"inbox": "[email protected]",
"domain": "example.com",
"received": "1985-04-12T23:20:50.52Z",
"size": 0,
"attachments":
[

    "5ea9c924627e68f988c9c7ca44340892"

],
"ip": "string",
"via": "string",
"folder": "inbox",
"labels":
[

    "string"

],
"read": true,
"rtls": true,
"links":

        [
            "string"
        ],
        "spam": 0.345
    }

}
4. Validate Content of the Email
The assert package is used to validate the contents of the email. The subject and text properties are assigned to new variables. assert.equal(subject, "Hello!"); will cause an exception if subject is not equal to Hello!. The test framework Mocha will interpret this as a failure and the test will fail. Likewise, if the variable email_text is not Check out https://example.com the test will fail.
const subject = wsMessage.subject;
const email_text = wsMessage.text;
assert.equal(subject, "Hello!");
assert.equal(email_text, "Check out https://example.com");
5-7. Send Another Email and Validate Its Content
The reason to send a second email is to demonstrate that the Mailsac WebSocket connection can be reused. This second test will reuse the WebSocket connection established (variable name ws) in the before() block in step 1. The only difference between the first and second test is the content of the email.
// Sends a second email reusing the websocket.
it("sends email with link to unsubscribe.example.com website", async () => {
  const transport = nodemailer.createTransport({
    host: smtpHost,
    port: smtpPort,
    auth: {
      user: smtpUserName,
      pass: smtpPassword,
    },
  });
  const result = await transport.sendMail({
    from: smtpUserName, // sender address
    to: mailsacToAddress, // recipient address
    subject: "Unsubscribe",
    text: "Click the link to unsubscribe https://unsubscribe.example.com",
    html: "Check out <a href https://example.com>My website</a>",
  });

  console.log("Sent email with messageId: ", result.messageId);

  const wsMessage = await new Promise((resolve) => {
    ws.on("message", (msg) => {
      const wsResponse = JSON.parse(msg);
      if (wsResponse.to) {
        resolve(wsResponse);
      }
    });
  });

  assert(wsMessage, "Never received messages!");

  const subject = wsMessage.subject;
  const email_text = wsMessage.text;
  assert.equal(subject, "Unsubscribe");
  assert.equal(
    email_text,
    "Click the link to unsubscribe https://unsubscribe.example.com"
  );
});
8. Delete Emails to Prevent Leaky Tests
An after() block will run after the tests have completed. The REST API Endpoint – Delete All Messages In An In Inbox is called to delete the test emails. By deleting all the test emails, it prevents these emails from being fetched in another test, which could impact the results of another test. It is best practice to clean up tests after they ran.
The NPM package supertest is used to make the REST call to delete the messages. Virtually any HTTP client library could be used to do this. Feel free to use the HTTP client library you feel most comfortable with.
afte(() =>
  request("https://mailsac.com")
    .delete(`/api/addresses/${mailsacToAddress}/messages`)
    .set("Mailsac-Key", mailsacAPIKey)
    .expect(204)
);
9. Close WebSocket Connection
An after() block is used to close the WebSocket connection after all the tests have completed. It is best practice to close all connections on the termination of the test.
// close websocket after all tests finish
after(() => ws.close());
Next Steps
The use of WebSockets helps speed up tests and uses API calls more efficiently.
See the WebSocket Test Page to see a WebSocket in action in your browser. This page includes a basic code example usage ofoffor a WebSocket client and is a great starting point before divining into integration testing using WebSockets.
If you have questions about this example or the Mailsac WebSocket service please post on https://forum.mailsac.com