Today’s release of Mailsac’s frontend services includes many fixes.
We tend to release weekly with no downtime and no fanfare. Occasionally we’ll post updates here.
fix: infrequent crash on logout
Most notable is a fix to a UI crash when logging out. In certain situations, you may have seen an error message, even though the logout was successful.
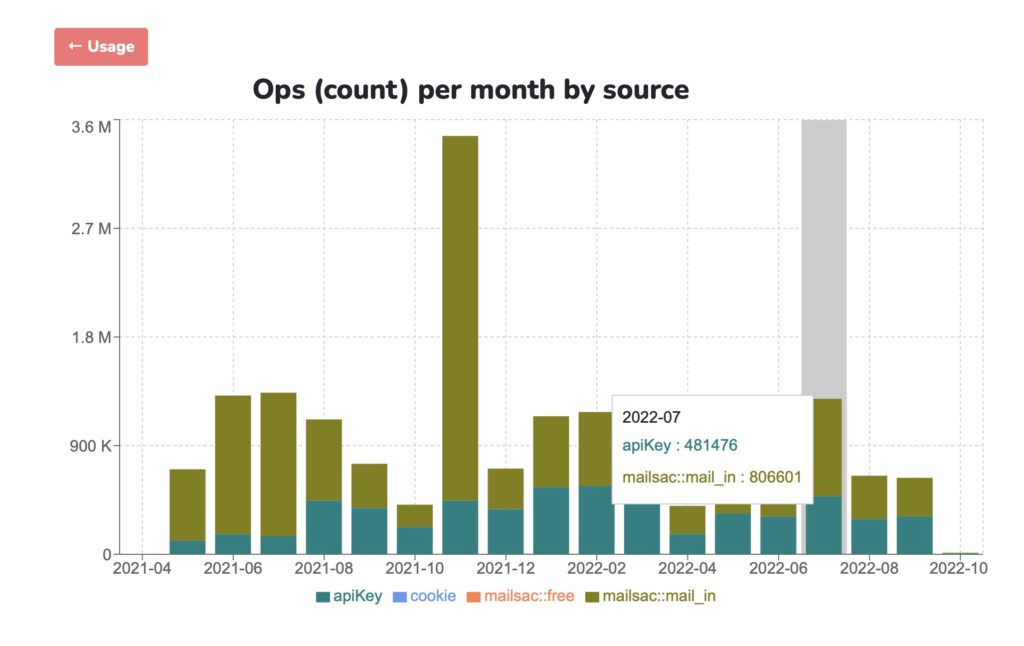
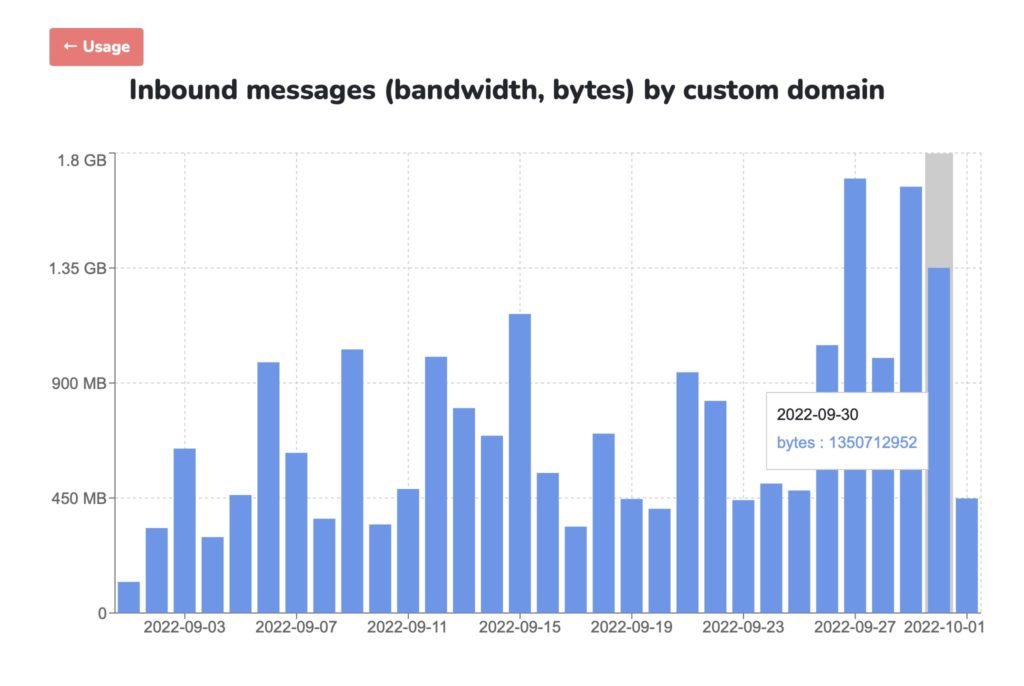
Prettier and more usable charts
We heard your feedback. Usage charts have been aging. Sometimes the styling makes the charts hard to read.
Some additional PostgreSQL optimizations are coming soon. We’ll continue reducing the load time on charts. Thanks for the patience!
Dependency upgrades
For better or worse, modern software stacks have huge numbers of dependencies. Staying ahead of security issues is a daily effort.
At Mailsac we use security scans, Dependabot, and npm audit to stay on top of upgrades. Hundreds of automated tests run to give us confidence that minor and patch semver updates don’t introduce breaking changes.
We subscribe to security mailing lists for our software, such as:
When the topic of domains and email comes up most people begin and end the conversation at the top domain level. Subdomains seem to be left out of the conversation in their entirety. Are we trapped in our thinking about subdomains as mere marketing and newsletter features? Maybe it’s too difficult to use subdomains without an IT team involved. Maybe no one has brought up subdomains outside of meme-filled newsletters. Maybe you just haven’t thought about subdomains in general.
Well, let’s break up that thinking. Subdomains have a lot to offer. Do you have trouble testing 10 different email features in your application? Does the thought of accidentally sending an email to thousands of users that says “Test” make you break into a cold sweat? Subdomains can help.
We’ll show you some of the possibilities of subdomains and walk through some use cases. We’ll also provide a quick 15-second walkthrough at the end that will setup up 2 new subdomains for development and testing purposes.
But before we show you some of the juicy scenarios, let’s do a quick rundown of what a subdomain actually is.
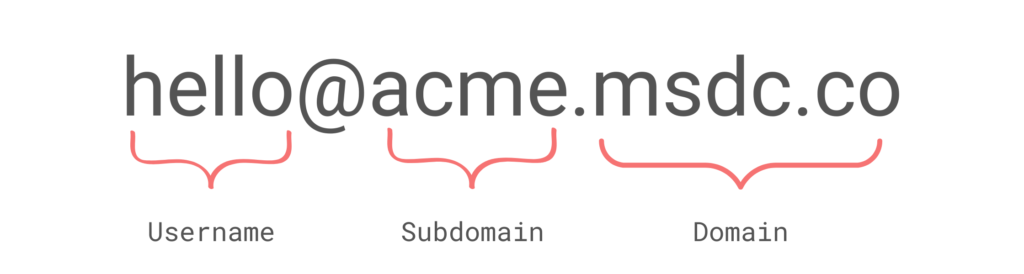
What’s the difference between an email domain and a subdomain?
Subdomains are a way to slice up domains for specific functions like newsletters and blogs. The advantage of a subdomain is having a clear purpose tied to the name. Receiving emails from [email protected] and[email protected] show their intent from their name alone. Receiving emails from[email protected] and [email protected] is a lot vaguer. The former set clearly sends memes and educational nuggets. The latter could be a friendly name for our billing bots.
Subdomains = an easy way to differentiate email by function.
Alright, sorry about that. Had to make sure everyone was on the same page on subdomains. Let’s move on to 3 different subdomain scenarios.
Subdomain Use Case 1: Developers Get Their Own Email Domains
You work on a team of developers, and each of you needs to test the same features on a few different applications. Additionally, each feature has an email workflow attached to it. The usual response to this is to have a shared inbox, for example, [email protected]. But the pain around that approach comes fast. Issues like:
Difficulty in separating out each developer’s testing scenarios
Having to sift through 1000 other unrelated emails while looking for that 1 workflow email is painful
Complex workflows are pretty difficult to track
A domain for me, a domain for you
Creating an email subdomain per developer is an effective way to isolate these emails across systems:
Remember that you don’t need to create these inboxes ahead of time. They are made on the fly and removed when they make sense for you, the person knee-deep in the application.
Also not shown above just yet: Mailsac’s unified inbox in action.
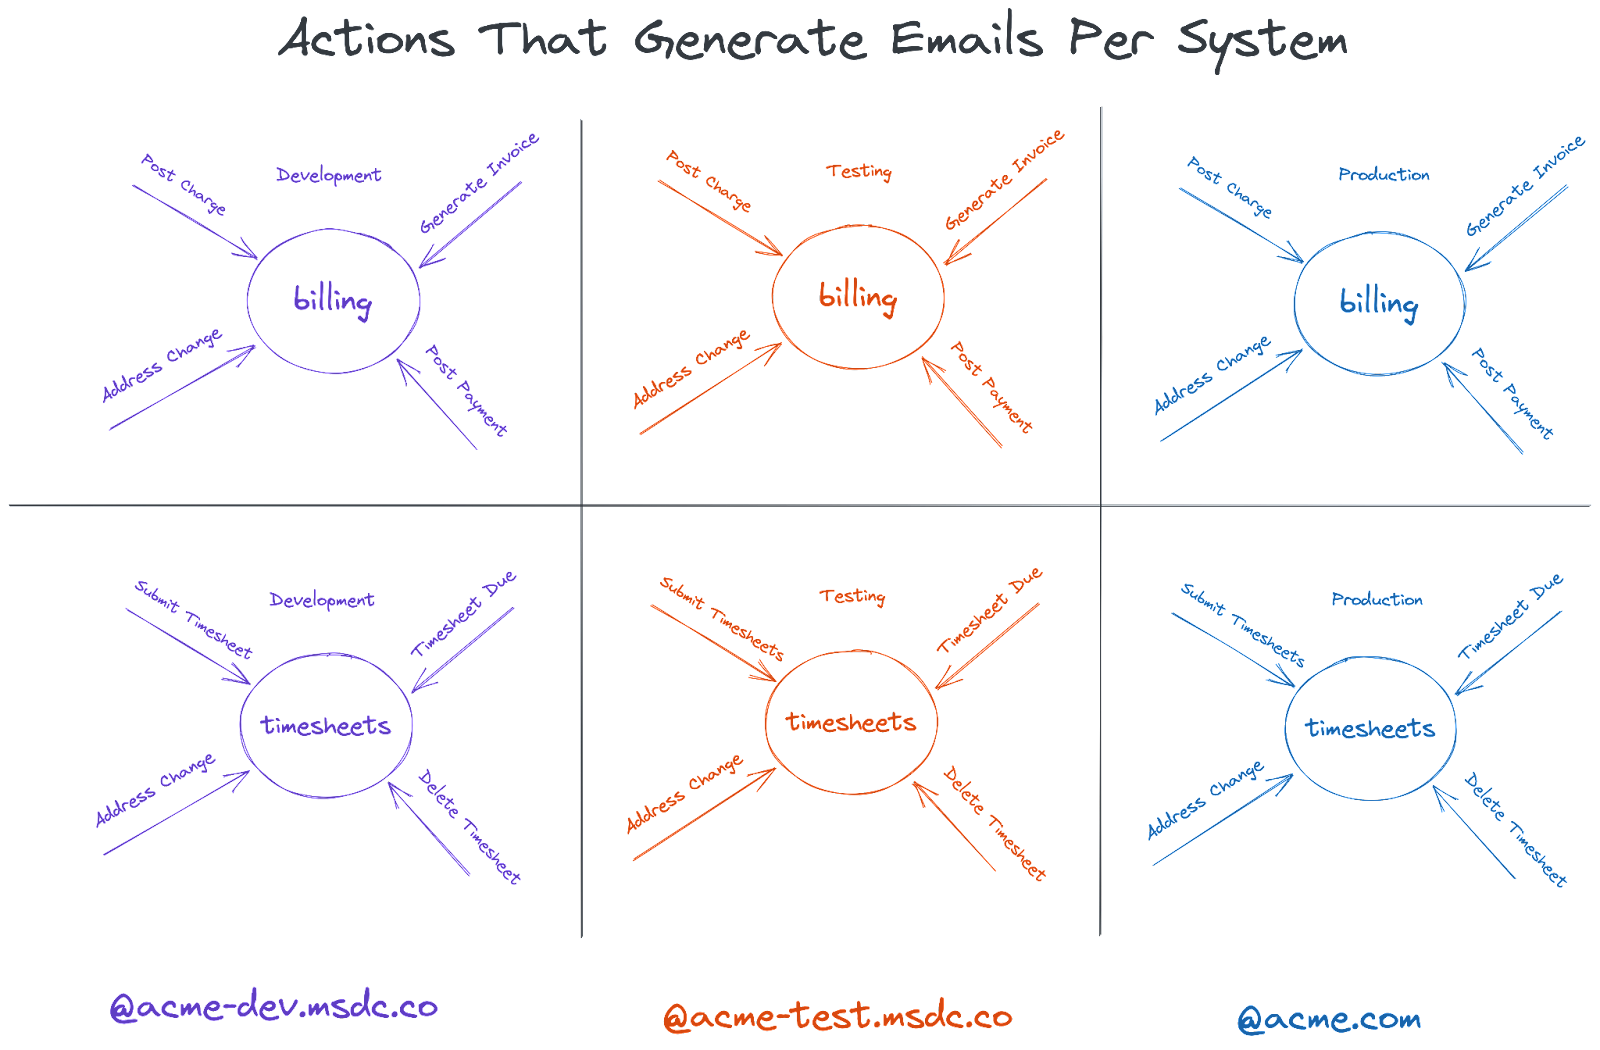
Subdomain Use Case 2: Company-Wide Domains per Environment
Ensure emails stay in their zone
Environments for each set of applications are a pretty common scenario amongst enterprises. A sample above shows 2 applications split between 3 environments:
The upside of this approach is having predefined email subdomains for each environment. Developers, QA teams, and operations all know which environment the emails are associated with. QA testers can review the messages easily knowing which environment sent the emails. Operations and developers know which email address and domain to use as variables when configuring tests or environments. Ultimately, this saves time for all the teams involved.
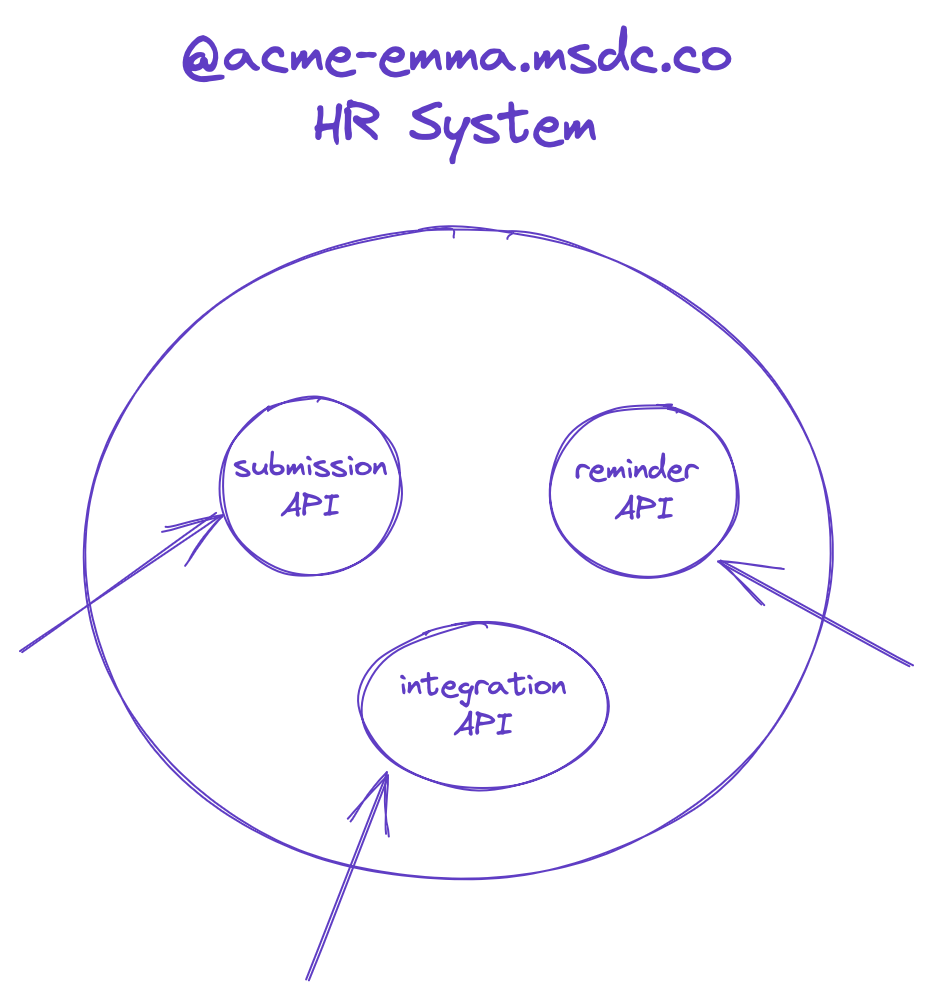
Subdomain Use Case 3: Email Driven API Workflow
An email-driven API workflow is a workflow that kicks off when an email arrives. The approach resembles the first scenario, where each developer gets their own domain. The difference is the usernames are less flexible. You pin it once to an API and use it for the long term. For example:
An email to [email protected] can trigger a Submit API action that can create a case in the HR management system
An email to [email protected] can trigger an Integration API action that can automatically create a ticketing workflow in your Incident Management system.
You can even string together a received email to a webhook using Mailsac’s webhook service. If you’d like to poll for updates instead we have websocket for close to real-time processing or the rest API for polling.
Alright, enough theory let’s do a walkthrough.
Walkthrough: Company-Wide Environments
Using the company-wide scenario we can have a working subdomain in a few seconds using Mailsac. A partner video will walk through the individual developer scenario.
You also have the option of using your own domain. This requires an external domain service provider. There are lots of guides out there on which domain registrar is the best.
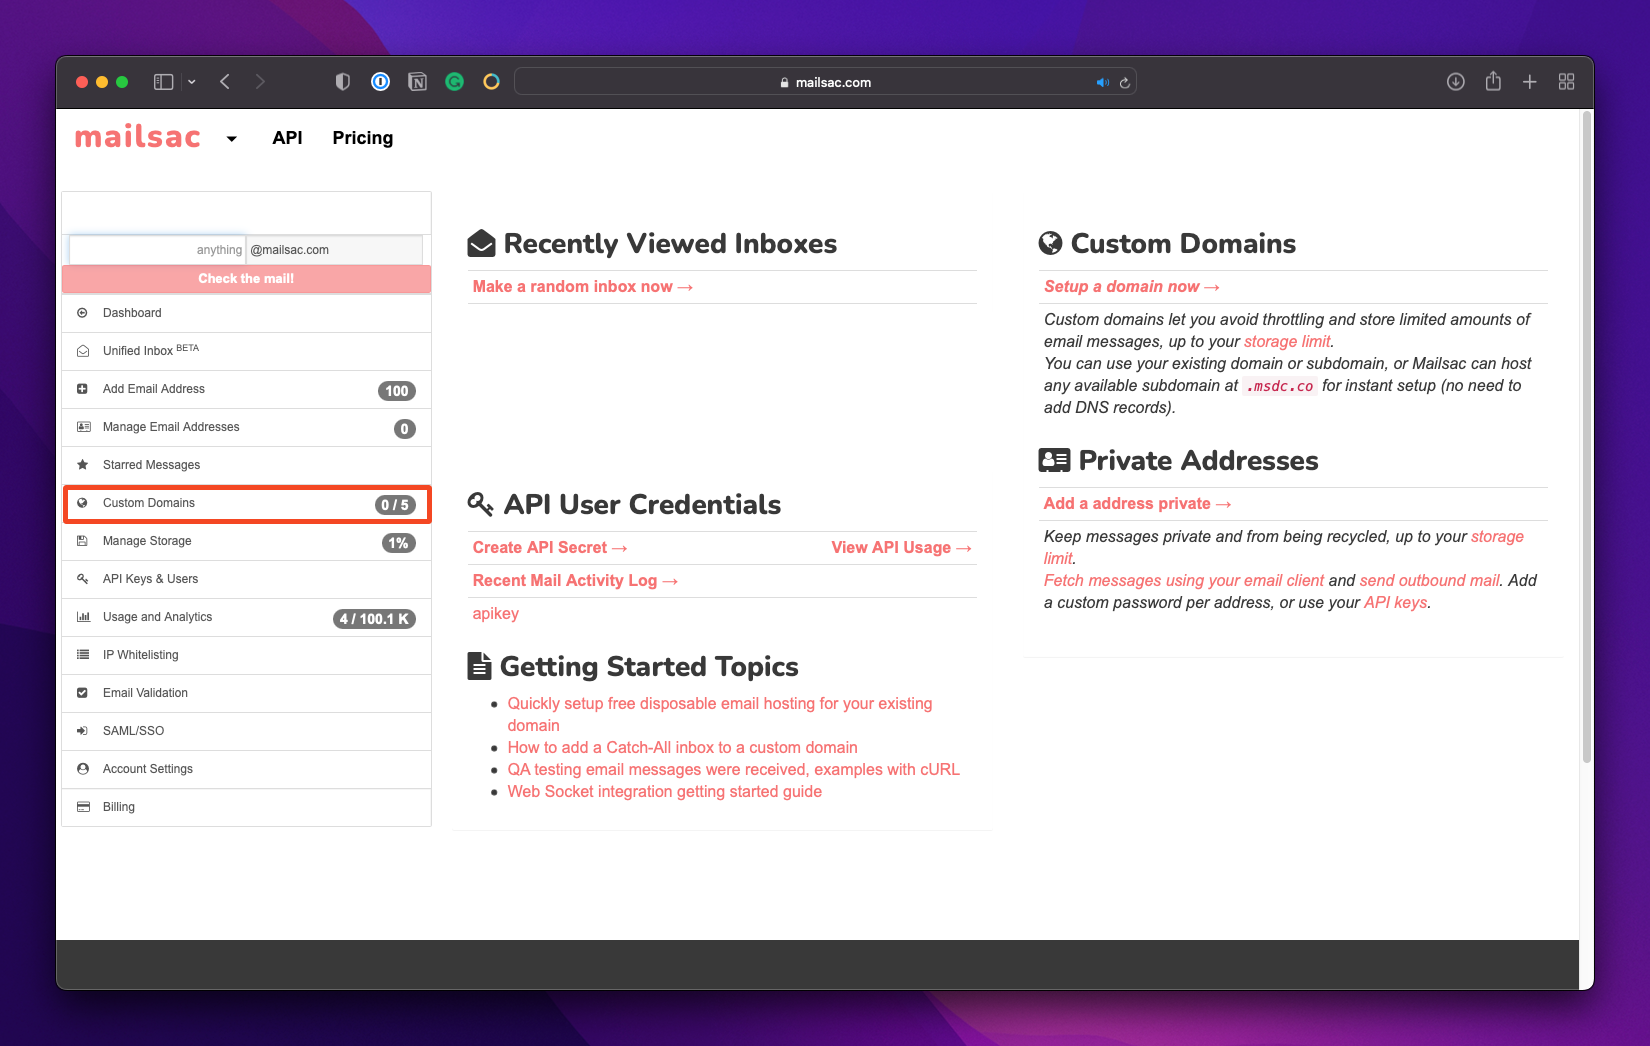
But let’s make this easy. Let’s use Mailsac’s Zero-Config Subdomain tool and bring up a new subdomain in 2 clicks. Note that you will need at least a Business Plan to make this scenario work. You can still enjoy the benefits of a single subdomain through the Indie Plan.
Type the name of the subdomain you’d like, in our case acme-dev and acme-test
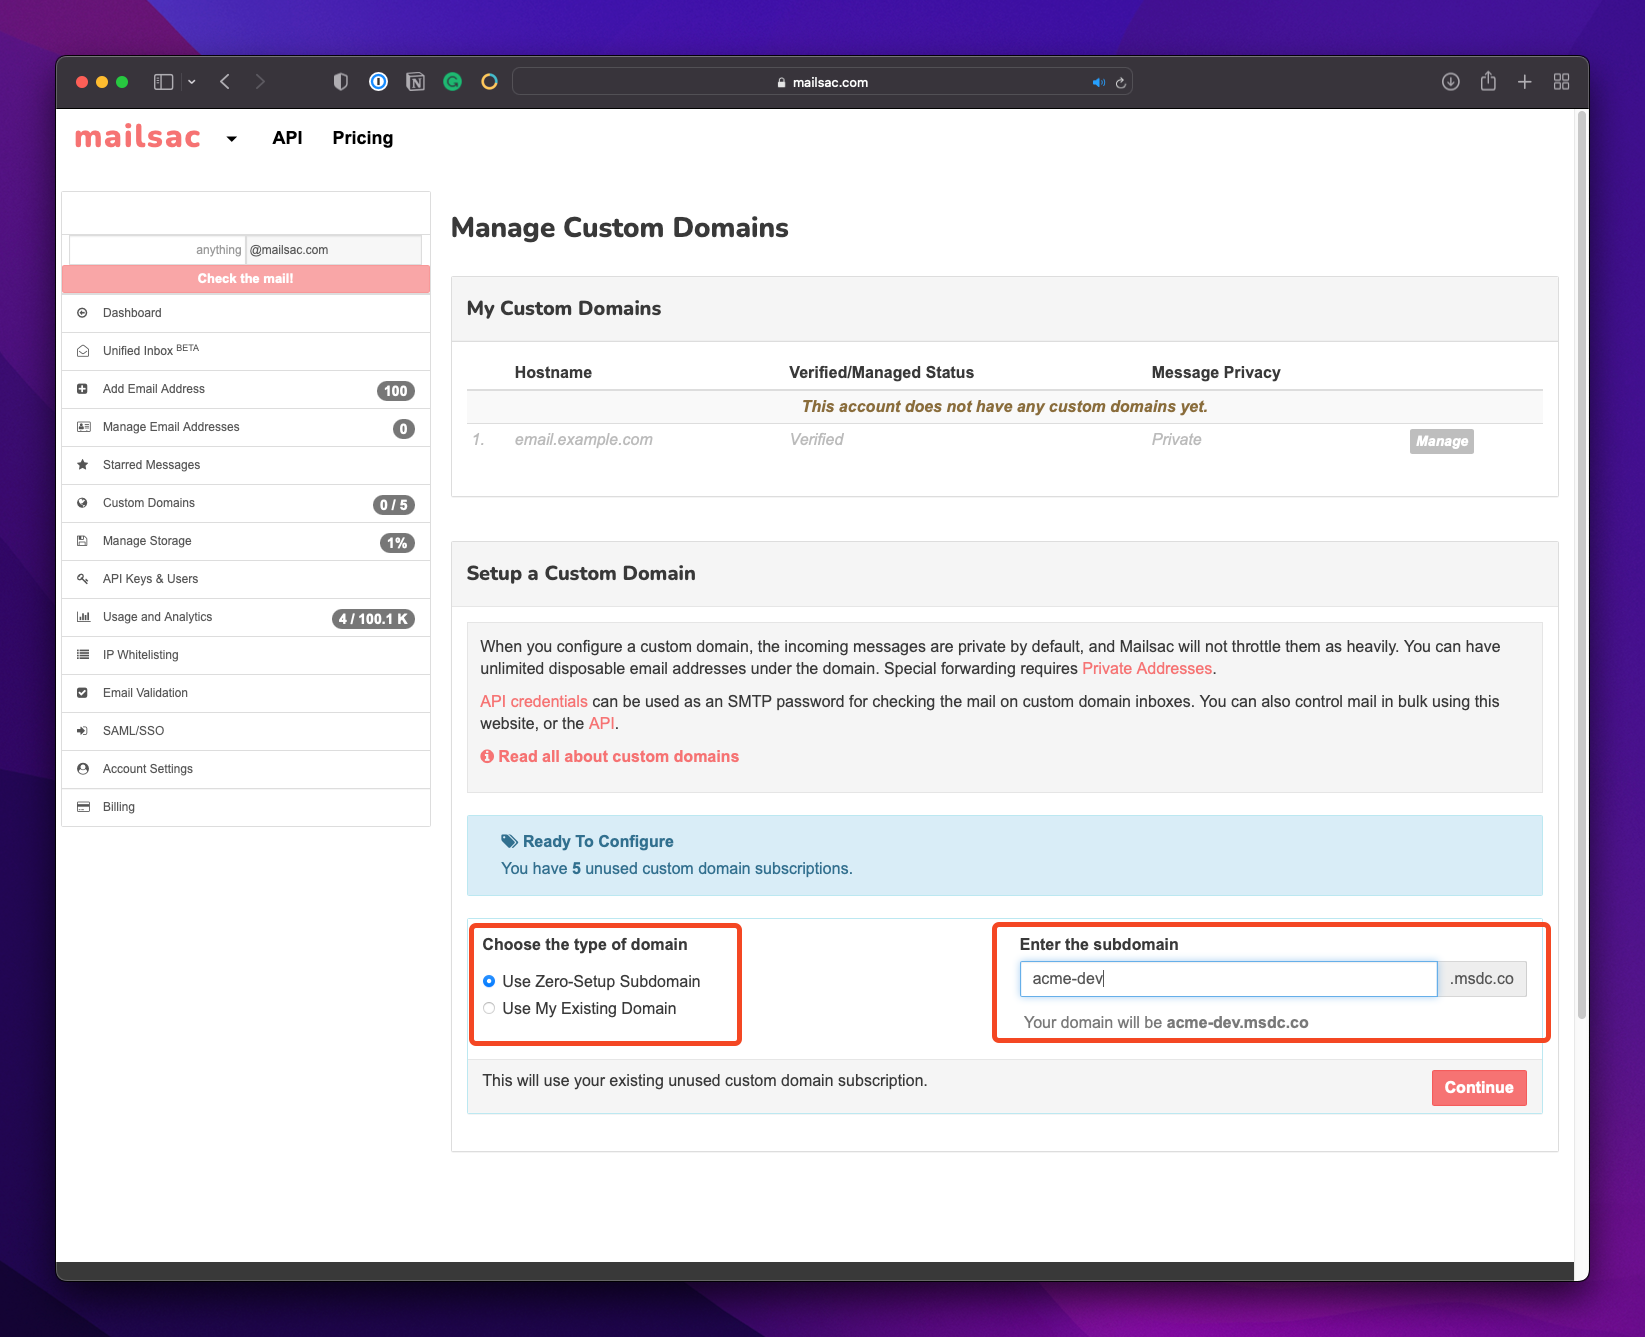
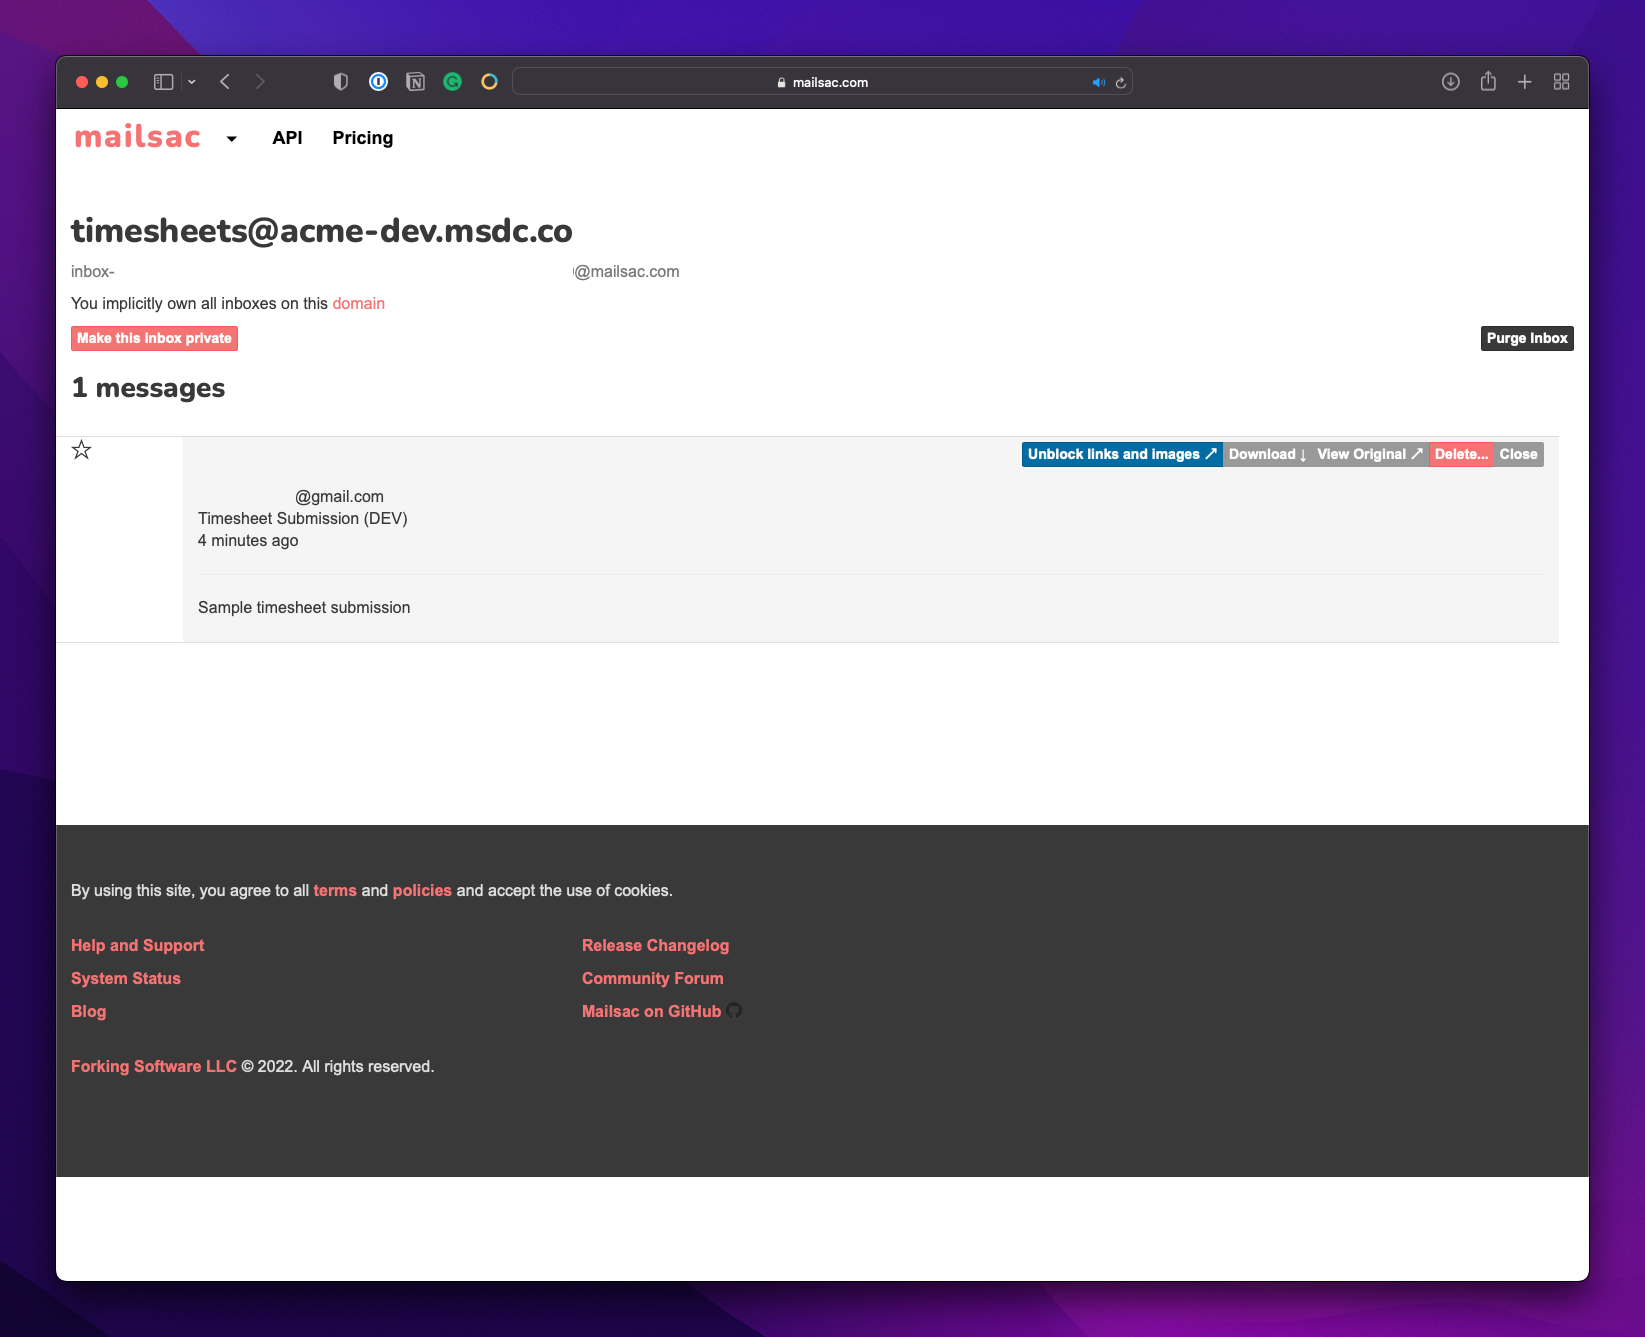
And that’s it! You should have 2 custom subdomains ready to use. Let’s put it them rough their paces. We’ll send out these emails from any client (I’ll use Gmail):
To: [email protected] Subject: Email sent to Billing (DEV) Content: This is meant for dev
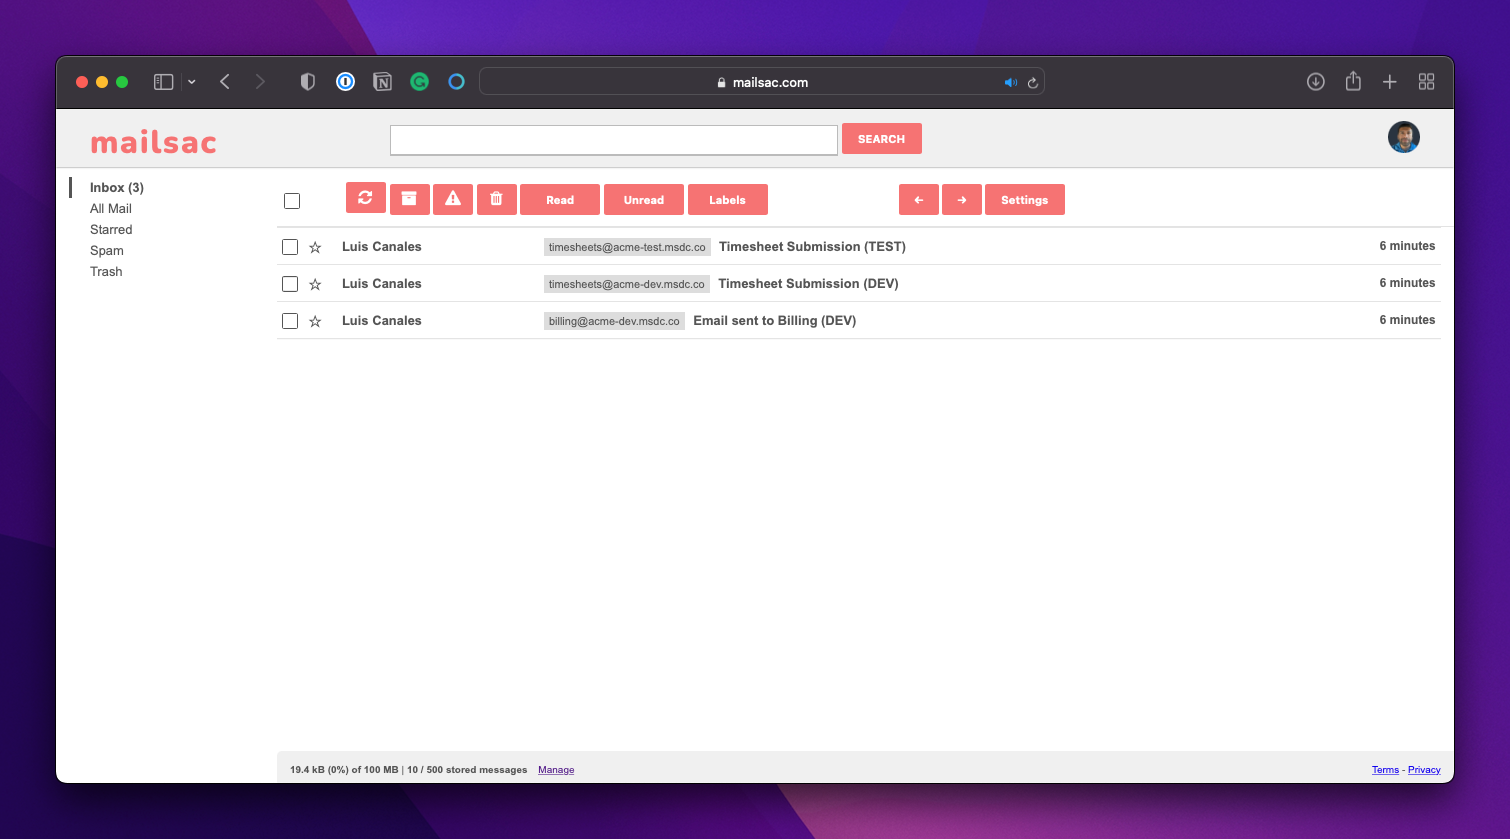
…or you could use the Unified Inbox feature that displays all of your custom domains, subdomains, and private addresses in one convenient location:
Much better
It’s just that easy!
Wrap Up
With this new superpower, you should be able to conjure up lots of different use cases for subdomains. The friction of creating and importing domains is completely taken care of for you. No need to register a domain with an external registrar, or manage an IT team to handle registration for you.
We’re always looking for feedback, so let us know what you think or if you run into any problems on our forums.
When I say “You need to test your code”, do you wince? Is it a feeling of guilt, one of “I know I should, but…”. Testing may not conjure up the sexiest of images. We as developers frequently put tests off until the end of our feature cycle. Or respond to a production bug by issuing a quick patch. Or worse, just bury our heads in the sand and pretend that we don’t have any bugs in our code at all. (Note: All code has bugs).
The reality is that testing is an incredible investment in your code’s future. Investing in tests is like an insurance policy: hedging your bets against an unknown future. An unknown future consisting of bitrot, dependency deprecations, or service API changes. Testing provides the ability to patch those unknowns through refactoring or flat-out removing stale dependencies. Testing can also buffer against those risks, providing peace of mind.
In this post, I’ll outline 3 different types of testing tools:
Selenium WebDriver
Selenium IDE
Puppeteer
To do an apples-to-apples comparison the testing scenario will be the same for all three tools. I’ll also model my testing after a user’s typical behavior. Behaviors like login attempts, searching, and form submissions. They also try to hit every layer of the application, from the user interface to the database.
Benefits of Testing a User Interface
Testing isn’t just limited to the backend. Testing your interface can provide complete end-to-end testing scenarios such as:
Repeated calls to your modal. Does the modal come back after the first call?
Does your submit button produce an error if the form has an incorrect value?
Does the UI load after a successful login to an empty state in your application?
Does a specific result come back after a form search?
I’m going to walk through a straightforward testing scenario with three tools. Not to rank them, but to touch on the nuances of each. Some of these tools allow you to create tests through simple browsing. Others are headless, allowing you to drive through programming languages.
What’s a headless browser?
Conventional browsing involves rendering forms, buttons, and images to the user. A headless browser interacts with websites through code without displaying any controls. Headless browsing opens up possibilities that are tough to achieve with conventional browsers like:
Integration with your build systems
Consistency in testing
Decreasing the duration of your tests
Layout screen captures and comparisons
Tools of the Automated Browser Trade
Onto the good stuff: The tools and testing scenarios.
WebDriver targets as its core base Developers and QA Team members who can write code.
The Easiest To Get Started with – Selenium IDE
Selenium designed the IDE version for exploratory testing and bug replication. It’s perfect for walking through a bug with someone else or creating a recording of a bug for your ticketing system.
Puppeteer is a favorite of the NodeJS community due to its easy integration into your existing build system. It automates form submission, UI testing, keyboard inputs, and more. It’s main limitation however is the browsers it supports. As of this writing Puppeteer only supports Chrome. Firefox support is, as of this writing, experimental.
Puppeteer’s killer feature is that it installs the browser binary for you, making the integrating into your build system easy.
Testing Scenario: A Failed Login to dev.to
Here’s our testing scenario:
Load https://dev.to
Click the “Log in” button
Load a page with “Welcome! – DEV Community” in its title.
Click on the “Continue” button
Ensure an “Unable to login” banner appears on the page.
For consistency throughout the walkthrough, I’ll use:
Chrome as my browser
Javascript as the programming language of choice
Test Case 1 – Selenium WebDriver
Let’s begin with an empty directory and selenium package installation:
npm init tests
cd tests
npm install selenium-webdriver
Next, download a browser driver. You can find the full supported list in selenium’s code repository. You can place the binary anywhere. For this walkthrough, I’ll place it in the current project directory under the bin/ path.
Set your specific browser driver path:
export PATH=$PATH:$PWD/bin
I’ll be using this quick test setup (selenium.js):
const {Builder, Browser, By, Key, until} = require('selenium-webdriver');

(async function example() {
  let driver = await new Builder().forBrowser(Browser.CHROME).build();
  try {
    await driver.get('http://dev.to');
    await driver.findElement(By.linkText('Log in')).click();
    await driver.wait(until.titleIs('Welcome! - DEV Community'), 3000);
    await driver.findElement(By.name('commit')).click();
    await driver.wait(until.titleIs(''), 3000);
    let errorBox = await driver.findElement(By.className('registration__error-notice'));
    await driver.wait(until.elementIsVisible(errorBox));
    let errorText = await errorBox.getText();

    if (!errorText.includes('Error')){
      throw new Error(`Error text does not contain expected value: ${errorText}`);
    }

  } finally {
    await driver.quit();
  }
})();
Set your driver and run the file
SELENIUM_BROWSER=chrome node selenium.js
A failed Selenium Test
In general I like to ensure my tests fail from the start, followed by working towards passing the tests:
const {Builder, Browser, By, Key, until} = require('selenium-webdriver');

(async function example() {
  let driver = await new Builder().forBrowser(Browser.CHROME).build();
  try {
    await driver.get('http://dev.to');
    await driver.findElement(By.linkText('Log in')).click();
    await driver.wait(until.titleIs('Welcome! - DEV Community'), 3000);
    await driver.findElement(By.name('commit')).click();
    await driver.wait(until.titleIs(''), 3000);
    let errorBox = await driver.findElement(By.className('registration__error-notice'));
    await driver.wait(until.elementIsVisible(errorBox));
    let errorText = await errorBox.getText();

    if (!errorText.includes('Unable to login')){
      throw new Error(`Error text does not contain expected value "${errorText}"`);
    }

  } catch(e) {
    console.error(`Error running test suite: ${e.message}`)
  }
  finally {
    await driver.quit();
  }
})();
With line 15 fixed, rerun the script:
A successful Selenium Test
Success!
The above was a taste of what you can do with Selenium. You can even break out of the testing mindset and use Selenium for scraping and populating activity trackers.
On to the next tool.
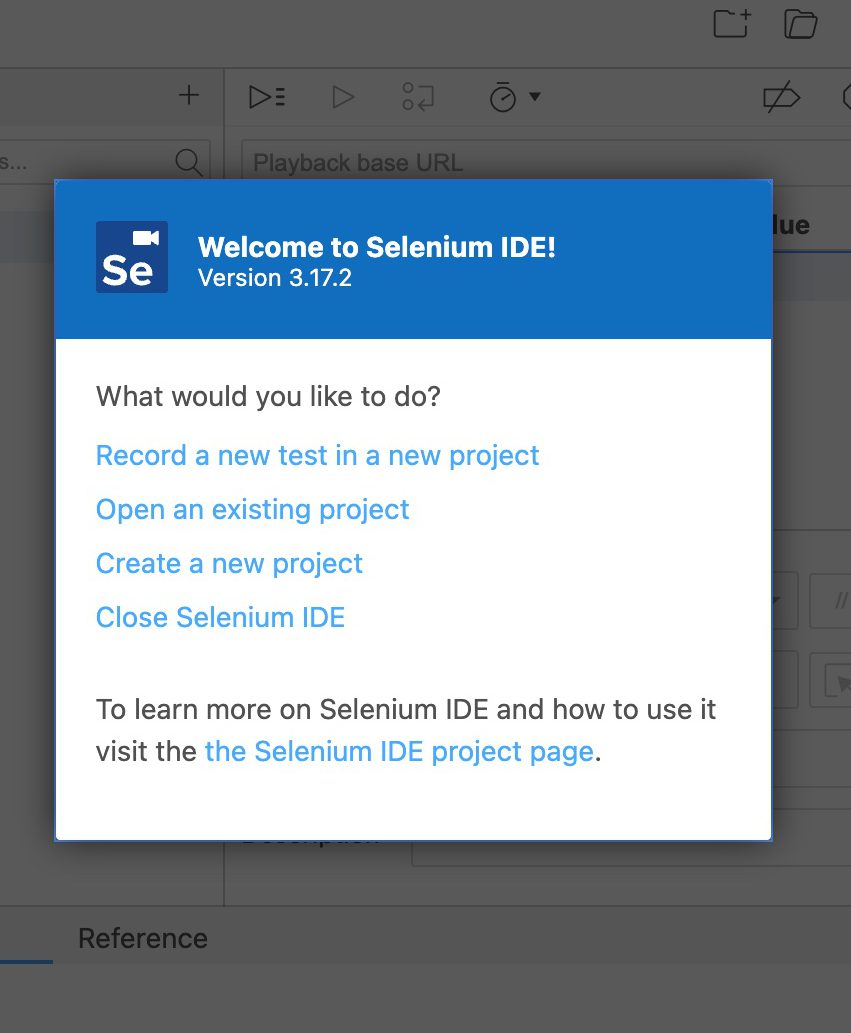
Test Case 2 – Selenium IDE
While the previous test requires some programming ability, Selenium IDE is friendly to anyone who can drive a browser. The IDE version’s main use case is bug discovery, recording and profiling.
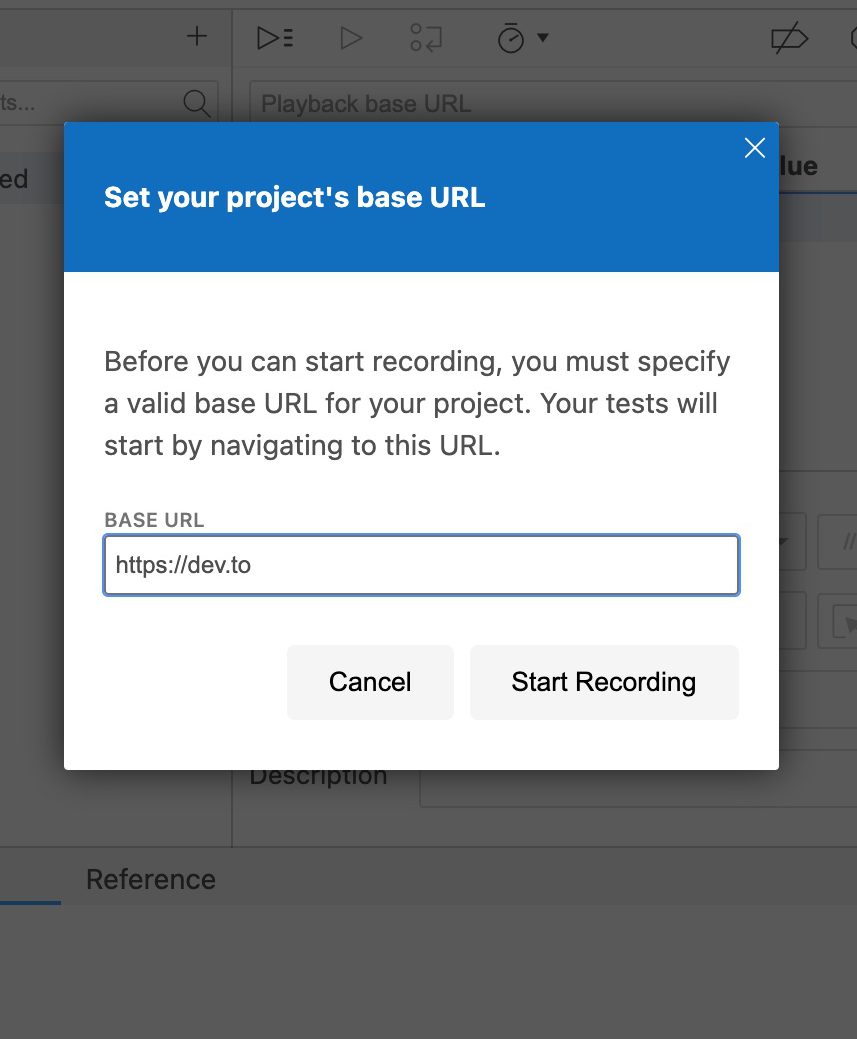
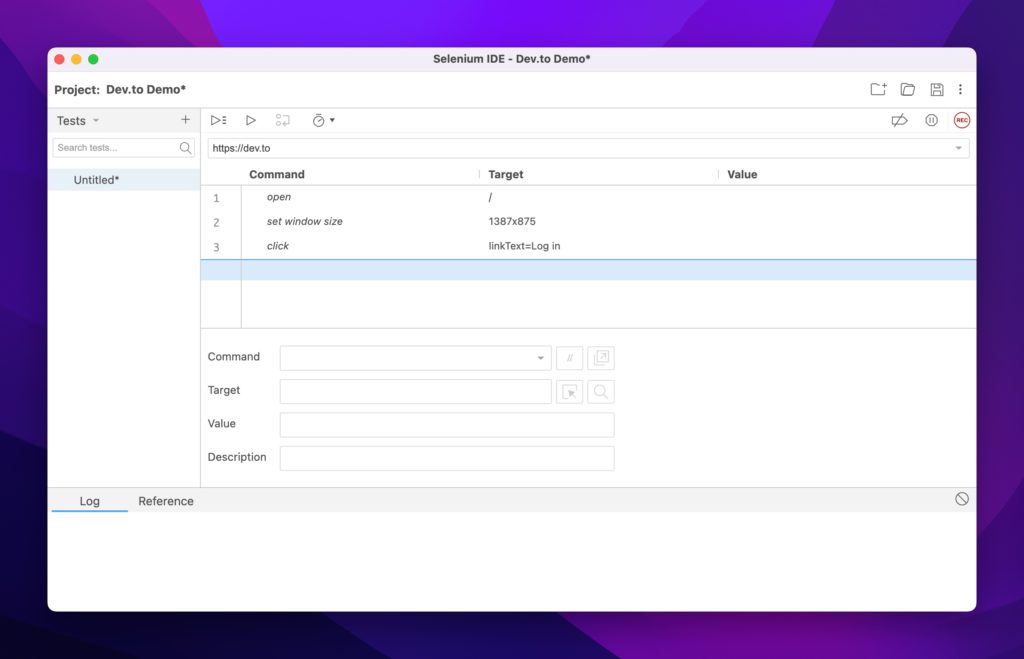
After you hit “Start Recording”, Selenium will launch a new Chrome window and redirect you to dev.to
Initial Dev.To Walkthrough with Selenium IDE
From the video, we:
Let the initial dev.to page load
Clicked on the “Log in” button
Clicked on the Selenium IDE extension
Stopped the Extension recording
Arrived at the Commands window below
Selenium testing properties loaded automatically
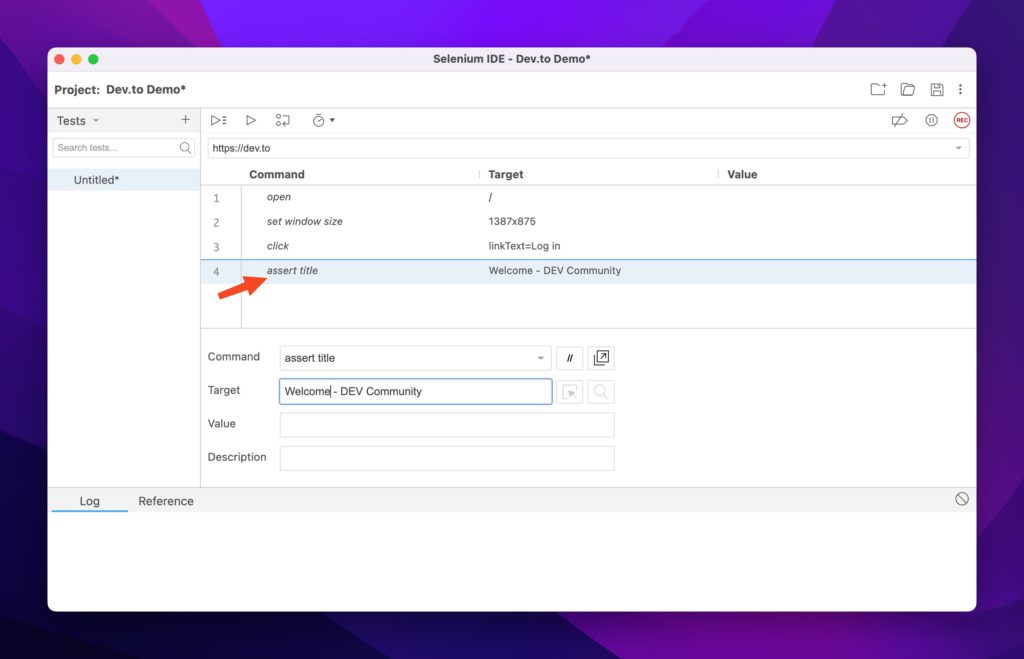
To continue our test scenario, let’s ensure that the page title is Welcome! - DEV Community and that our login attempt fails with an empty submission.
Again, I always like to have my tests fail first, so let’s start with that case. Use Selenium’s assert title command to ensure the title is what we expect. Add it to the command list:
Asserting the page title to fail
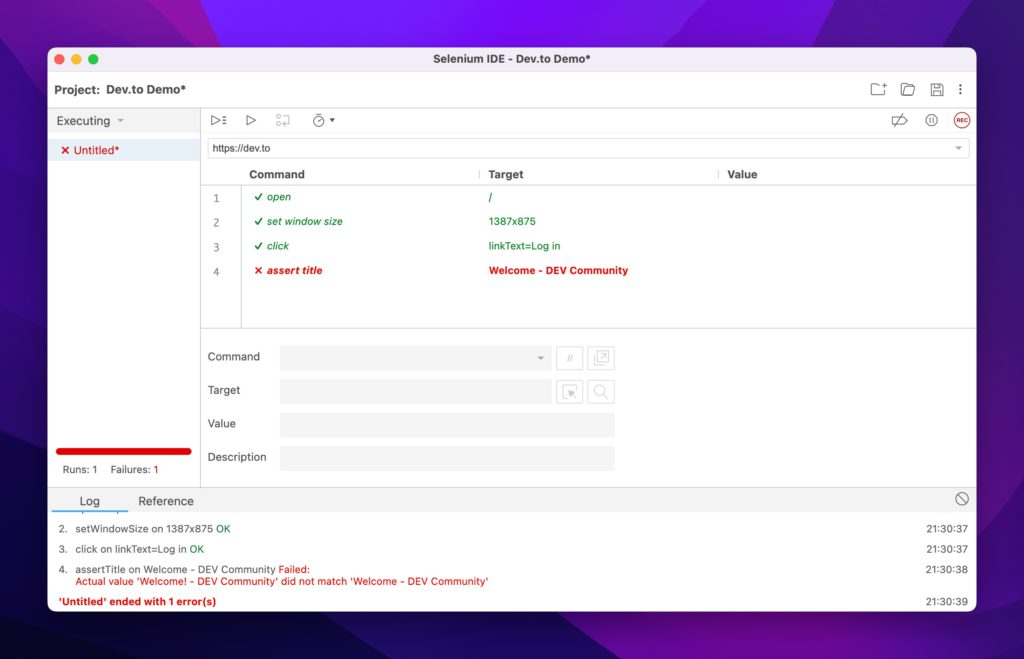
If you run the test, it should fail:
Example of a failed test
Let’s go ahead and fix it with the correct title and rerun the test:
Successful Title Check
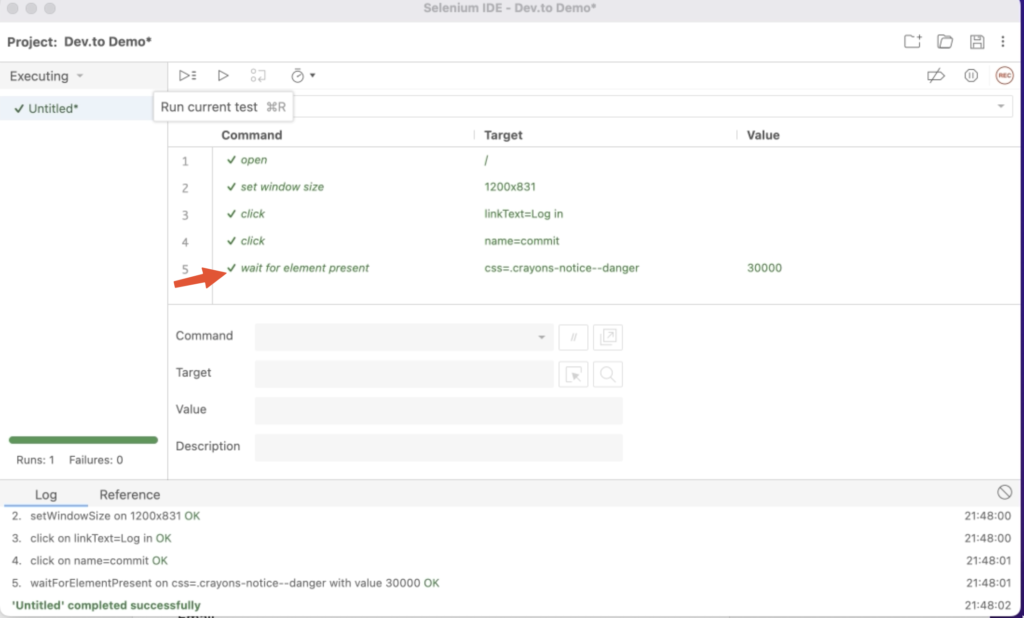
And success! Now let’s add the login check:
Walking through a complete test to success.
To summarize the video, we:
Started a new recording
Hit the Log in button
Clicked Continue without supplying credentials
Used the Selenium element picker to pick out the element we were interested in asserting.
The Commands window should now look like this:
Added Command Check
Success!
The IDE version is the simplest to get started with and I recommend it for initial test write-ups. It can help you identify which elements you need to test against, think about app flow and what counts as a failure.
One question remains: Rendering the browser is nice, but I want to hook this into my continuous integration system. How can I do that when every test wants to load an application that requires a windowing system?
The answer is to go headless.
Test Case 3 – Puppeteer
Puppeteer is the perfect match to test web UI components inside a continuous integration system. It’s fast, headless, brings its own dependencies and runs the latest versions of Chrome and Firefox.
Let’s start by installing puppeteer on a new project:
mkdir tests
npm i puppeteer
Keep in mind that this automatically installs the chrome driver we had to manually download in the Selenium example. From Puppeteer’s documents:
When you install Puppeteer, it downloads a recent version of Chromium (~170MB Mac, ~282MB Linux, ~280MB Win) that is guaranteed to work with the API (customizable through Environment Variables).
https://pptr.dev/#installation
With that said, let’s create a test file that will run (and fail) our test scenario (puppeteer.js):
const puppeteer = require('puppeteer');

(async () => {
  const browser = await puppeteer.launch({headless: false});
  const page = await browser.newPage();
  const loginSelector = 'a[href="/enter"]';
  const submitLoginSelector = '[name="commit"]';
  const errorBoxSelector = '.bad notice';
  try {
    await page.goto('https://dev.to');
    await page.waitForSelector(loginSelector,{ timeout: 3000 });
    await page.click(loginSelector);
    const pageTitle = await page.title();

    if (pageTitle !== 'Welcome! - DEV Community'){
      throw new Error(`Page title ${pageTitle} does not match expected value`);
    }
    await page.waitForSelector(submitLoginSelector,{ timeout: 3000 });
    await page.click(submitLoginSelector);
    await page.waitForSelector(errorBoxSelector,{ timeout: 3000 });

  }catch(e){
    console.error(`Error in test suite: ${e.message}`)
  }finally {
    await browser.close();
  }
})();
Failed test due to incorrect error box selection
Some notes on the above code:
Lines 6-8 are Puppeteer’s method of selecting elements on the page.
Like Selenium WebDriver, you have to manually check a page’s attributes and decide on what to do should they fail
In the above code it’s line 15, asserting the title matches the expected value
It’ll also implicitly fail on line 20, due to the error div class not matching what dev.to sends to the browser.
I’ve disabled the headless feature to show that Puppeteer lets you do that!
Let’s fix the test. Change it to the correct value *and* turn on headless mode:
const puppeteer = require('puppeteer');

(async () => {
  const browser = await puppeteer.launch({headless: true});
  const page = await browser.newPage();
  const loginSelector = 'a[href="/enter"]';
  const submitLoginSelector = '[name="commit"]';
  const errorBoxSelector = '.registration__error-notice';
  try {
    await page.goto('https://dev.to');
    await page.waitForSelector(loginSelector,{ timeout: 3000 });
    await page.click(loginSelector);
    const pageTitle = await page.title();

    if (pageTitle !== 'Welcome! - DEV Community'){
      throw new Error(`Page title ${pageTitle} does not match expected value`);
    }

    await page.waitForSelector(submitLoginSelector,{ timeout: 3000 });
    await page.click(submitLoginSelector);
    await page.waitForSelector(errorBoxSelector,{ timeout: 3000 });
  }catch(e){
    console.error(`Error in test suite: ${e.message}`)
  }finally {
    await browser.close();
  }
})();
Now rerunning the test simply gets you the empty prompt:
I’ve gone through three different sets of tools for different needs. The best part about these tools is that you can string them all together or pick and choose the ones that are right for you.
I hope the main takeaway is the same: Testing can be painless and even fun!
Developing an application that sends emails is straightforward but not without its risks. Ensuring deliverability but not actually having any of those emails land inside real inboxes is a top concern for any developer. Which leads to questions like: “How do you test your application’s outbound email capabilities?” or “How do I manage email testing for free?”
Enter email capture services. While the term “email capture service” tends to focus on the marketing aspects (capturing information from your calls to action, ensuring emails don’t get caught in spam, etc) they also include SMTP deliverability. Mailsac offers an email capture service that addresses the deliverability aspect, specifically not delivering any email to its intended recipient. Effectively a “black hole” where no email should escape to the outside world.
In this post, we’ll walk through a sample application in Next.js that will generate emails and have those emails captured by Mailsac’s email sandboxing service.
Do I Really Need To Do Email Testing?
Some frameworks do come with email previewing capabilities like Rails’ ActionMailer. Said frameworks don’t actually attempt to send anything but instead preview the email on your machine. We recommend real testing during the development and quality assurance phase by using an external SMTP server to mimic the application’s behavior in production.
Testing that capability has to be done safely unless you want to land on Twitter’s trending page for accidentally sending customers an integration test email.
Test Email Sending With A Next.js Application
For the rest of this guide, we’ll focus on wiring up a simple application that will allow users to send an email when a button is pushed from a UI. We’ll then demonstrate the capture of those emails in our development environment.
The components we’ll use are:
Next.js with a React frontend and API Routes backend
nodemailer package for routing email on the backend
While the focus of this guide isn’t a line-by-line walkthrough of the sample code, we’ll focus on the key aspects of the application that mainly involve emailing capabilities.
The application source can be found in our git repository.
1. Application setup
Let’s start by creating a quick next app with tailwind support:
mailsac % npx create-next-app
…
Success! Created nodejs-send-email at /Users/mailsac/code/nodejs-send-email

cd nodejs-send-email
npm install -D tailwindcss postcss autoprefixer @tailwindcss/forms
npm install @headlessui/react@latest @heroicons/react
npx tailwindcss init -p
The second line brings in a component that takes in a message and formats it as a pop-up notification. The useEffect() method sends your email recipient and body input to the backend, which will forward that data to Mailsac’s servers.
const nodemailer = require("nodemailer");

export default async function handler(req, res) {
  let emailEnvelope = JSON.parse(req.body)
  if (
        req.method === 'POST'
        && typeof(emailEnvelope.to) !== 'undefined'
        && emailEnvelope.to !== ''
  ){
    const mailsaUserName = process.env.MAILSAC_USERNAME
    const mailsacAPIKey  = process.env.MAILSAC_API_KEY

    const transporter = nodemailer.createTransport({
      host: 'capture.mailsac.com',
      port: 5587,
      // will use TLS by upgrading later in the connection with STARTTLS
      secure: false,
      auth: {
        user: mailsaUserName,
        pass: mailsacAPIKey
      }
    })

    try {
      const results = await transporter.sendMail({
        from: '"Sample App" [email protected]',
        to: emailEnvelope.to,
        subject: 'Sample App Send',
        text: emailEnvelope.body
      })
      res.status(200).json(
        {
          message: "You should now see an email in Mailsac's capture service",
          response: results.data
        }
      )
    } catch (error){
      console.log(`ERROR ${error}`)
      res.status(500).json({ message: `${error.response}`, response: error })
    }
  } else {
    return res.status(200).json({message: "No data"});
  }
}
In the highlighted line, we’re ensuring the useEffect() hook gets called with input data before we allow the rest of the function to continue. useEffect() gets called a variety of times in the component lifecycle, and this check is to ensure it was initiated by an end user and not as part of the component mounting.
5. Test driving the app
Fire up the application via
npm run dev
Navigate to http://localhost:3000 and type a text message:
Then navigate over to mailsac.com to view the message
6. Capturing other email domains
While that works well as a contrived example, the real value comes when using any arbitrary email in the recipient field:
Capturing emails outside the mailsac.com domain is extremely valuable when switching between different environments. For example, in the demo application example above, the .env environment file could instead look like
const nodemailer = require("nodemailer");

export default async function handler(req, res) {
  let emailEnvelope = JSON.parse(req.body)
  if (
        req.method === 'POST'
        && typeof(emailEnvelope.to) !== 'undefined'
        && emailEnvelope.to !== ''
  ){
    const mailsaUserName = process.env.MAILSAC_USERNAME
    const mailsacAPIKey  = process.env.MAILSAC_API_KEY

    const transporter = nodemailer.createTransport({
      host: process.env.MAILSAC_HOST,
      port: process.env.MAILSAC_PORT,
      // will use TLS by upgrading later in the connection with STARTTLS
      secure: false,
      auth: {
        user: mailsaUserName,
        pass: mailsacAPIKey
      }
    })

    try {
      const results = await transporter.sendMail({
        from: '"Sample App" [email protected]',
        to: emailEnvelope.to,
        subject: 'Sample App Send',
        text: emailEnvelope.body
      })
      res.status(200).json(
        {
          message: "You should now see an email in Mailsac's capture service",
          response: results.data
        }
      )
    } catch (error){
      res.status(500).json({ message: `${error.response}`, response: error })
    }
  } else {
    return res.status(200).json({message: "No data"});
  }
}
The above edits would allow you to deploy to a testing or production environment and the only changes required would be in the .env file. Specifically, the SMTP host and authentication settings.
Conclusion
The above guide just scratches the surface of what you can do with our email services. We provide a unified inbox that allows testers to view their bulk email testing in one unified view and custom domains for those who do not have their own domains with zero setup configurations.
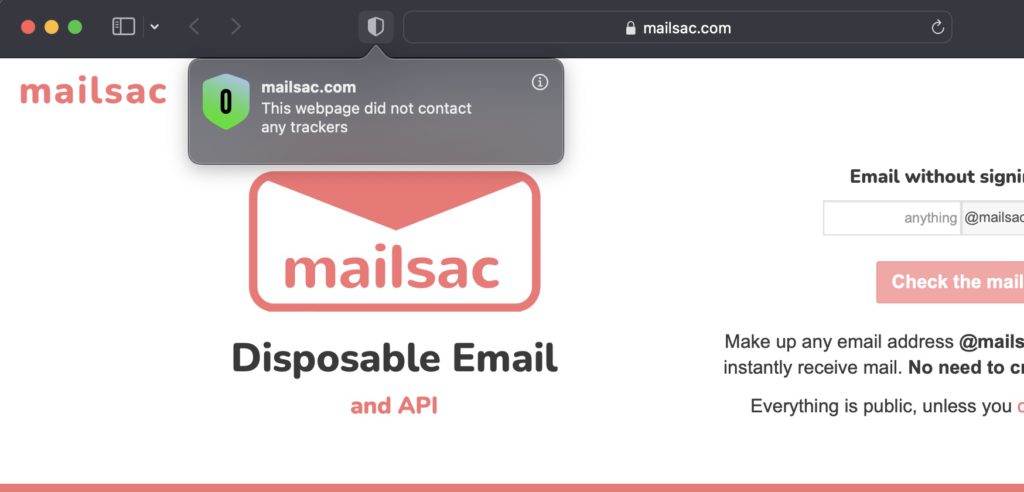
Google Analytics (GA), the ubiquitous web analytics service provided by Google, has been removed from all Mailsac properties. GA is used to see which pages people visit, how frequently users return to a website, and where they were referred from.
Despite Google Analytics being the de facto tracking service on the internet – mostly because it is entirely free – we decided it was not a good fit for our users.
It is worth noting that Mailsac does not use Facebook analytics, nor any other 3rd party trackers. We do leverage the privacy-focused – and paid – Cloudflare Analytics, which is included with our DNS and caching service. We also track minimal usage metrics on the server side of Mailsac.com, for billing purposes.
Mailsac was created over 10 years ago with the goal of providing a reliable disposable email platform for software testers. We serve no advertisements, sell no data to 3rd parties. We rely on users to pay us for providing a good service. From the time of Mailsac’s creation – until recently – we did leverage Google Analytics as a tool to understand website load. As a “free” product, GA helped keep costs down and worked well. We have come to understand that “free” meant we effectively shared our users browsing habits with Google, for the purpose of serving ads. So we no longer do that.
Screenshot of mailsac.com on 2022-04-28 in Safari showing zero trackers
Outbound SMTP service will no longer be supported by Mailsac.
What Does this Mean for Me?
Mail will no longer be able to sent from Mailsac addresses or custom domains using the outbound Mailsac SMTP service.
If you are sending from the REST API, compose email form, or Unified Inbox we encourage you to seek out other SMTP sending services. Mailsac has always supported direct SMTP from anywhere, without a mail relay, as well.
Reasons for the Change
Email delivery is not an easy problem at scale.
Our customers, especially quality assurance teams, are using Mailsac as a receive-only service.
The likelihood that Mailsac’s outbound messages are delivered to the intended inbox has been trending lower over time, despite increased effort.
We made the decision to focus our efforts on improving our core product – disposable inbound email for testing.
The Mailsac Self-Hosted Temporary Email User Interface is available in a GitHub repository. This project provides a self-hosted user interface for viewing disposable email. It uses mailsac.com as the backend email service.
Mailsac.com Limitations
Mailsac already offers disposable email without a need to sign up for an account. What need does this application meet that Mailsac doesn’t already provide?
Mailsac has limitations on what can be viewed without signing up for an account. Only the latest email in a public mailbox can be viewed without signing in. Mail in a private domain cannot be viewed without signing in with an account that has permissions to the private domain.
Use Cases
There are two use cases that customer’s have brought to our attention that Mailsac’s service doesn’t satisfy. Both stem from a requirement to allow users read-only access to an inbox without the requirement of creating a Mailsac account.
Class Room Use Case
An instructor may want students, who are young in age and don’t have an email address, to sign up for an account with a web service used in the class. The Mailsac Self-Hosted Temporary Email User Interface application provides a simplified interface for students to view email sent to a private mailsac hosted domain without the need to sign up for a mailsac account or email address.
Acceptance Tester Use Case
As part of the sofware development lifecycle there is a need to have software tested by users. Temporary email has long been beneficial to testing. The Mailsac Self-Hosted Temporary Email User Interface makes this easier. Users can test applications using email addresses in a Mailsac hosted private domain without the need to sign up for a Mailsac account. Furthermore, because the application is self-hosted companies can use a reverse proxy to enforce IP allow lists or put the application behind basic authentication.
Running the Mailsac Self-Hosted Email User Interface
Local
With NodeJS installed this application can be run with the following commands.
npm install && npm run build
MAILSAC_KEY=YOUR_MAILSAC_API_KEY npm run start
You will need to generate a Mailsac API key. To generate or manage API Keys use the API Keys page.
The application is now running and can be accessed via a web browser at http://localhost:3000 .
Any public or private Mailsac hosted address the API key has access to can be viewed by entering the email address in the text box and selecting “view mail”.
Domain Option
You can prepopulate the domain by using the NEXT_PUBLIC_MAILSAC_CUSTOM_DOMAIN environment variable.
NEXT_PUBLIC_MAILSAC_CUSTOM_DOMAIN=example.mailsac.com npm run build
MAILSAC_KEY=YOUR_MAILSAC_API_KEY npm run start
Vercel Hosted
Vercel is a platform as a service provider. Their service makes running your own Next.js application easy.
Grant Vercel permissions to read all your repos or choose to grant permission on the forked repo
Import forked repository into Vercel
Configure MAILSAC_KEY environment variable
Deploy application
After a successful deployment you can click on the image of the application to be taken to the live application.
NOTE There is currently no authentication on this application. Anyone with the URL will be able to view emails and domains associated with the Mailsac API key that was used. Operations will be tracked in the Mailsac account in which the API key is associated with.
You are free to deploy this app however you like. Please keep the attribution to Mailsac.
Mailsac is changing DNS providers to Cloudflare to provide a more resilient SaaS offering.
Customer Changes
No customer changes are required. If you implemented IP based ACLs at the VLAN or border firewall, it is possible these rules may need to be updated. Cloudflare publishes a list of their IP addresses.
Updates
Saturday April 2nd 14:33 UTC DNS has been switched over to use Cloudflare. All validation tests have been completed. We will continue to monitor for issues.
Mailsac provides a REST API to fetch and read email. The REST API also allows you to reserve an email address that can forward messages to another mailsac email address, Slack, WebSocket, or webhook
This article describes how to integrate with Mailsac using Java and the JUnit testing framework. The JavaMail API will be used to send email via SMTP.
What is JUnit?
JUnit is a unit testing framework for the Java programming language. The latest version of the framework, JUnit 5, requires Java 8 or above. It supports testing using a command-line interface, build automation tools, and IDEs.
JUnit can be used to test individual components of code to ensure that each unit is performing as intended.
Setting Up the Environment
Depending on the environment, there are multiple ways to run tests. Testing using the command and JUnit are included in this example.
Testing Using Command-Line
Running tests from the command-line requires the ConsoleLauncher application(junit-platform-console-standalone-1.7.2.jar). JUnit ConsoleLauncher is published in the Maven Central repository under the junit-platform-console-standalone directory.
The first section of output shows the name of the unit test (tests truth) and the test names (true equals true and false equals false). The checkmark next to the test name indicates it was successful.
The second section of output shows a summary of the test results.
Testing Using Build Tools
Testing from build automation tools, like Maven, is another option. In many ways, using build tools is the best option. For instance, they provide a standard directory layout that encourages industry standard naming conventions.
Maven abstracts many underlying mechanisms allowing developers to run a single command for validating, compiling, testing, packaging, verifying, installing, and deploying code.
This section will describe how to set up Maven for building, managing, and testing a project.
Edit the AppTest.java file: $EDITOR src/test/java/com/mailsac/api/AppTest.java
package com.mailsac.api;

import static org.junit.jupiter.api.Assertions.assertTrue;
import static org.junit.jupiter.api.Assertions.assertEquals;
import org.junit.jupiter.api.Test;

class TestClass {

    @Test
    void trueEqualsTrue() {
        // The assertTrue method asserts that the supplied condition is true.
        // static void assertTrue(condition)
        assertTrue(true);
    }

    @Test
    void falseEqualsFalse() {
        // The assertEquals method asserts that expected and actual are equal.
        // static void assertEquals(expected, actual)
        assertEquals(false, false);
    }

}
In the directory mailsac-integration-test-java, run mvn clean package. This command deletes the folder target , packages the project into a new target folder, and runs a unit test.
Tests can be manually run using the command mvn test in the mailsac-integration-test-java directory.The output should appear similar to:
[INFO] -------------------------------------------------------
[INFO]  T E S T S
[INFO] -------------------------------------------------------
[INFO] Running com.mailsac.api.TestClass
[INFO] Tests run: 2, Failures: 0, Errors: 0, Skipped: 0, Time elapsed: 0.029 s - in com.mailsac.api.TestClass
[INFO]
[INFO] Results:
[INFO]
[INFO] Tests run: 2, Failures: 0, Errors: 0, Skipped: 0
Mailsac Java Integration Test
This section describes how to leverage Mailsac and JUnit to test mail delivery. Emails will be sent to Mailsac using SMTP and email delivery will be validated with JUnit.
There are 3 additional libraries that will be used:
The Unirest library will to used to send REST requests to the Mailsac API
public class AppTest {
    // MAILSAC_API_KEY environment variable. Generated by mailsac. See
    // https://mailsac.com/api-keys
    static String mailsacAPIKey = "";
    // MAILSAC_TO_ADDRESS environment variable. Who you're sending an email to.
    static String mailsacToAddress = "";
    // SMTP_FROM_ADDRESS environment variable. Necessary if you are sending
    // through out.mailsac.com (unlikely - you most likely will replace
    // sendMail() below.
    static String fromAddress = "";
    // SMTP_USERNAME environment variable. Required for authenticated SMTP sending
    static String smtpUserName = "";
    // SMTP_PASSWORD environment variable. Required for authenticated SMTP sending
    static String smtpPassword = "";
    // SMTP_HOST environment variable. Hostname of your SMTP server
    static String smtpHost = "";
    // SMTP_PORT environment variable. Port used for SMTP sending
    static int smtpPort = 587;

    @BeforeAll
    static void setup() throws Exception {
        mailsacAPIKey = System.getenv().get("MAILSAC_API_KEY");
        mailsacToAddress = System.getenv().get("MAILSAC_TO_ADDRESS");
        fromAddress = System.getenv().get("SMTP_FROM_ADDRESS");
        smtpUserName = System.getenv().get("SMTP_USERNAME");
        smtpPassword = System.getenv().get("SMTP_PASSWORD");
        smtpHost = System.getenv().get("SMTP_HOST");
        if (System.getenv().get("SMTP_PORT") != null) {
            Integer.parseInt(System.getenv().get("SMTP_PORT"));
        }
        if (mailsacAPIKey == null || mailsacToAddress == null || fromAddress == null) {
            throw new Exception("Missing environment variable setup!");
        }
        if (smtpUserName == null || smtpPassword == null || smtpHost == null) {
            throw new Exception("Missing SMTP environment variables");
        }
        System.out.println(mailsacAPIKey);
        System.out.println(mailsacToAddress);
        System.out.println(fromAddress);
    }
}
Add a purgeInbox() method which makes a DELETE request to api/addresses/{email}/messages/(messageId}.
This section of code should be added to the existing AppTest class.
public class AppTest {
  //...
 @BeforeEach
 @AfterEach
 // purgeInbox cleans up all messages in the inbox before and after running each
 // test,
 // so there is a clean state.
 void purgeInbox() throws UnirestException, JsonProcessingException {
     HttpResponse<String> response = Unirest
             .get(String.format("https://mailsac.com/api/addresses/%s/messages", mailsacToAddress))
             .header("Mailsac-Key", mailsacAPIKey)
             .asString();

     // Parse JSON
     ObjectMapper objectMapper = new ObjectMapper();
     Object[] messagesArray = objectMapper.readValue(response.getBody(), Object[].class);

     for (int i = 0; i < messagesArray.length; i++) {
         JsonNode m = objectMapper.convertValue(messagesArray[i], JsonNode.class);
         String id = m.get("_id").asText();
         System.out.printf("Purging inbox message %s\n", id);
         Unirest.delete(String.format("https://mailsac.com/api/addresses/%s/messages/%s", mailsacToAddress, id))
                 .header("Mailsac-Key", mailsacAPIKey)
                 .asString();
     }
 }
  //...
}
Implement a sendMail() method which sends an email. This section will likely likely be different depending on your use case. For example, you may be sending emails via your web application or via an email campaign.
public class AppTest {
    //...
    static void sendMail(String subject, String textMessage, String htmlMessage)
            throws UnsupportedEncodingException, MessagingException {
        Session session = Session.getDefaultInstance(new Properties());
        javax.mail.Transport transport = session.getTransport("smtp");
        MimeMessage msg = new MimeMessage(session);

        // set message headers
        msg.addHeader("Content-type", "text/HTML; charset=UTF-8");
        msg.addHeader("format", "flowed");
        msg.addHeader("Content-Transfer-Encoding", "8bit");

        msg.setFrom(fromAddress);
        msg.setReplyTo(InternetAddress.parse(fromAddress));
        msg.setSubject(subject, "UTF-8");
        msg.setText(textMessage, "UTF-8");
        msg.setContent(htmlMessage, "text/html");

        msg.setSentDate(new Date());

        msg.setRecipients(Message.RecipientType.TO, mailsacToAddress);
        msg.saveChanges();
        System.out.println("Email message is ready to send");
        transport.connect(smtpHost, smtpPort, smtpUserName, smtpPassword);
        transport.sendMessage(msg, msg.getAllRecipients());

        System.out.println("Email sent successfully");
    }
    // ...
}
Add test. Use a for loop to check if the message was received by scanning the recipient inbox periodically. If the recipient inbox is not empty, and a message was found, the test verifies the message content:
This test uses the Mailsac API endpoint/api/addresses/{email}/messages which lists all messages in an inbox.
public class AppTest {
    //...
    @Test
    void checkEmailWithLink() throws MessagingException, UnirestException, IOException, InterruptedException {
        sendMail("Hello!", "Check out https://example.com", "Check out <a href='https://example.com'>My website</a>");
        // Check inbox for the message up to 10x, waiting 5 seconds between checks.
        found: {
            for (int i = 0; i < 10; i++) {
                // Send request to fetch a JSON array of email message objects from mailsac
                HttpResponse<String> response = Unirest
                        .get(String.format("https://mailsac.com/api/addresses/%s/messages", mailsacToAddress))
                        .header("Mailsac-Key", mailsacAPIKey)
                        .asString();

                // Parse JSON
                ObjectMapper objectMapper = new ObjectMapper();
                Object[] messagesArray = objectMapper.readValue(response.getBody(), Object[].class);

                System.out.printf("Fetched %d messages from Mailsac for address %s\n", messagesArray.length,
                        mailsacToAddress);
                eachMessage: {
                    for (int m = 0; m < messagesArray.length; m++) {
                        // Convert object into JSON to fetch a field
                        JsonNode thisMessage = objectMapper.convertValue(messagesArray[m], JsonNode.class);

                        // After a message is found, the JSON object is checked to see if the link was
                        // sent correctly
                        assertTrue(thisMessage.get("links").toString().contains("https://example.com"),
                                "Missing / Incorrect link in email");

                        System.out.printf("Message id %s contained the correct link\n",
                                thisMessage.get("_id").asText());

                        return; // end the tests
                    }
                }

                System.out.println("Message not found yet, waiting 5 secs");
                Thread.sleep(5000);
            }

            // Fail the test if we haven't reached assertTrue above
            fail("Never received expected message!");
        }
    }
    // ..
}
At this point, the code is complete. Package the project: mvn clean package. This will also run a test.
Subsequent changes to the source file do not require you to run mvn clean package again. Instead, run mvn test.
The output should appear similar to this:
[INFO] -------------------------------------------------------
[INFO]  T E S T S
[INFO] -------------------------------------------------------
[INFO] Running com.mailsac.api.AppTest
[INFO] Tests run: 1, Failures: 0, Errors: 0, Skipped: 0, Time elapsed: 9.148 s s - in com.mailsac.api.AppTest
[INFO]
[INFO] Results:
[INFO]
[INFO] Tests run: 1, Failures: 0, Errors: 0, Skipped: 0
GitHub Repository
If you encounter any difficulties, git clone https://github.com/mailsac/mailsac-integration-test-java. Make edits as necessary, and run mvn package.
Alternatively, if your tests fail because of error codes when making requests to the Mailsac API, please refer to the API Specification for further reading.
Next Steps
The Mailsac API Specification has generated code examples in Java + Unirest for making requests. It also has code examples in other languages.
This example can be adjusted to get all private email addresses for an account and purge their inboxes if necessary.
Please visit our forums if you have any questions!