We’re delighted to announce a significant enhancement to our free tier plan, specifically tailored to meet the needs of Quality Assurance (QA) teams and automated testers. Effective immediately, all free Mailsac users will have access to one free private address, enabling them to maintain confidentiality during email testing and ensure privacy for sensitive testing communications.
The addition of the free private address empowers QA teams and automated testers with an extra layer of control over their email testing activities. With the free private address, they can separate and safeguard their testing correspondence, ensuring the confidentiality of valuable testing data. By seamlessly managing both public and private email addresses within a single Mailsac account, QA teams and automated testers can streamline their workflow and simplify the management of their testing environments.
“At Mailsac, we understand the critical importance of data privacy and confidentiality in the testing process. We are excited to offer QA teams and automated testers the advantage of one free private address to enhance their email testing capabilities,” stated Michael Mayer, managing executive at Mailsac. “This enhancement is a testament to our commitment to empowering professionals in the QA field with robust email solutions that prioritize privacy and security.”
In addition to the free private address, Mailsac’s free tier plan includes a comprehensive range of features designed to cater to the unique needs of QA teams and automated testers. These features include rolling message storage space, customizable email addresses, and reliable email forwarding and routing capabilities. The ability to forward emails to various testing integrations environments, via Slack, webhooks, websockets, and other Mailsac addresses, facilitates seamless communication and collaboration within a company’s testing ecosystem. Furthermore, Mailsac provides a robust REST API, enabling QA teams and automated testers to check and manage email messages with ease during their testing cycles.
To benefit from enhanced privacy, advanced email testing capabilities, and a comprehensive range of features, QA teams and automated testers can sign up for Mailsac’s free tier plan at https://mailsac.com/pricing. The inclusion of the free private address and the expanded email testing options demonstrate Mailsac’s commitment to meeting the specific requirements of QA professionals, enabling them to conduct thorough and secure email testing.
About Mailsac: Mailsac is the leading provider of secure and flexible email testing services, catering to the needs of individuals, small businesses, and organizations worldwide. With a strong emphasis on user privacy and data protection, Mailsac empowers QA teams and automated testers to conduct rigorous and secure email testing while maintaining control over their digital identities. From the free tier plan to enterprise offerings, Mailsac delivers unmatched email solutions and exceptional customer support.
For media inquiries, please contact: Michael Mayer Email: [email protected]
Email deliverability testing, and QA testing web apps with multiple account permissions, are critical aspects of software development and Quality Assurance (QA). Although disposable email websites and gmail addresses are a common choice for this task, they present several significant drawbacks for enterprises. This article will detail the advantages of using dedicated email deliverability platforms like Mailsac instead.
Limitations of Disposable Email
1. Security and Privacy
Disposable email platforms typically make all emails public. These websites are frequently crawled by scammers to acquire sensitive information.
Disposable email services often lack robust security measures, exposing sensitive test data. This lack of security can compromise the integrity of testing and risk breaches of confidential information. They rely on security through obscurity – random email addresses that are hopefully unguessable.
Disposable email providers typically do not have Information Security and Assurance programs, and cannot pass a Vendor Risk Assessment.
2. Business Agreements
The terms of service for disposable email services are often unsuitable for professional development and testing contexts. They can include problematic clauses and offer limited protections for users, which isn’t ideal for businesses. The terms and privacy policies tend to be non-negotiable.
3. B2B Interfaces
Disposable email services often lack capabilities for Business-to-Business (B2B) interfacing. This limitation can hinder the integration of these services into larger, automated testing suites, significantly limiting their usefulness in professional testing scenarios.
4. Uptime and Performance
Disposable email services are often slow and lack reliable uptime. These performance issues can introduce unnecessary delays into the testing process and create uncertainties around the reliability of test results. If an email was delayed, it can be hard to know if it was on your end, or theirs.
Advantages of Using Mailsac
Mailsac, as a dedicated email deliverability platform, provides a solution to these limitations and offers considerable advantages for professional QAs and software devs.
1. Enhanced Security
Mailsac prioritizes security, providing secure paid private inboxes and whole subdomains for testing.
You can test your application’s email functionality without risking sensitive data being leaked or public, or sold to a data broker.
2. Professional Business Agreements
Mailsac offers business-friendly terms of service, custom terms, P.O.s, multiple users, SSO and other features designed with the needs of professional QAs and software developers in larger companies with legal and security requirements. This provides a more suitable environment for business operations and testing.
3. Integration and functional testing
Mailsac provides powerful REST APIs, webhooks, and web sockets for integrating into CI/CD and workflows. Companies frequently integrate mailsac seamlessly into their automated testing suite. Using a consumer disposable provider often results in unexpectedly failed builds. Using a professional provider gives you comprehensive and efficient testing and enables continuous deployment.
4. Reliable Performance
Mailsac has high uptime and quick API and UI performance, ensuring a smooth and reliable email testing process. We believe performance is a feature.
5. Share test environment account email addresses
When you are testing a web application, you can use email addresses that are private to your Mailsac account to sign up for your app. Then share those inboxes with your teammates. For example, you may be testing a web app with two RBAC roles – administrator and readonly user. Each can have a unique mailsac email address. Your web app sends a sign-in link via email. All team members can access it (using mailsac’s multi-user or SSO feature). And since it’s not disposable email, the sign-in link to your app’s dev environment won’t be public.
While disposable email services may appear convenient, they come with considerable drawbacks for professional QAs and software devs. They can be against company policies because they may leak proprietary business information. Mailsac, with its robust features and focus on business needs, provides a far more effective solution for email deliverability testing.
The importance of Quality Assurance (QA) testing in software development and operations cannot be overstated. It ensures the product or system performs as expected, minimizing the risk of unexpected failures in production environments. A crucial aspect of QA testing involves testing email deliverability. This article will focus on how to use Mailsac, a leading tool in email testing, to execute this task effectively.
What is Mailsac?
Mailsac is a service providing temporary, “for-test-only” email addresses that can be used for testing and development purposes. Mailsac’s uniqueness lies in its capability to accept emails sent to any unique, auto-generated email addresses under its domain, thus eliminating the need for pre-generating email addresses or setting up a dedicated testing email server.
Why Use Mailsac for Email Deliverability Testing?
Email deliverability testing is vital to ensure emails are correctly dispatched from your application and are appropriately received by your users. Mailsac offers the flexibility to test various email formats and content, inspect the received emails, and verify they are correctly formatted and contain the correct data. This helps mitigate common issues such as emails being marked as spam, lost emails, or broken email formats.
How to Perform QA Testing with Mailsac
Let’s delve into the steps to conduct QA testing for email deliverability using Mailsac.
Step 1: Set Up a Mailsac Account
First and foremost, you need to create a Mailsac account. Visit the Mailsac website and follow the sign-up instructions.
Step 2: Send Emails to Mailsac
Next, send emails from your application to any addresses on the mailsac.com domain. Mailsac is designed in such a way that you don’t need to pre-generate the email addresses. Just decide on the address you want to use and send the email. The inbox will be created automatically when an email is received.
You can send the emails from anywhere, too – personal or work addresses, fake senders, CLI tools, software applications – without a separate sending gateway.
Step 3: Check Email Deliverability
After sending the emails, you can verify their delivery in the Mailsac interface. Here, you can view the received emails, check their contents, and confirm they are correctly formatted. Mailsac also enables you to check if attachments are included correctly using the Unified Inbox or API, and whether the links and images in the email are functioning properly.
Advanced Testing with Mailsac API
For more sophisticated or comprehensive testing, Mailsac offers a robust JSON REST API and Web Socket API. This empowers you to automate the process of sending emails, checking their delivery, and verifying their contents. These API calls can be integrated into your automated testing suite, enabling you to conduct in-depth email deliverability tests as a part of your regular testing process.
Wrapping Up
Mailsac presents a powerful and versatile method to test email deliverability as a part of your QA process. It allows you to send emails to any address on its domain, and the inboxes are created automatically when an email is received. By integrating Mailsac into your QA testing, you can significantly enhance the quality and reliability of your email notifications, thus offering a better user experience. Sign up and start receiving email in seconds.
A look at filtering email messages with the Mailsac API
Mailsac has rolled out a new API endpoint feature, dubbed “inbox filter.”
It limits email messages using the to, from, and subject fields. Say goodbye to the conventional OR logic of /api/inbox-search and embrace the power of logical AND.
The Inbox Filter Endpoint: Technical Breakdown
The /api/inbox-filter API endpoint accepts the following optional query parameters:
andSubjectIncludes: Filter messages by text included in the subject line
andFrom: Filter messages by text included in the FROM envelope
andTo: Filter messages by text included in the TO envelope
This endpoint delivers results only when at least one query condition is specified, otherwise, expect a 400 error. The response is capped at 100 results, so adjust your query or prune your account accordingly.
JavaScript Unit Test with Mocha and Axios
To illustrate the usage of the /inbox-filter API endpoint, here’s a JavaScript unit test using Mocha and Axios:
Looking for a robust email testing solution that can simplify your workflow and improve efficiency? Look no further, friends. Mailsac offers powerful features like this new inbox filter API endpoint and many more, tailored to meet the needs of developers, testers, and businesses alike. Discover the benefits of Mailsac today and elevate your email management game. Try Mailsac for free or learn more about our plans and join our growing community of satisfied users at forum.mailsac.com.
Get ready for some boring news. At Mailsac, we release a steady stream of updates – week by week, all year long – with no fanfare. We avoid breaking changes wherever possible. Most of our customers have Mailsac integrated deeply into their CI/CD and QA processes. Breaking your build is not cool.
Here’s a recap of improvements we made over the past few months:
Updated UI interfaces for managing things like API keys, email addresses, and more. We’re modernizing the main website for security and ease-of-use. Stay tuned for a lot more of this.
Additional “Copy text” buttons and cross-browser compatibility improvements.
POP3 server fixes to some edge cases around Windows line endings.
Over 50 security updates to dependencies which are (hopefully) completely transparent to you.
Performance and security upgrades to our underlying servers.
Over time, SaaS services add too many features, getting clunky and slow user interfaces. At Mailsac we’re not beholden to venture capital or shareholders. Customers have our full attention. You pay us for dev and QA tools to help test email. Thus we prioritize speed and singleness of purpose to deliver you those tools. We want to be extremely helpful, yet stay out of your way.
If you’ve ever got issue with Mailsac, paying customers can contact us at [email protected]. A human being will reply pretty quickly, getting you unblocked. (For non-paying users, please ask for help at https://forum.mailsac.com )
As a business manager in a software company, you understand the importance of effective communication with your customers. Email remains a critical channel for connecting with your audience, but many organizations overlook the importance of thoroughly testing their email sending capabilities. Failing to test your outbound email systems can lead to embarrassing mistakes, decreased customer satisfaction, and even regulatory consequences in certain industries. In this blog post, we’ll explore the downsides of neglecting email testing and explain why it should be a priority for your business.
Sending Duplicate or Incorrect Emails
One of the most common issues businesses face when not testing their email sending capabilities is accidentally sending duplicate or incorrect emails. This can happen due to software bugs, incorrect configuration, or simple human error. When customers receive multiple copies of the same email or emails containing inaccurate information, it can create confusion, erode trust, and damage your brand reputation. By investing in proper email testing, you can catch these errors before they reach your customers.
Personalization Mistakes
Email personalization is essential for connecting with customers on a deeper level. However, without proper testing, you may encounter issues like incorrect name insertion or the use of outdated customer data. These mistakes can make your emails appear unprofessional and impersonal, undermining your efforts to build strong relationships with your customers. Email testing can help ensure your personalization efforts are successful and your customers feel valued.
Missing Critical Notifications
When your email sending capabilities are not tested thoroughly, there’s a risk of failing to send important notifications to customers. This can include transaction confirmations, account updates, or even password reset emails. Delayed or missing notifications can lead to customer frustration, increased support requests, and potential security issues. Implementing a comprehensive email testing strategy can help ensure your customers receive timely and accurate notifications.
Deliverability Issues
Email deliverability is crucial for ensuring your messages reach your customers’ inboxes. If you don’t test your email sending capabilities, you may encounter issues like high bounce rates, being marked as spam, or being blocked by email service providers. These problems can severely impact your email marketing campaigns and customer communication efforts. Proper email testing can help you identify deliverability issues and address them before they harm your business.
Regulatory Consequences
In certain industries, companies are required to send timely and accurate notifications to customers, such as financial services or healthcare. Failing to meet these requirements due to untested email systems can result in regulatory consequences, including fines or legal actions. By prioritizing email testing, you can ensure compliance with industry-specific regulations and avoid potential penalties.
Conclusion
As a business manager, it’s essential to recognize the importance of thoroughly testing your email sending capabilities. Neglecting this critical aspect of your communication strategy can lead to various issues, including duplicate emails, personalization mistakes, missed notifications, deliverability problems, and regulatory consequences. By investing in proper email testing, you can ensure your messages are accurate, professional, and effective in reaching your customers. This will ultimately contribute to increased customer satisfaction and a stronger brand reputation.
Email has become a crucial communication channel for companies to interact with their customers. While this powerful tool offers numerous benefits, it also comes with certain responsibilities. Various laws and regulations govern how businesses must notify their customers about important information. In this blog post, we will explore some of the most common customer notification laws and discuss the role of email in ensuring compliance.
This article is informational. It cannot substitute for advice from a lawyer.
CAN-SPAM Act
The Controlling the Assault of Non-Solicited Pornography and Marketing (CAN-SPAM) Act is a US federal law that regulates commercial emails. While its primary focus is on marketing and promotional messages, the Act also has implications for transactional and relationship emails. Key requirements include: a. Providing a clear and conspicuous opt-out mechanism for recipients. b. Including the sender’s physical postal address in the email. c. Accurately representing the sender’s identity and email subject line.
By adhering to the CAN-SPAM Act, businesses can avoid potential fines and ensure their emails remain compliant with the law.
General Data Protection Regulation (GDPR)
The GDPR is a European Union regulation that governs data privacy and protection for EU citizens. It requires companies to obtain explicit consent from users before sending marketing emails. Additionally, the GDPR mandates that businesses must notify customers within 72 hours of becoming aware of a data breach. Failure to comply with GDPR requirements can result in significant fines.
California Consumer Privacy Act (CCPA)
The CCPA is a California state law that grants residents specific rights regarding their personal information. Under the CCPA, businesses must inform customers about their data collection practices and allow them to opt-out of the sale of their personal information. Email is an effective method for providing these notifications and ensuring compliance with the CCPA.
Health Insurance Portability and Accountability Act (HIPAA)
HIPAA is a US federal law that governs the privacy and security of protected health information (PHI). Healthcare providers, health plans, and other covered entities are required to notify individuals via email or written communication in the event of a breach of their PHI. The notification must be sent within 60 days of discovering the breach, and failure to comply with HIPAA regulations can result in hefty fines.
Financial Industry Regulations
Various financial regulations, such as the Gramm-Leach-Bliley Act (GLBA) and the Fair Credit Reporting Act (FCRA), require companies to notify customers about specific events or changes to their accounts. Examples include changes to account terms, privacy policies, or suspicious account activity. Email serves as a fast and efficient means of delivering these required notifications.
Conclusion
As a business, understanding and complying with customer notification laws is essential to protect your customers’ privacy and your company’s reputation. By leveraging email as a communication channel, you can efficiently and effectively meet the requirements of various regulations. However, it is crucial to remain up-to-date with these laws and ensure that your email practices align with the latest requirements. By doing so, you can foster trust with your customers and avoid potential legal consequences.
Email delivery testing is an essential part of ensuring your application sends emails correctly and efficiently. With Mailsac, you can take advantage of its powerful REST API to simplify your email testing process. In this blog post, we’ll show you how to use Cypress, a popular end-to-end testing framework, in combination with Mailsac for seamless email delivery testing. We’ll cover setting up the Cypress environment, running tests, and provide plenty of code samples to get you started.
Setting up the Cypress Environment
First, you’ll need to have Node.js installed on your computer. Once that’s done, follow these steps to set up Cypress:
1. Create a new directory for your project and navigate to it in the terminal. b. Run npm init to create a package.json file. c. Install Cypress by running npm install cypress. d. Add a script to your package.json file to run Cypress:
"scripts": {
  "cypress:open": "cypress open"
}
2. Configuring Cypress and Mailsac API
Next, create a cypress.json file in your project’s root directory. This file will store your Mailsac API key and other configuration options:
Replace your_mailsac_api_key with your actual Mailsac API key.
3. Writing Your First Cypress Test
Now, let’s create a test file in the cypress/integration folder. Name it email_delivery_spec.js. In this file, we’ll write a test that sends an email to a random Mailsac address and then checks whether the email was received.
// cypress/integration/email_delivery_spec.js

describe("Email Delivery Test", () => {
  it("sends an email and verifies its receipt", async () => {
      const randomEmail = `test-${Math.random().toString(36).substring(2)}@mailsac.com`;
      const testSubject = `Cypress Email Delivery Test ${Math.random().toString(36).substring(2)}`;
      const testBody = "This is a test email sent using Cypress and Mailsac.";

      // Send an email using your application's email sending method
      // ...
      // TOOD: integrate your app here!

      // Function to poll Mailsac API for received messages. It will be called
      // recursively.
      const checkEmail = async () => {
        let response = await cy.request({
          method: "GET",
          url: `https://mailsac.com/api/addresses/${randomEmail}/messages`,
          headers: {
            // Get a mailsac api key at: mailsac.com/api-keys
            "Mailsac-Key": Cypress.env("mailsac_api_key")
          }
        });
        const messages = response.body;
        const message = messages.find(msg => msg.subject === testSubject);

        if (!message) {
          return cy.wait(1000).then(() => {
            checkEmail();
          });
        }

        expect(message.from[0].address).to.equal("[email protected]");
        expect(message.inbox).to.equal(randomEmail);

        // Check email content for testBody text
        const textResponse = await cy.request(`https://mailsac.com/api/text/${randomEmail}/${msg._id}`);
        expect(textResponse.body).to.contain(testBody);

        // Clean up by deleting the received messages. This could also be done in an afterEach block.
        await Promise.all(messages.map((msg) =>
          cy.request({
            method: "DELETE",
            url: `https://mailsac.com/api/addresses/${randomEmail}/messages/${msg._id}`,
            headers: {
              "Mailsac-Key": Cypress.env("mailsac_api_key")
            }
          })
        ));
      };

      // Start polling for received messages
      await checkEmail();
    }
  );
});
Replace [email protected] with your application’s sender email address.
This will open the Cypress Test Runner, and you’ll see your email_delivery_spec.js test listed. Click on the test to run it.
Welcome to the second part of the two-part series on running selenium tests with GitHub Actions. In the first article, we outlined how to get started and how to set up your repo for Actions. In this guide, we’ll outline how to run email integration tests and pass secrets to GitHub Actions.
To start… Why would you want to test emails with live email services in the first place? Can’t you simply write to a log file or standard out? Yes… and no. Writing to log files or standard out is ok at the beginning of the application lifecycle. Building out the email send feature takes a back seat to ensure the application actually works.
But let’s say your application is almost ready for its initial release. You want to test that you can even connect to an SMTP server. Or test to ensure the right message can go to the right inbox. Testing via log files or standard out starts to get a bit limiting in that regard. Additionally, say you want to be really sure that the contents of an email you send are what you expect them to be. At this point, you’d like to simulate as much of the email delivery as possible.
You can accomplish this with a disposable email service like Mailsac.
Allow us to plug our mail service
At Mailsac we focus on the developer experience around email automation and testing. That’s why we’ve made it so you can test out the API mentioned in this guide with a free account. You can sign up here.
So let’s lay out our testing goal:
Simulate an email send with our sample application.
Let’s craft the email by driving Selenium through the form. Start by crafting a selenium test:
const chrome = require('selenium-webdriver/chrome');
const {Builder, Browser, By } = require('selenium-webdriver');
const screen = {
width: 1920,
height: 1080
};
(async function emailSendTest() {
let driver = await new Builder()
.forBrowser(Browser.CHROME)
// .setChromeOptions(new chrome.Options().headless().windowSize(screen))
.build();
try {
await driver.get('<http://localhost:3000>');
let didSendButtonRender = await driver.findElement(By.id('sendbutton')).isDisplayed()
if (!didSendButtonRender){
throw new Error(`Send button was not rendered properly.`);
}
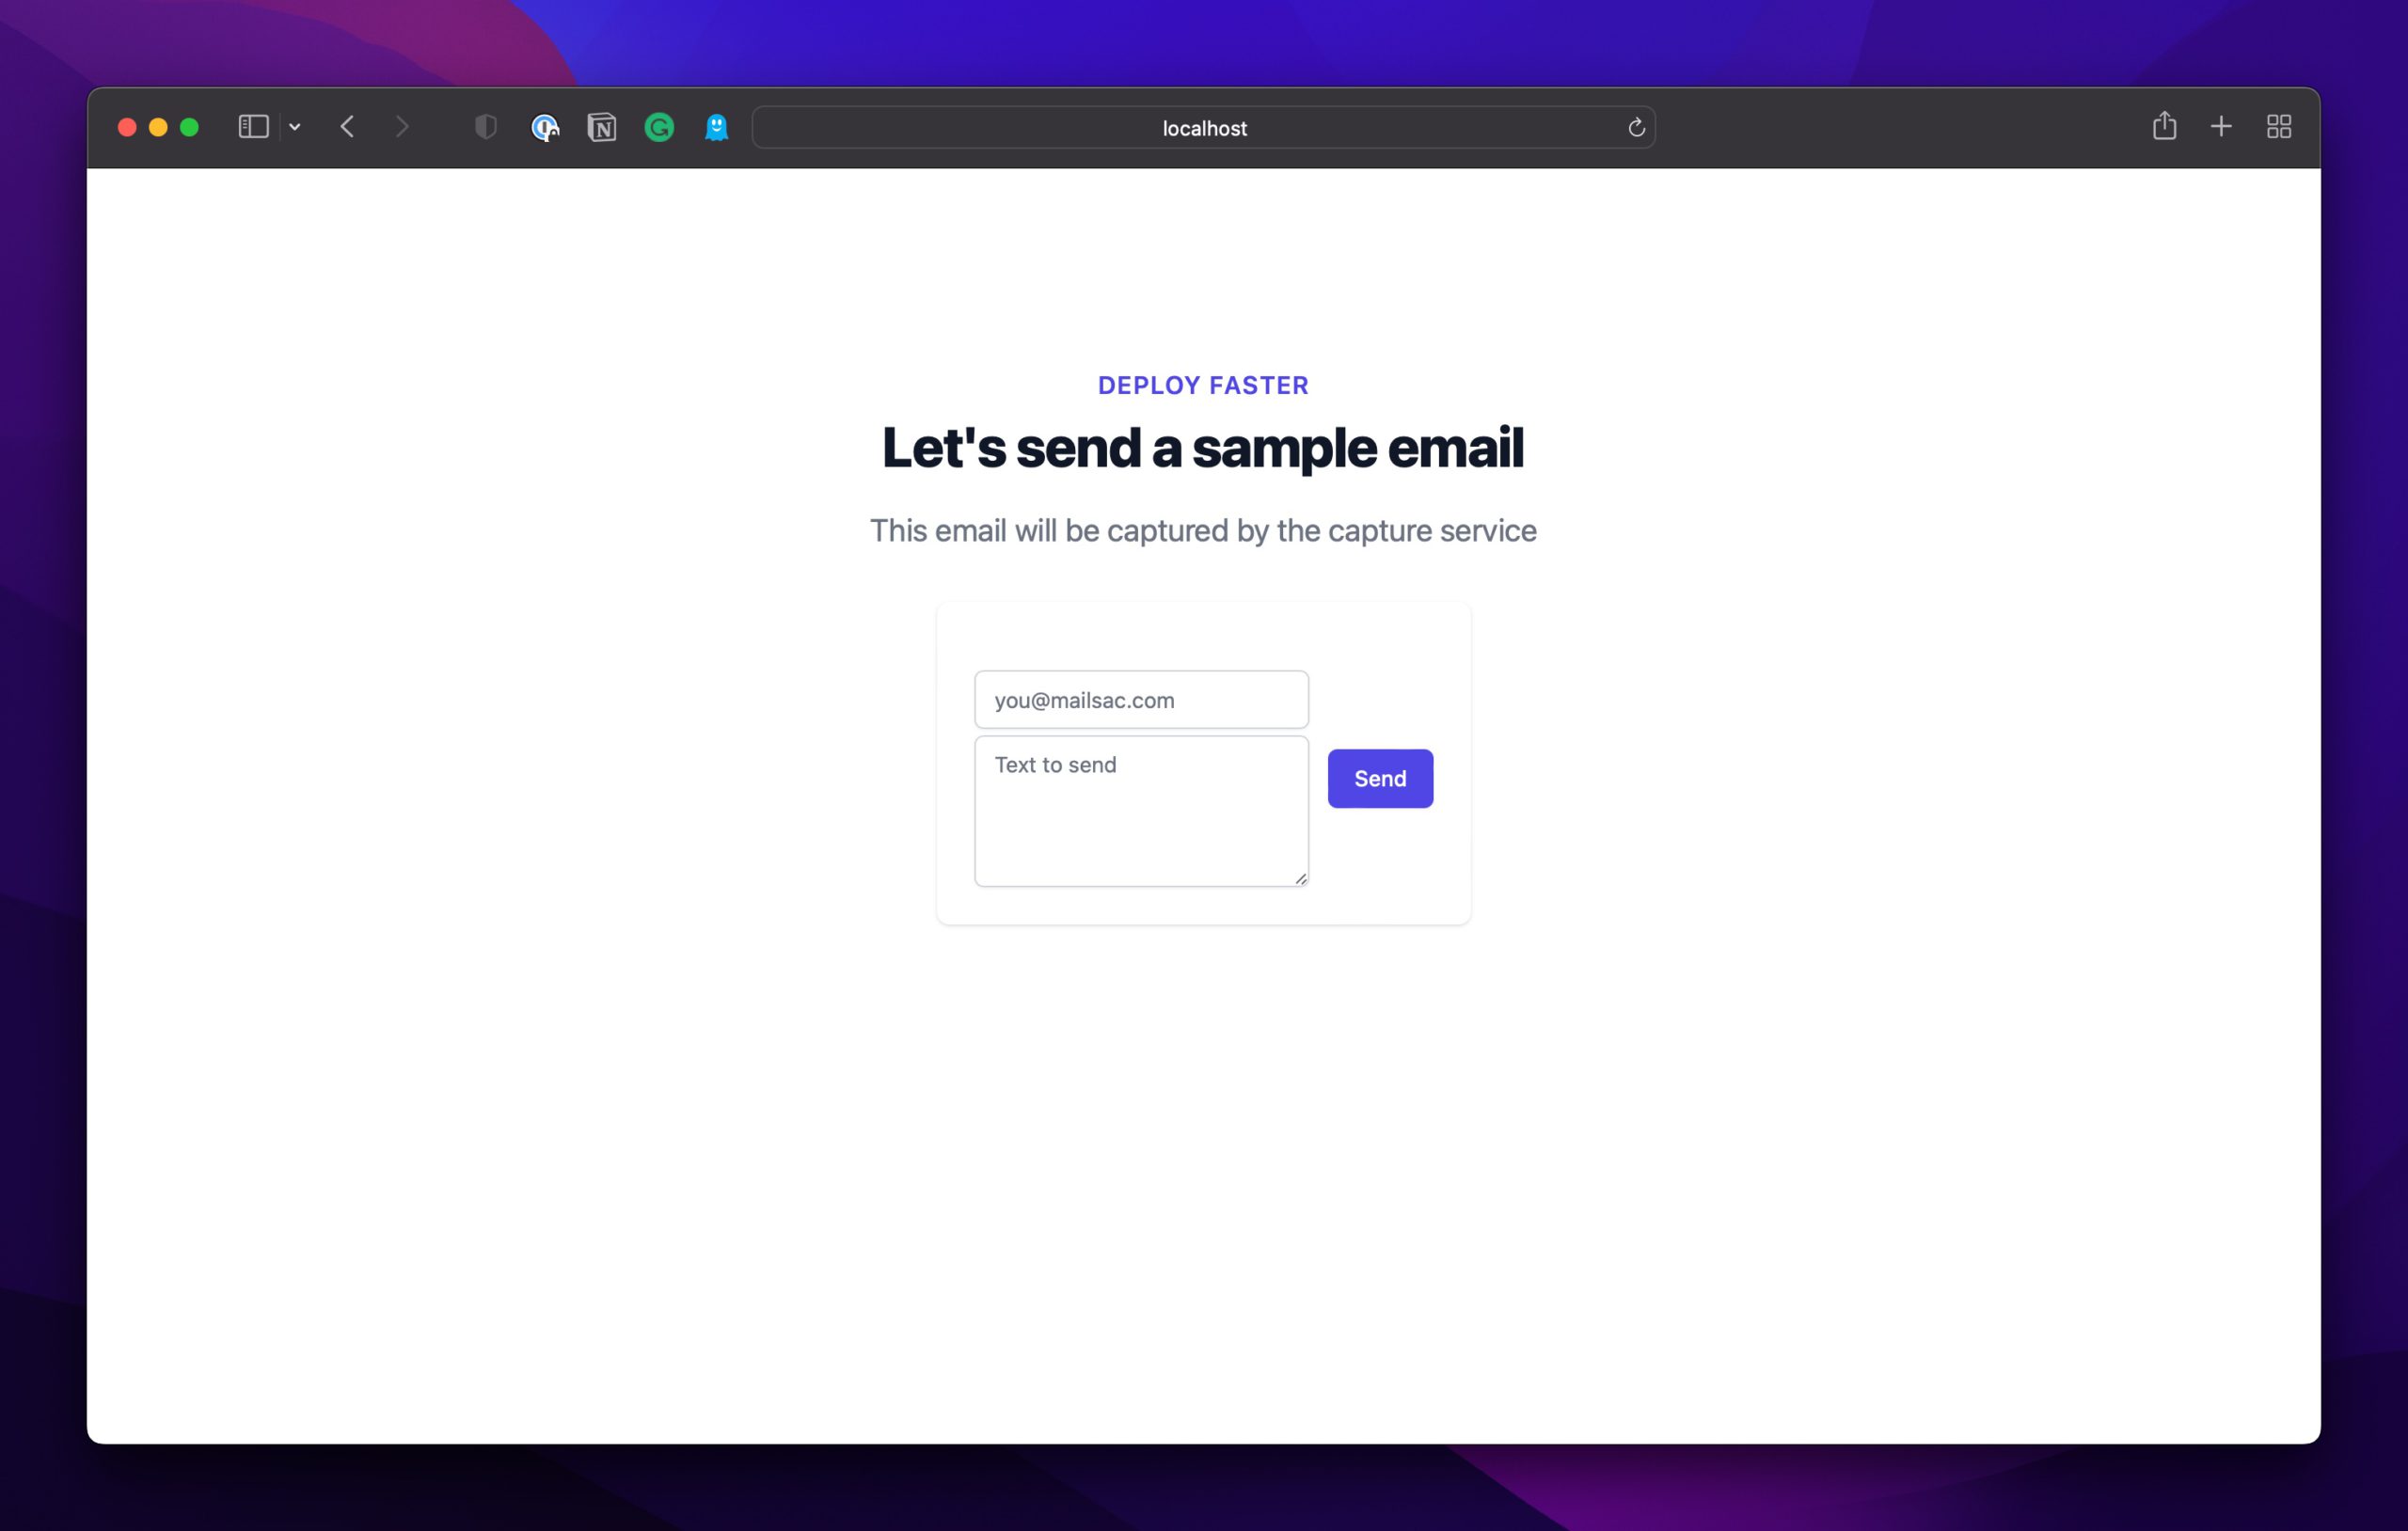
await driver.findElement(By.id('email')).sendKeys("[email protected]");
await driver.findElement(By.id('comment')).sendKeys("This is some text from our Selenium test.");
await driver.findElement(By.id('sendbutton')).click();
} finally {
await driver.quit();
}
})();
tests/email-send.js
Note: I left the headless option off for this first test. You’ll want to turn the headless option back on for the test run via our continuous integration environment.
Note that you’ll need to install a couple of dev packages to get this to work: dotenv and superagent. dotenv is needed in this instance since our tests don’t load the entire next framework and as such, we need a method to read your .env file. superagent is a small client-side HTTP request library for doing quick HTTP calls like the one we’re about to do.
So go ahead and add them to your developer dependencies:
npm install --save-dev dotenv superagent
And add our own text comparison to Mailsac’s sample code:
require('dotenv').config()

const superagent = require('superagent')
const mailsac_api_key = process.env.MAILSAC_API_KEY
const expected_message = 'This is some text from our Selenium test.'

superagent
  .get('<https://mailsac.com/api/addresses/[email protected]/messages>')
  .set('Mailsac-Key', mailsac_api_key)
  .then((messages) => {
      const messageId = messages.body[0]._id
      superagent
          .get('<https://mailsac.com/api/text/[email protected]/>' + messageId)
          .set('Mailsac-Key', mailsac_api_key)
              .then((messageText) => {
                  if (messageText.text !== expected_message)  {
                    throw new Error(`Message '${messageText.text}' does not match expected text '${expected_message}'`)
                  }
                  else{
                    console.log("Message comparison passed");
                  }
              })
  })
  .catch(err => {
      console.log(err.message)
			process.exit(-1)
  })
tests/email-read.js
Running the test locally should result in a passing test:
Of course, if we’ll run these tests many times we’ll also want to ensure that we delete the email contents after our successful read. Let’s add a cleanup step to our read test:
require('dotenv').config()

const superagent = require('superagent')
const mailsac_api_key = process.env.MAILSAC_API_KEY;
const expected_message = 'This is some text from our Selenium test.';
const testInbox = '[email protected]';

superagent
.get(`https://mailsac.com/api/addresses/${testInbox}/messages`)
  .set('Mailsac-Key', mailsac_api_key)
  .then((messages) => {
      const messageId = messages.body[0]._id
      superagent
          .get(`https://mailsac.com/api/text/${testInbox}/` + messageId)
          .set('Mailsac-Key', mailsac_api_key)
              .then((messageText) => {
                  if (messageText.text !== expected_message)  {
                    throw new Error(`Message to delete '${messageText.text}' does not match expected text '${expected_message}'`)
                  }
                  else{
                    console.log("API Read Op: Message comparison passed");
                    superagent
                    .delete(`https://mailsac.com/api/addresses/${testInbox}/messages/${messageId}`)
                    .set('Mailsac-Key', mailsac_api_key)
                    .then((messageResponse) => {
                        console.log(`API Deletion Op: ${messageResponse.body.message}`)
                    })
                  }
              })
  })
  .catch(err => {
      console.log(err.message)
      process.exit(-1)
  })
tests/email-read.js
Let’s add it to a test script and our workflow YAML file:
Note that we added a run mail-tests script to our end-to-end testing.
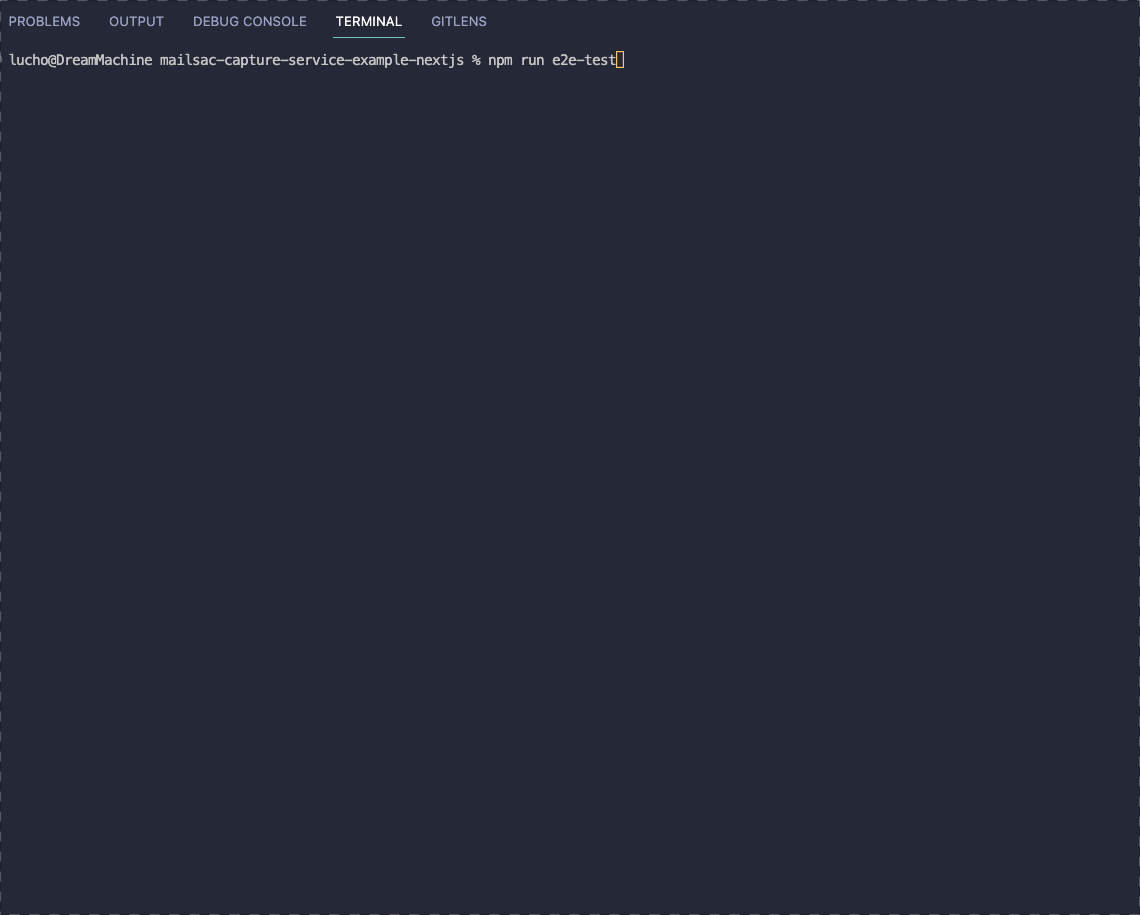
Try your end-to-end script locally to ensure it works:
GitHub Action Test
Now that you have a working test on your local workstation, it’s time to push it up so GitHub Actions can start running your tests. If you haven’t already, read through the first article to catch up on GitHub Actions configuration and initialization.
As a reminder, this is our main.yml workflow file:
on: [push]

jobs:
  tests:
    runs-on: ubuntu-latest
    name: Run Selenium Tests
    steps:
    - name: Start selenoid
      uses: Xotabu4/selenoid-github-action@v2

    - uses: actions/checkout@v1
    - run: npm ci

    - name: Run end to end tests
      run: npm run e2e-test

    - name: Run external login test
      run: npm run external-tests
.github/workflows/main.yml
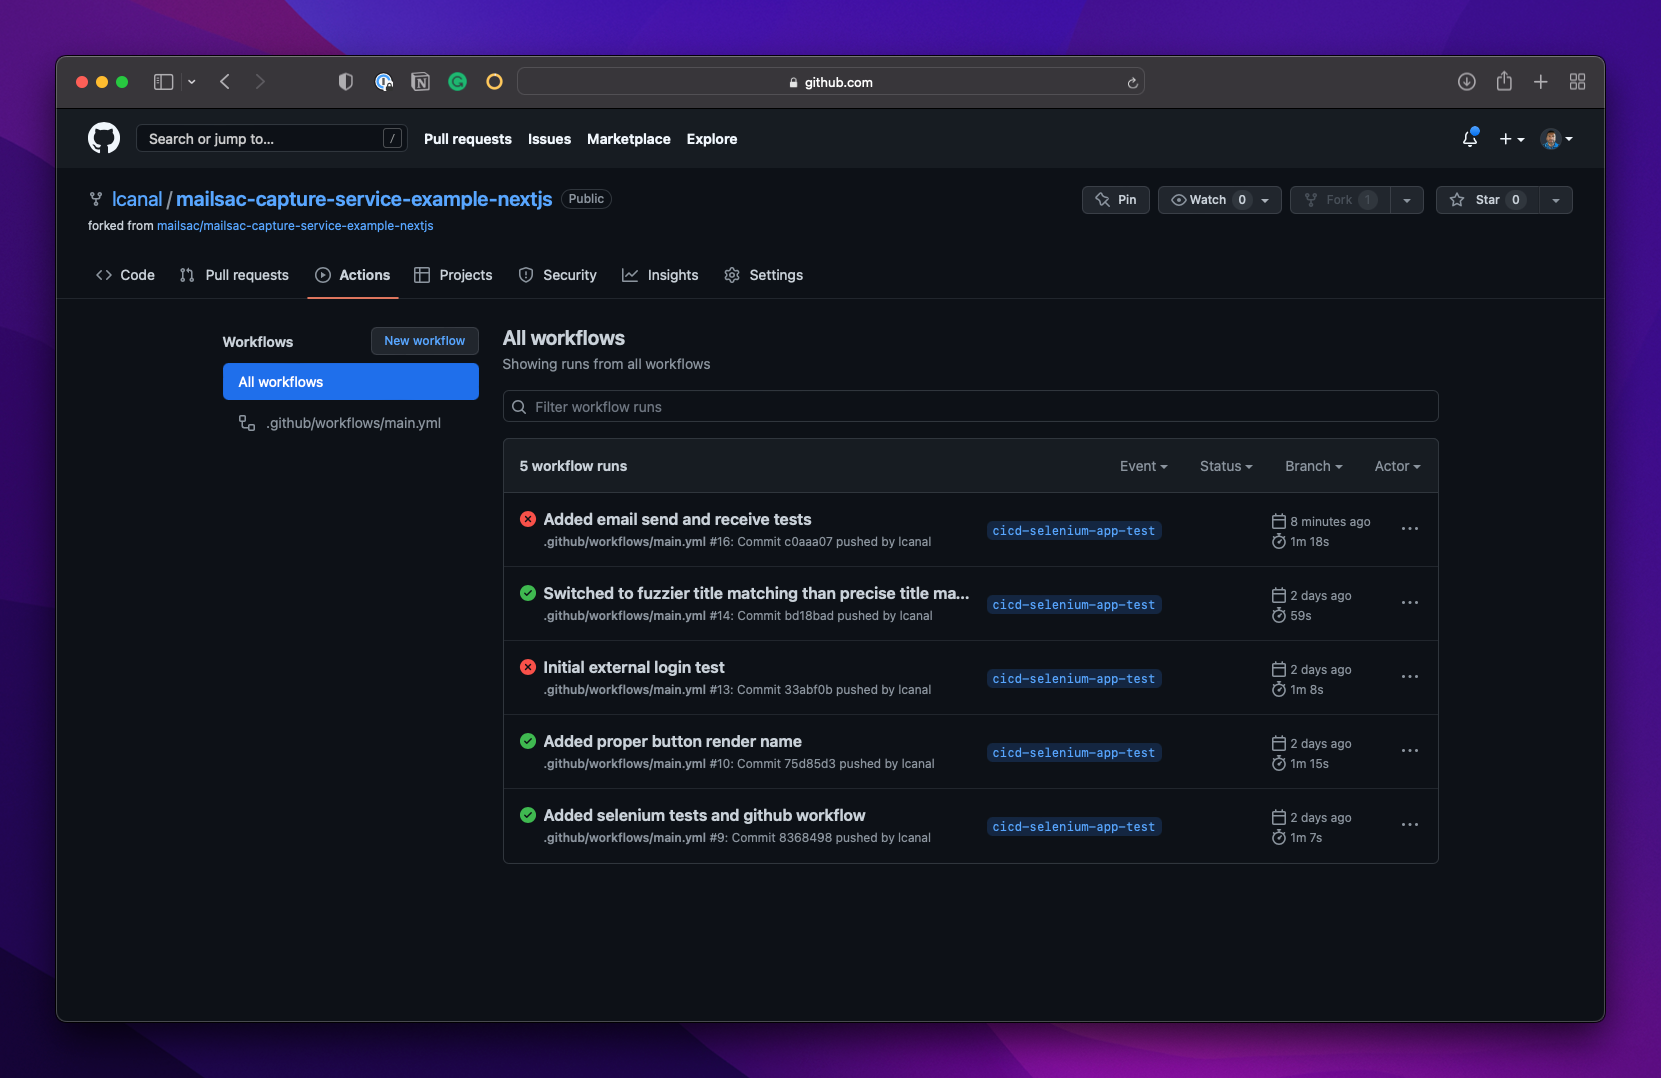
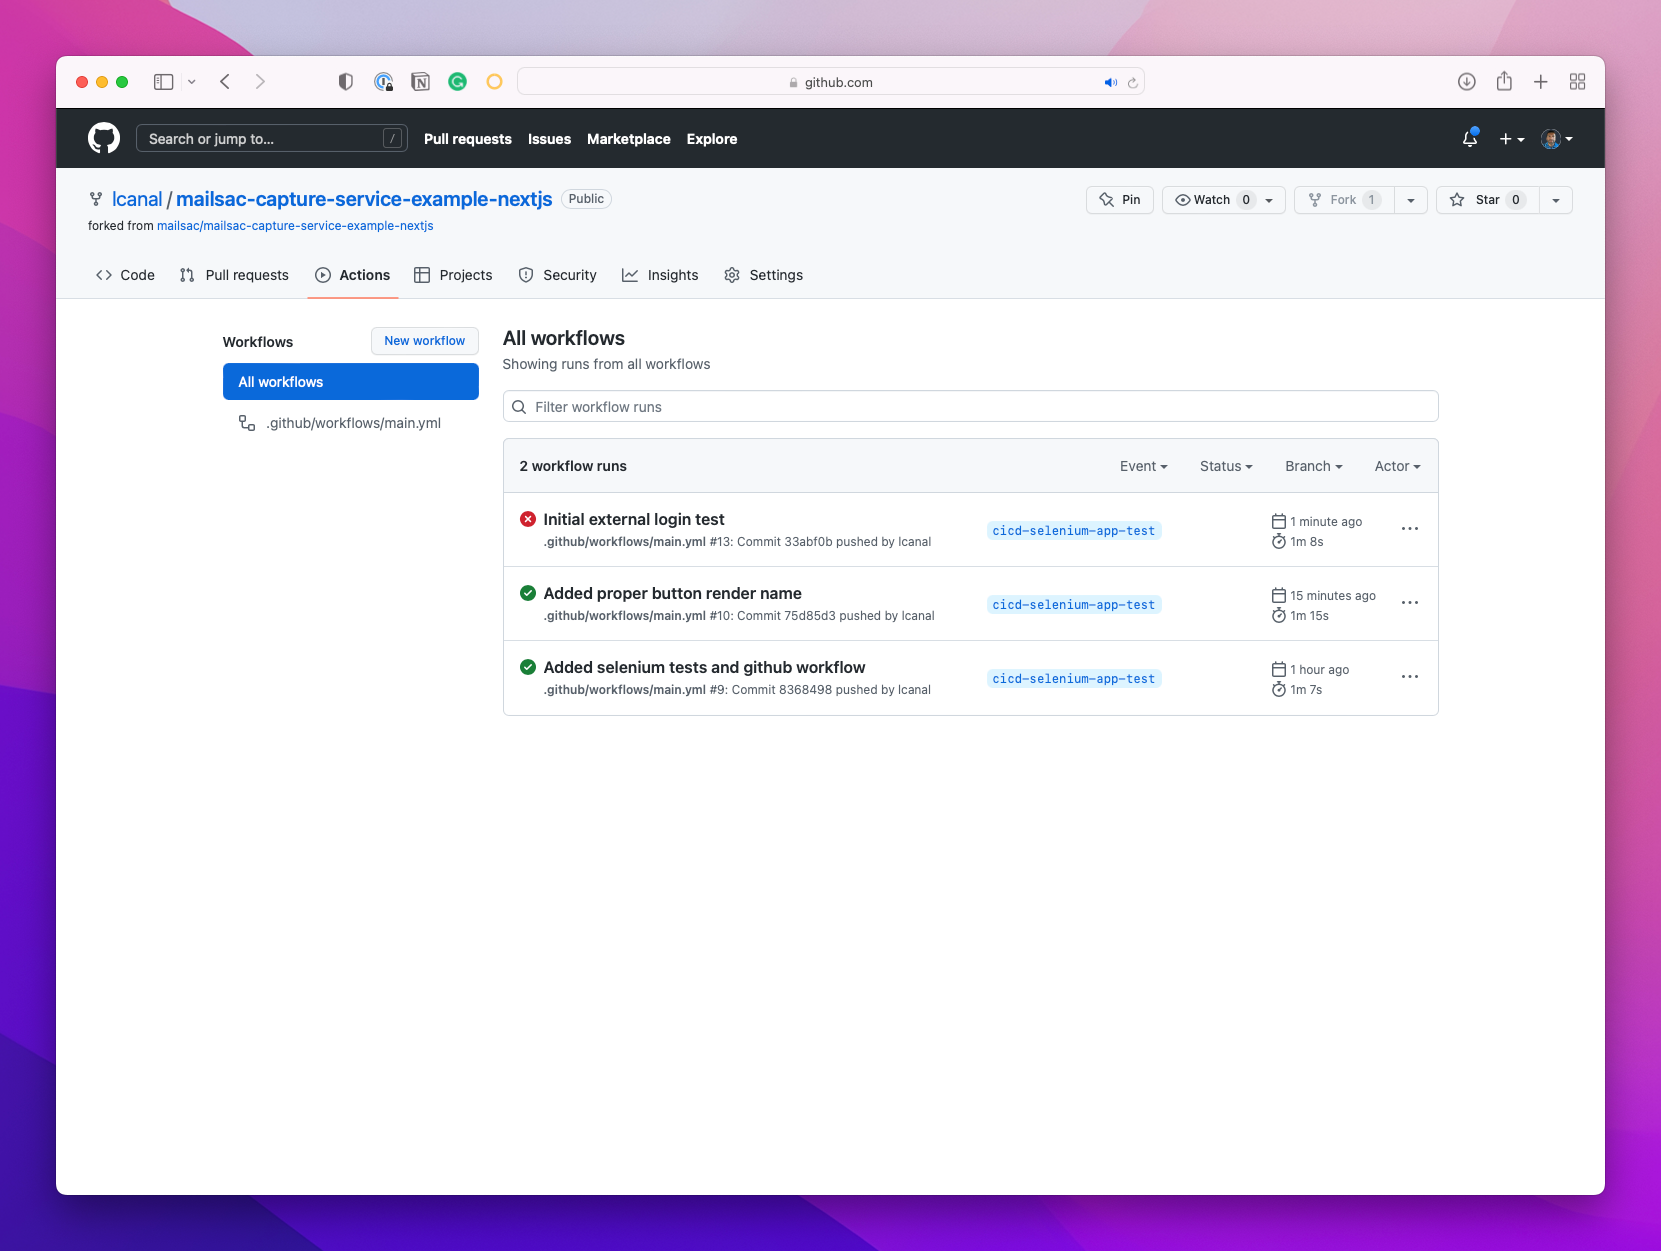
With all that said, let’s try and see if this email test sends an email on GitHub.
Do a git push and check your results on GitHub:
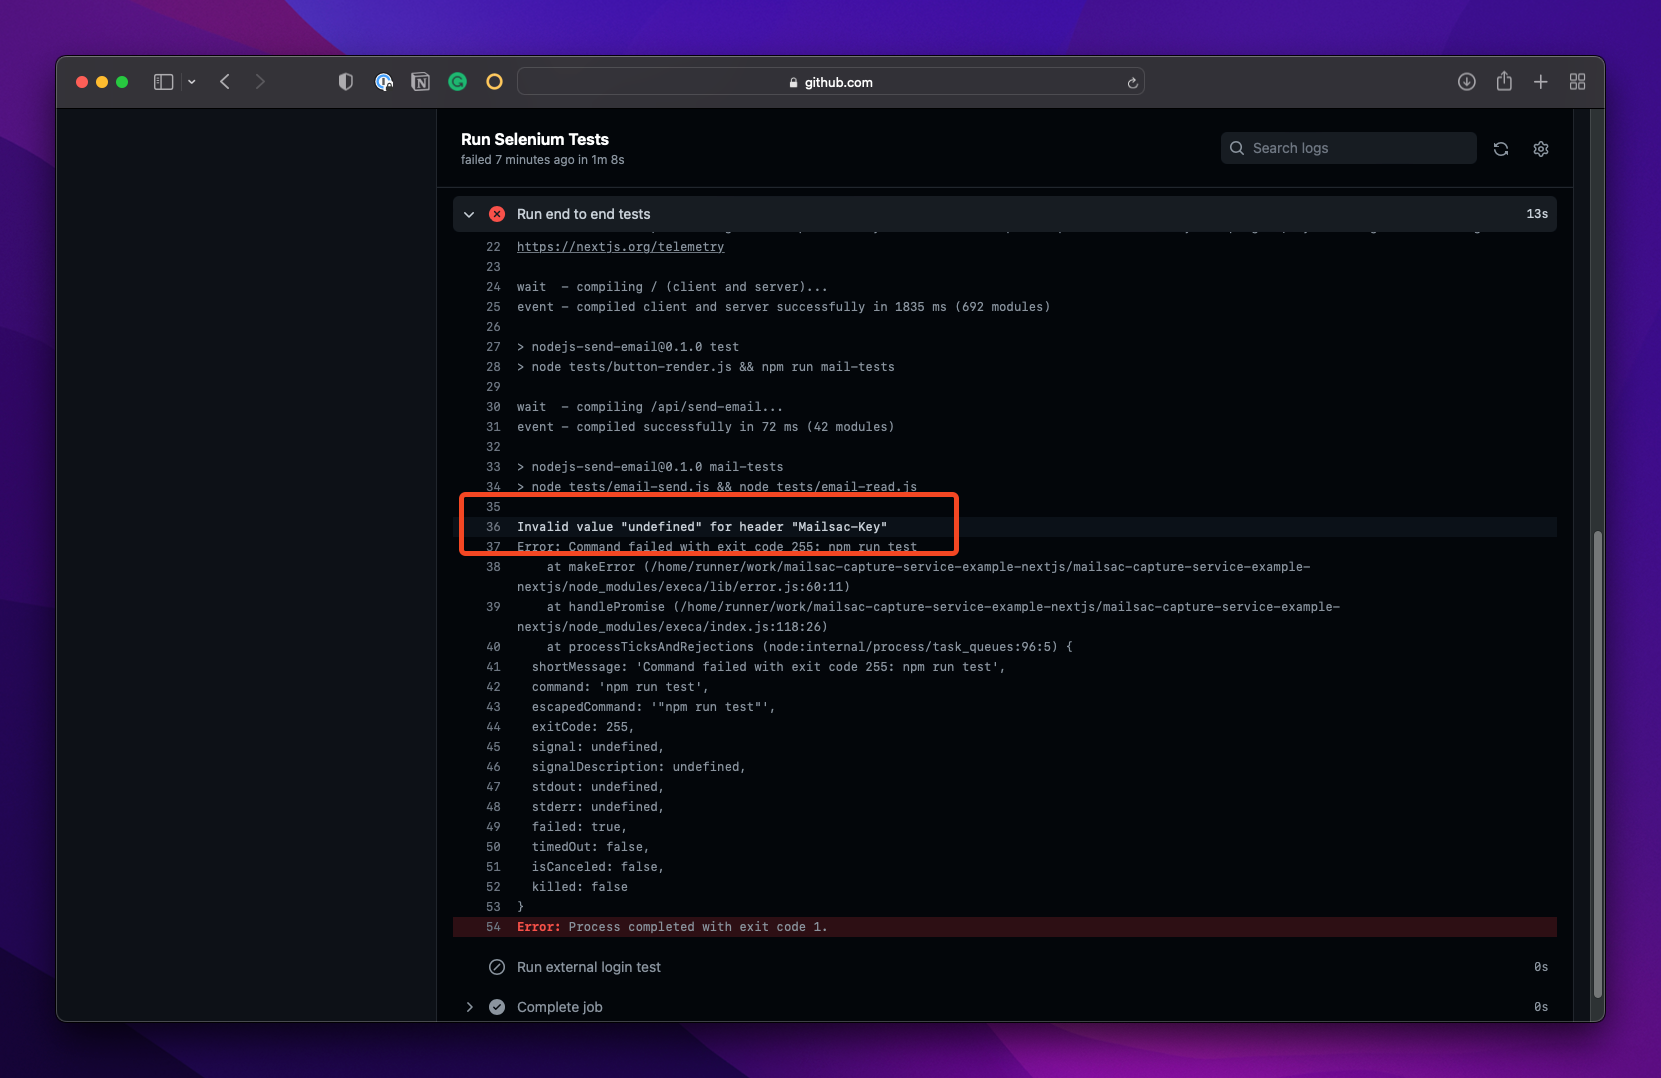
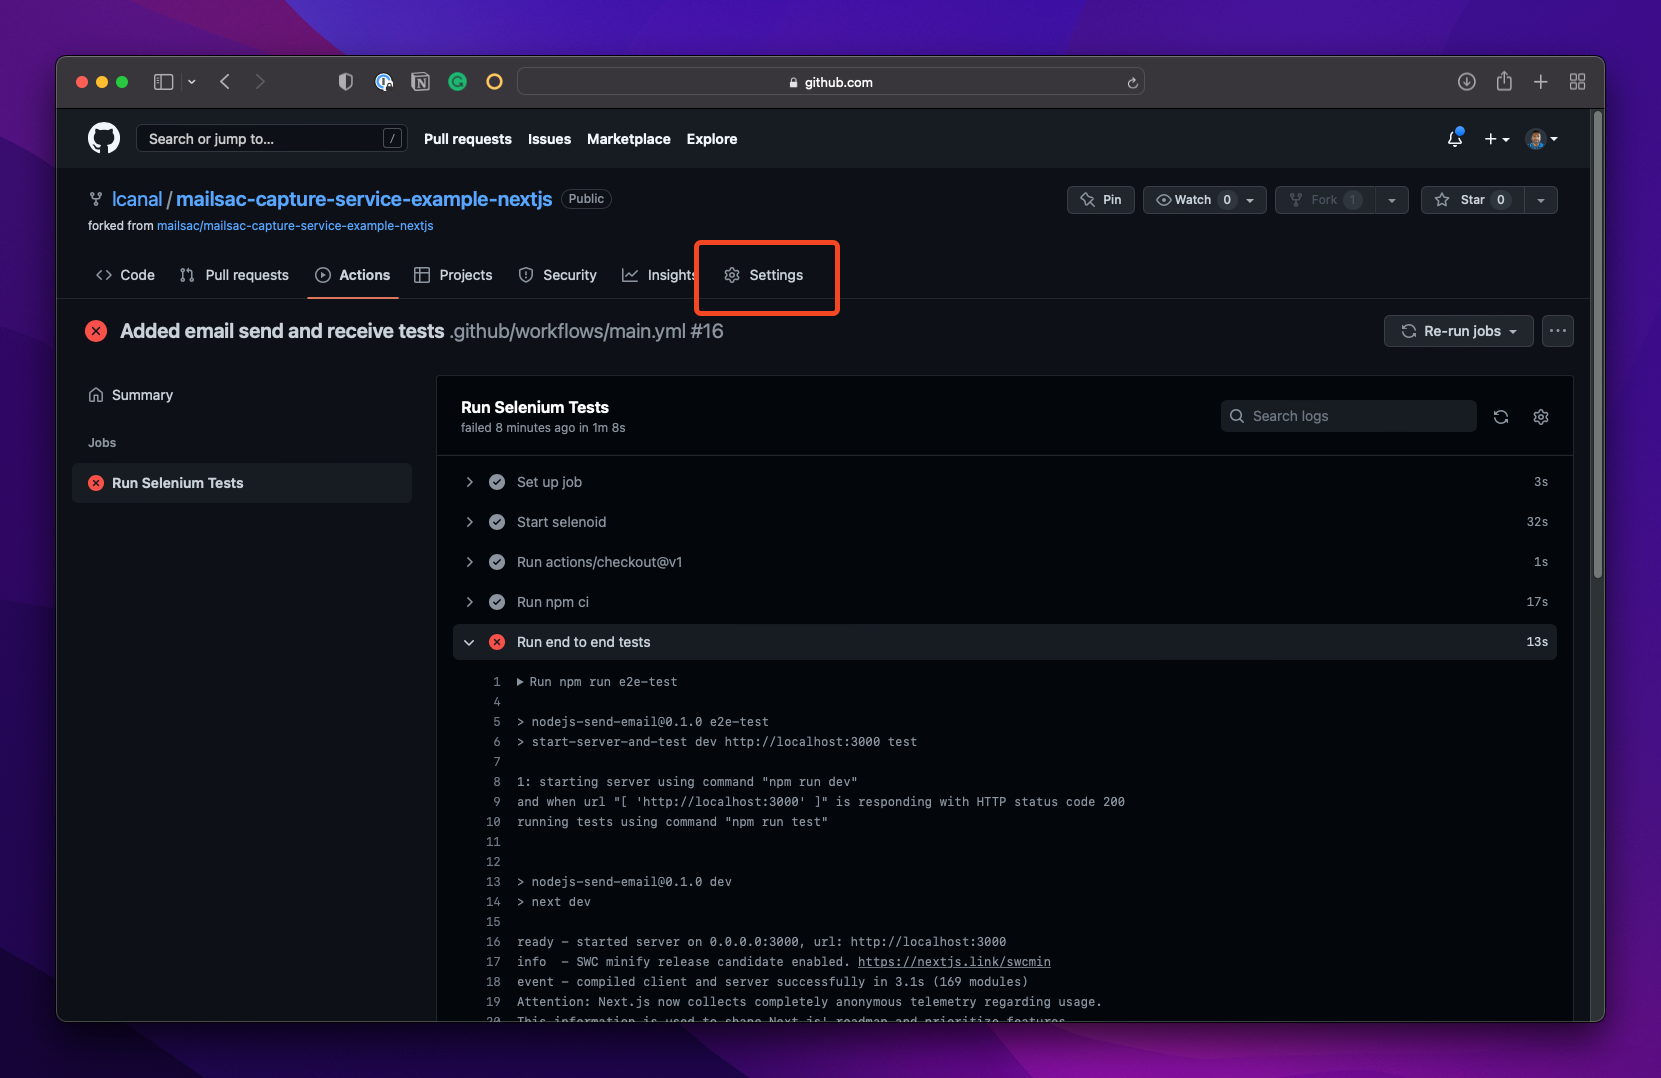
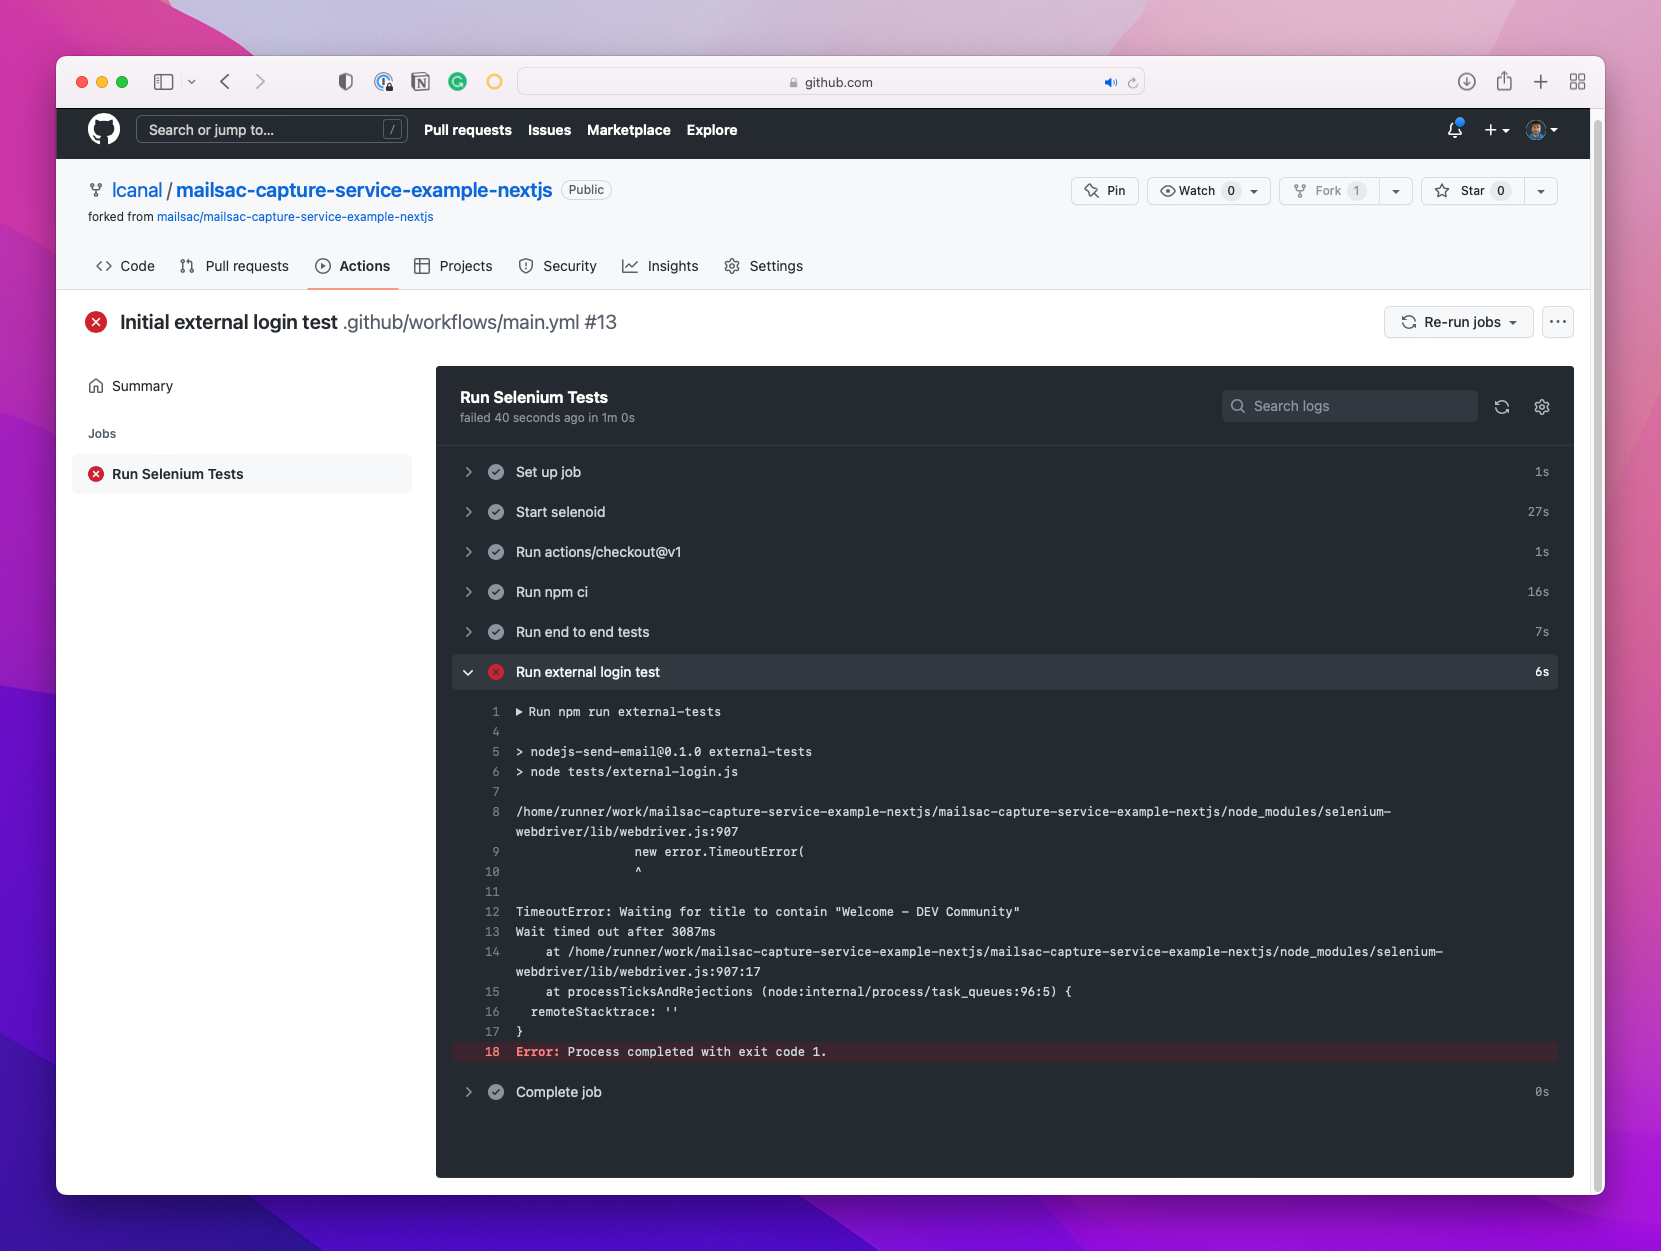
Looks like a failure. On closer inspection:
Ah, that’s right! We forgot to set our API keys at the GitHub level. Let’s go ahead and do that.
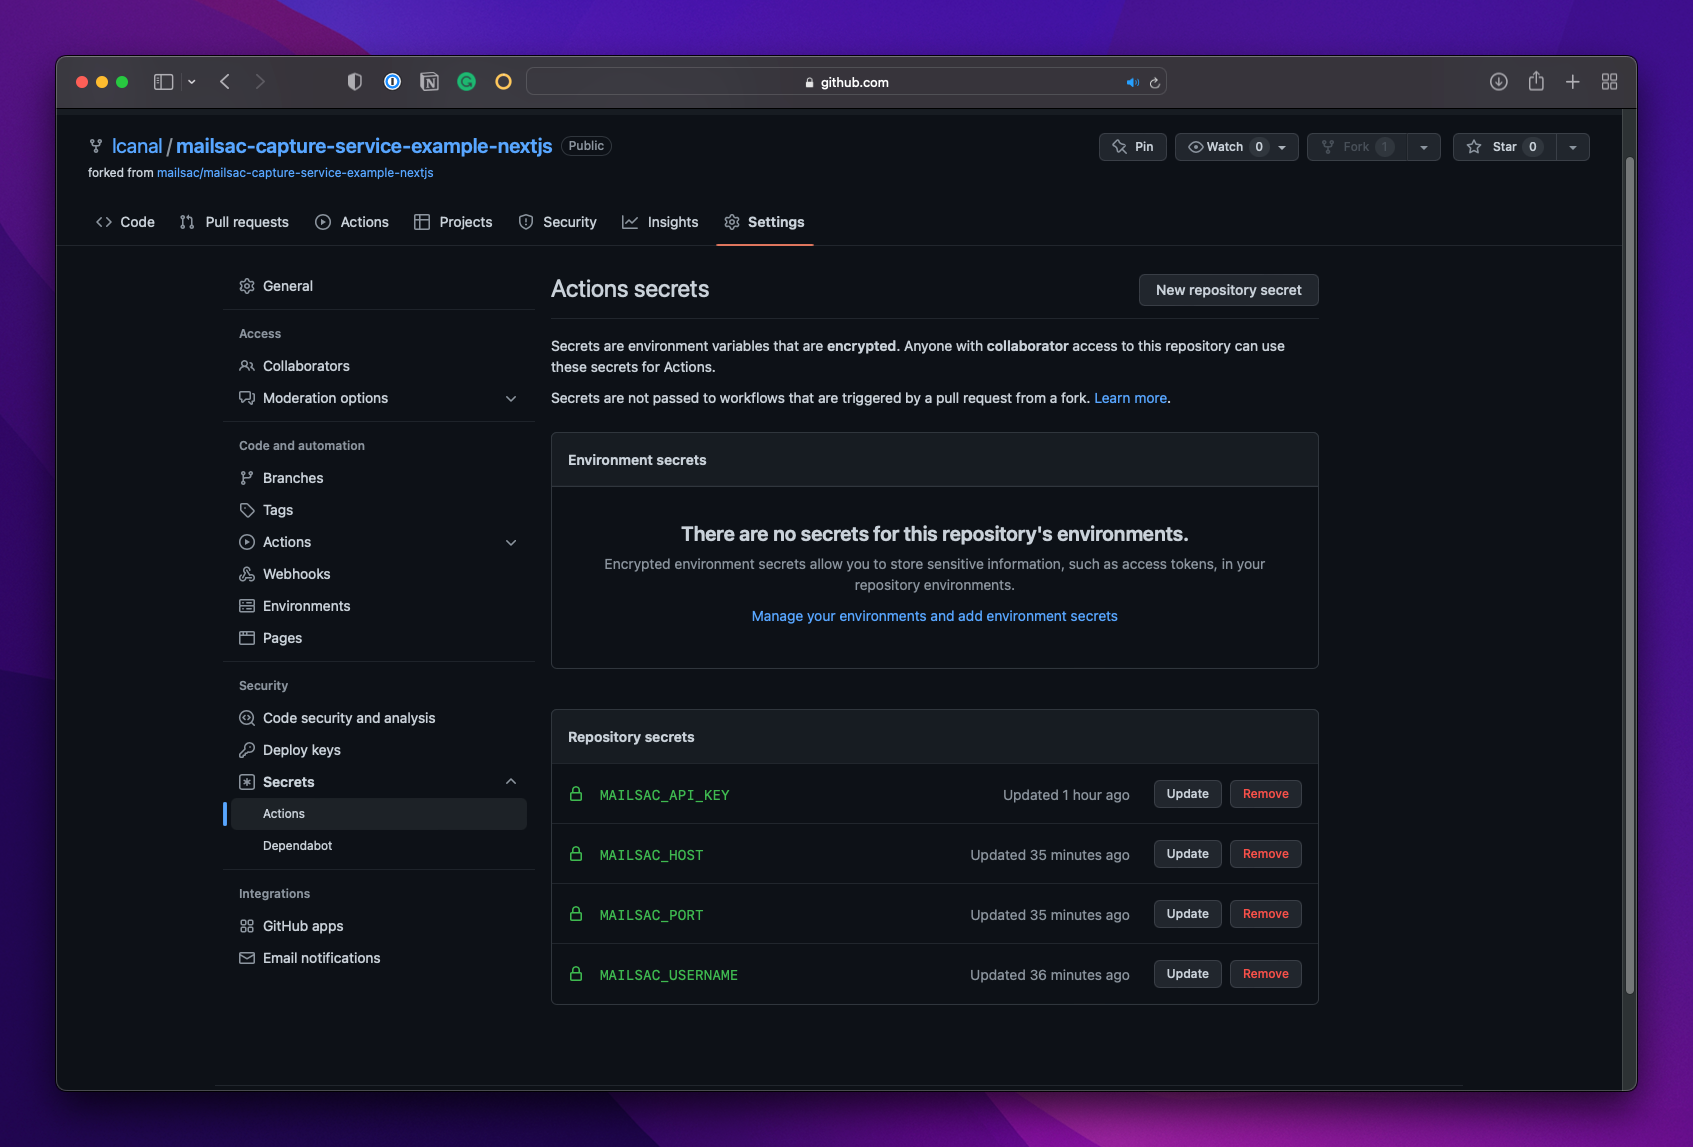
GitHub Actions Secrets
You can find it under Settings in your repo:
Then under Secrets → Actions click New repository secret
Add each secret that will be needed:
Finally, ensure you add it to the workflow file:
- name: Run end to end tests
      run: npm run e2e-test
      env:
        MAILSAC_API_KEY:  ${{secrets.MAILSAC_API_KEY}}
        MAILSAC_USERNAME: ${{ secrets.MAILSAC_USERNAME }}
        MAILSAC_HOST:     ${{ secrets.MAILSAC_HOST }}
        MAILSAC_PORT:     ${{ secrets.MAILSAC_PORT }}
.github/workflows/main.yml
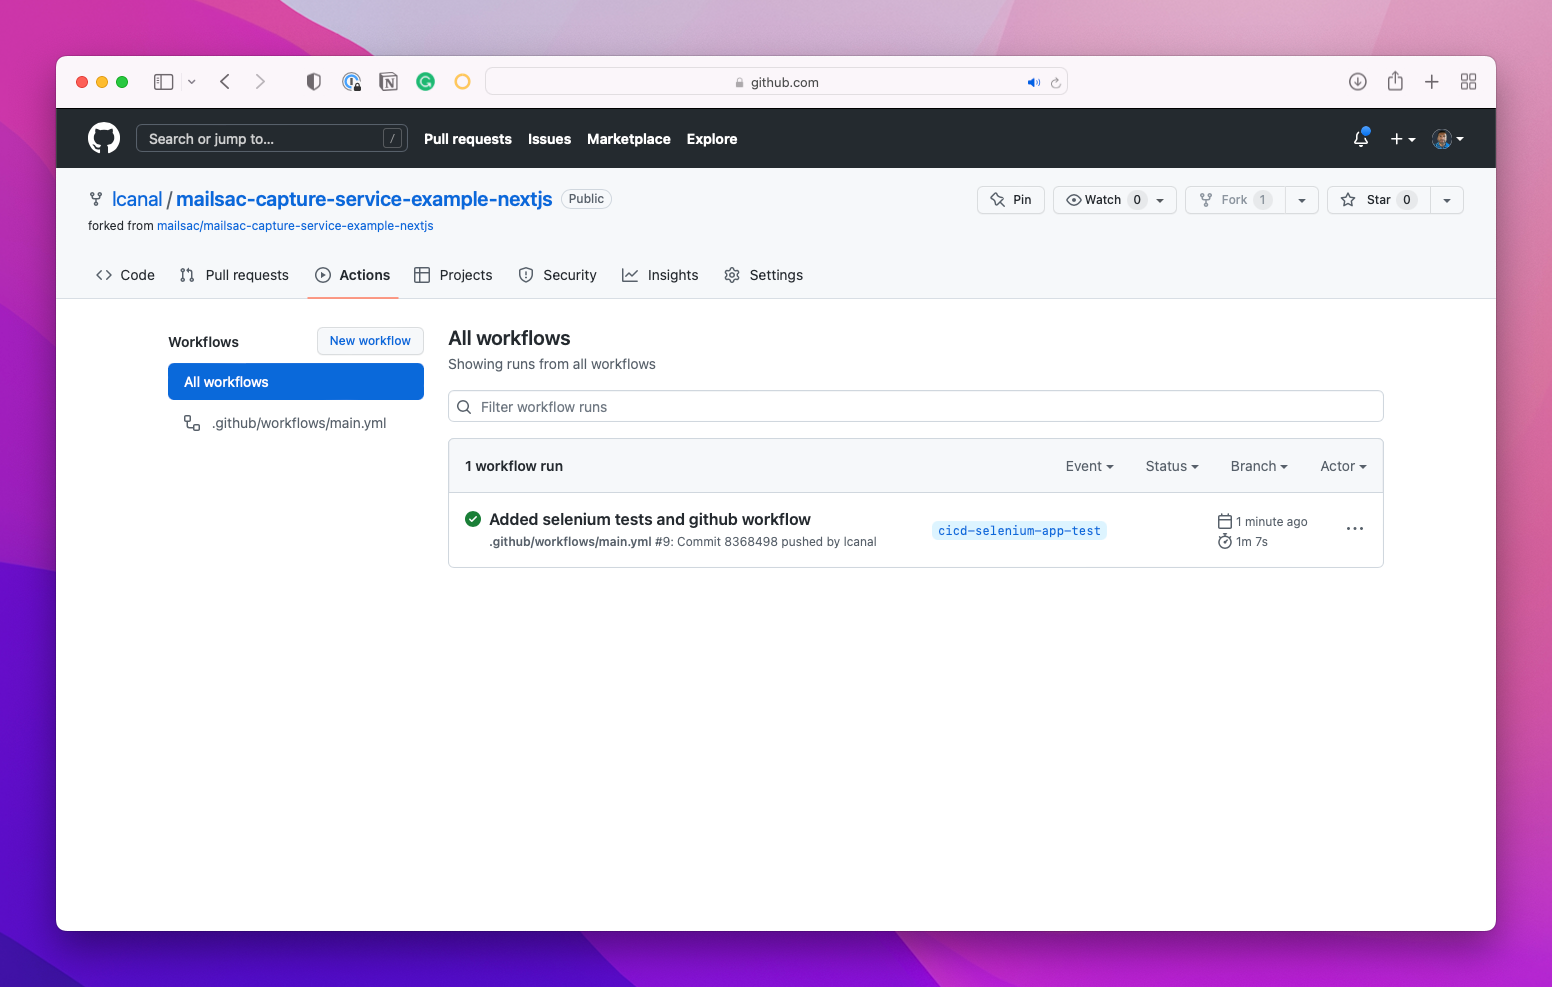
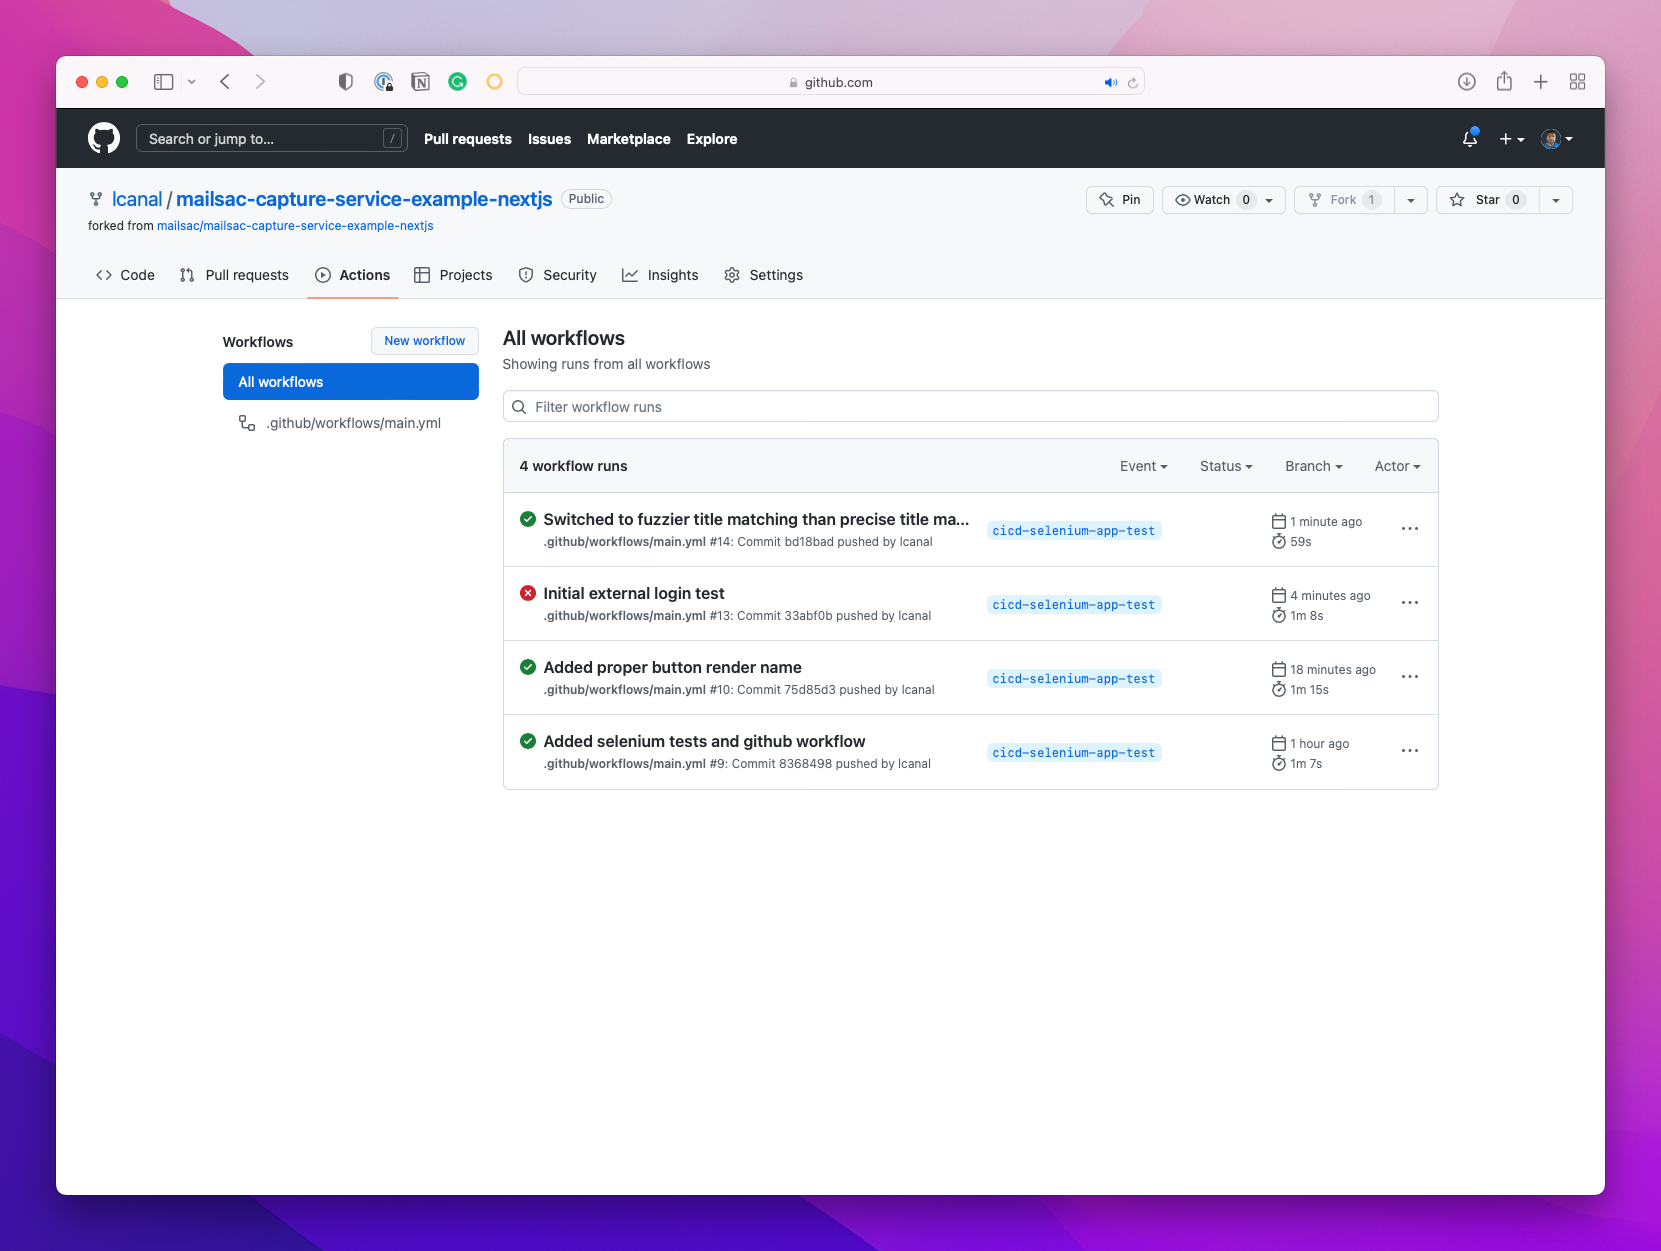
Do a git commit and git push and see the results on GitHub:
Success! You can check the details to ensure the API read and write options fire fired off:
Conclusion
GitHub Actions is a powerful CI/CD tool and we have only scratched the surface of its capabilities with Selenium. We’ve also shown the power of email testing and how you can ensure the contents of every email are intentional.
We hope you enjoyed the guide, and hope to hear from you on our forums or follow our other content on LinkedIn.
Browser automation is an invaluable tool. At a personal level, you can use it to automate repetitive tasks online. But browser automation can deliver so much more. At its best, it can run tasks with consistent results. Tasks that need lots of manual execution and complexity. Tasks like checking button placement, evaluating user login, and registration workflows. And in our modern era, we have our pick of browser automation frameworks.
We’ve covered browser automation before, but in this guide, we’ll do a deep dive into one of those frameworks. Additionally, we’ll cover using those testing frameworks alongside a specific continuous integration application.
In this guide we’ll walk through three testing scenarios using Selenium and GitHub Actions:
Check if a button rendered
Test a login workflow
Ensure the contents of a sent email
We’ll use our sample application to make our examples concrete, informative, and useful.
First, let’s talk about what you need to enable GitHub Actions.
Getting started with GitHub Actions
First, if you’d like a primer on GitHub Actions their page is a great resource. To summarize, it’s an easy way to run tasks when someone takes an “action” against your repo.
Actions can be:
Pull request merges
Commits
Repo pushes
GitHub takes your action and runs a task like integration tests, unit tests, etc. All you need to do is create a .github/workflows/main.yml file. Note: Running tasks is just one of the many possibilities for GitHub Actions. You can encompass entire workflows and even produce packages.
We’ll introduce more details further along the guide. For now, you can start by adding an empty file at:
We’ll use this repo to walk through the examples mentioned in the intro. These sample scenarios are not meant to be comprehensive, of course. They’re meant to kick-start your journey with GitHub Actions.
To start, you’ll need to run the standard node installation and run the command:
npm install
npm run dev
Navigate to http://localhost:3000 and see our application in action:
With the preliminary steps done, on to the tests.
First Selenium Test: Check if the button rendered
Let’s start with the simplest test, a button render assertion test.
For this first section, we will:
Add the node packages required to test
Add our selenium test
Add testing scripts to our package.json so that GitHub Actions can call our tests
Add a simple Github Actions workflow file
Let’s start by adding a new branch (or you can fork the repo if you’d like):
We’ll need to add selenium and a start-server-and-test package. start-server-and-test starts our application. Then it calls our selenium tests so they can run against our running application.
start-server-and-test is one of our most straightforward ways to add live server testing capabilities. If you need more flexible frameworks, you may want to investigate mocha or cypress.
We’ll just focus on the core GitHub actions and selenium testing in this guide.
Selenium Test: Button Render
On to the test itself.
Let’s create a test under tests/button-render.js using selenium and headless chrome:
const chrome = require('selenium-webdriver/chrome');
const {Builder, Browser, By } = require('selenium-webdriver');

const screen = {
  width: 1920,
  height: 1080
};

(async function buttonRender() {
  let driver = await new Builder()
    .forBrowser(Browser.CHROME)
    .setChromeOptions(new chrome.Options().headless().windowSize(screen))
    .build();

  try {
    await driver.get('<http://localhost:3000>');
    let didSendButtonRender = await driver.findElement(By.id('sendbutton')).isDisplayed()
    if (!didSendButtonRender){
      throw new Error(`Send button was not rendered properly.`);
    }

  } finally {
    await driver.quit();
  }
})();
Now let’s add the workflow main.yml file to the repo. This is the main file that kicks off a GitHub Action workflow. To keep things simple, we’ll execute our actions based on when a comitter pushes code. You can find the full list over at GitHub’s documentation pages.
on: [push]

jobs:
  tests:
    runs-on: ubuntu-latest
    name: Run Selenium Tests
    steps:
    - name: Start selenoid
      uses: Xotabu4/selenoid-github-action@v2

    - uses: actions/checkout@v1
    - run: npm ci

    - name: Run end to end tests
      run: npm run e2e-test
.github/workflows/main.yml
For our project, we’ll use solenoid-github-action, a GitHub Action that starts a selenium grid instance in a docker container. Solenoid is a golang reimplementation of Selenium. It makes it very easy to integrate with any continuous integration/deployment environment.
In the last portion of the file, the npm run e2e-test section kicks off the end-to-end test that starts our server and runs the selenium tests.
That’s it! Before you commit and push your code, try running it locally:
npm run e2e-test
The test should pass in your local environment. If it fails due to chrome driver issues you can find a full guide on browser driver installations here.
Head over to your repo on GitHub and under the Actions tab you should now see a selenium test run
You can drill down and see where our specific tests ran
Congrats! That completes our first successful test using selenium and GitHub actions. Let’s move on to something a bit more useful.
Second Selenium Test: Open and login into a web app
Let’s expand on our tests a bit. Since we’re aiming for simplicity in this guide, I won’t add a whole authentication workflow to our application. Instead, let’s focus on an existing website and attempt (and fail) to log in.