Many email services including Gmail, iCloud and Fastmail support stripping the + plus symbol and everything after it in the local-part of the address (everything before the @ symbol).
Plus-addressing has long been a useful feature to segment user accounts across services. At Mailsac we offer a variety of disposable email and forwarding utilities that are designed for software QA engineers and developers. Things like forwarding all messages in a domain to a single address, or automatically routing email to webhooks or slack, are really easy – may not even require DNS setup.
Tech news has recently been full of CVEs related to a popular JVM logging library named Log4J.
Mailsac services do rely on JVM languages, including Java. This extends through the entire stack, custom apps, self-hosted open source software, internal and external, infrastructure, proxies, and scripts.
The Mailsac Team is small yet mighty, with decades of experience taking security seriously. We follow best practices for infrastructure-as-code, patching, testing, network isolation, backups, restoration, and principle of least access access. Large enterprises including banks and government agencies trust Mailsac for disposable email testing. We provide exceptionally fast and predictable REST and Web Socket APIs with an excellent uptime record.
Mailsac has support for multiple users under the same account, so you can keep disposable email testing private within your company.
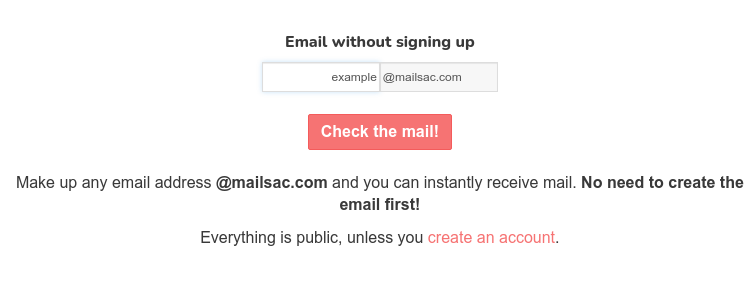
It’s free to test email immediately – no payment details required. You can send email to any address @mailsac.com and confirm delivery in seconds without even logging in. Start now at mailsac.com.
dracula is a high performance, low latency, low resource counting server with auto-expiration.
The Mailsac engineering team recently open sourced our internal throttling service, dracula, under an open source license. Check it out on Github. In the repo we prebuild server and CLI binaries for mac and linux, and provide a client library for Go.
Dracula has performed extremely well in AWS on ARM64 in production for us. It handles thousands of requests per second without noticeable CPU spikes, while maintaining low memory.
In this blog post we’re going to give an overview of why it was necessary, explain how it works, and describe dracula’s limitations.
Why we made it
For the past few years Mailsac tracked throttling in a PostgreSQL unlogged table. By using an unlogged table we didn’t have to worry about lots of disk writes, nor the safety provided by having the write-ahead-log. Throttling records are only kept for a few minutes. We figured if Postgres was rebooting, losing throttling records from the past minutes would be the least of our worries.
In the months leading up to replacing this unlogged table with dracula we began having performance bottlenecks. Mailsac is experiencing fast growth in the past few years. Heavy sustained inbound mail was resulting in big CPU time while Postgres vacuumed the throttling tables. The throttling table started eating too many CPU credits in AWS RDS – credits the we needed for more important stuff like processing emails.
We needed a better throttling solution. One that could independently protect inbound mail processing and REST API services. Postgres was also the primary data store for parsed emails. The Postgres-based solution was a multi-tiered approach to throttling – especially against bad actors – and helped our website and REST API snappy, even when receiving a lot of mail from questionable sources. The throttling layer also caches customer data so we can filter out the paying users from unknown users. Separating this layer from the primary data store would help them scale independently.
Can Redis do it?
So it was time to add a dedicated throttle cache. We reached for Redis, the beloved data structure server.
We were surprised to find our use case – counting quickly-expiring entries – is not something Redis does very well.
Redis can count items in a hash or list. Redis can return keys matching a pattern. Redis can expire keys. But it can’t expire list or hash item entries. And Redis can’t count the number of keys matching a pattern – it can only return those keys which you count yourself.
What we needed Redis to do was count items matching a pattern while also automatically expiring old entries. Since Redis couldn’t do this combination of things, we looked elsewhere.
Other utility services seemed too heavy and full-of-features for our needs. We could have stood up a separate Postgres instance, used MongoDB, Elasticache, or Prometheus. The team has experience running all these services. But the team is also aware that the more features and knobs a service has, the more context is needed to debug it – the more expertise to understand its nuances, the more risk you’ll actually use additional features, and the more risk you’ll be slow responding to issues under heavy load.
All we wanted to do was put some values in a store, have them expired automatically, and frequently count them. We’d need application level logic to do at least some of this, so we made a service for it – dracula. Please check it out and give it a try!
How it works under the hood
Dracula is a server where you can put entries, count the entries, and have the entries automatically expire.
The dracula packet layout is as follows. See protocol.go for the implementation.
Section Description
Command characterPut, Count, Error
space
xxhashpre shared key + id + namespace + data
space
Client Message ID
space
Namespace
space
Entry data
Size
1 byte
1 byte
8 bytes
1 byte
4 bytesunsigned 32 bit integer (Little Endian)
1 byte
64 bytes
1 byte
remaining 1419 bytes
Example
byte(‘P’), ‘C’, ‘E’
byte(‘ ‘)
0x1c330fb2d66be179
byte(‘ ‘)
6 or []byte{6, 0, 0, 0}
byte(‘ ‘)
“Default” or “anything” up to 64 bytes
byte(‘ ‘)
192.169.0.1, or any string up to end of packet
500 byte dracula packet byte order
Here’s roughly how the dracula client-server model works:
The client constructs a 1500 byte packet containing a client-message ID, the namespace, and the value they want to store in the namespace (to be counted later).
A hash of the pre-shared secret + message ID + namespace + entry data is set inside the front part of the message.
A handler is registered under the client message ID.
The bytes are sent over UDP to the dracula server.
Client is listening on a response port.
If no response is received before the message times out, a timeout error is returned and the handler is destroyed. If the response comes after the timeout, it’s ignored.
Server receives packet, decodes it and checks the hash which contains a pre-shared secret.
Server performs the action. There are only two commands – either Put a namespace + entry key, or Count a namespace + entry key.
Server responds to the client using the same command (Put or Count). The entry data is replaced with a 32 bit unsigned integer in the case of a Count command. The hash is computed similarly to before.
Client receives the packed, decodes it and confirms the response hash.
Data structures
Dracula uses a few data structures for storing data.
Namespaces are stored in a hashmap provided by github.com/emirpasic/gods, and we use a simple mutex to sync multithreaded access. Entries in each namespace are stored in wrapped AVL tree from the same repo, which we added garbage collection and thread safety. Each node of the AVL tree has an array of sorted dates.
Here’s another view:
dracula server
Namespaces (hashmap)
Entries (avltree)
sorted dates (go slice / dynamic array of int64)
Server configuration
When using dracula, the client has a different receiving port than the server. By default the dracula server uses port 3509. The server will write responses back to the same UDP port it received messages from on the client.
Messages are stored in a “namespace” which is pretty much just a container for stored values. The namespace is like a top-level key in Redis. The CLI has a default namespace if you don’t provide one. The go client requires choosing a namespace.
Namespaces and entries in namespaces are exact – dracula does not offer any matching on namespaces.
At Mailsac, we use uses the namespaces to separate messages on a per-customer basis, and to separate free traffic. Namespaces are intentionally generic. You could just use one namespace if you like, but performance under load improves if entries are bucketed into namespaces.
Production Performance
Dracula is fast and uses minimal resources by today’s standards.
While we develop it on Intel, and in production we run dracula on Arm64 architecture under Amazon Linux for a significant savings.
In its first months of use, dracula did not spike above 1% CPU usage and 19 MB of RAM, even when handling single-digit-thousands of requests simultaneously.
Tradeoffs
By focusing on a small subset of needs, we designed a service with sharp edges. Some of these may be unexpected features so we want to enumerate what we know.
It only counts
It’s called dracula in an allusion to Count Dracula. There’s no way to list namespaces, keys, nor return stored values. Entries in a namespace can be counted, and the number of namespaces can be counted. That’s it! If we provided features like listing keys or namespace, we would have needed to change the name to List Dracula.
No persistence
Dracula is designed for short-lived ephemeral data. If dracula restarts, nothing is currently saved. This may considered for the future, though. Storing metrics or session data in dracula is an interesting idea. On the other hand, we see no need to reinvent Redis or Prometheus.
Small messages
An entire dracula protocol message is 1500 bytes. If that sounds familiar, it’s because 1500 bytes is the normal maximum-transmission-unit for UDP. Namespaces are capped at 64 bytes and values can be up to 1419. After that they’re cut off.
Same expiry
All namespaces and entries in the entire server have the same expire time (in seconds). It shouldn’t be too difficult to run multiple draculas on other ports f you have different expiry needs.
HA
The approach to high-availability assumes short-lived expiry of entries. A pool of dracula servers can replicate to one another, and dracula clients track health of pool members, automatically handling failover. Any client can read from any server, but in the case of network partitioning, consistency won’t be perfect.
Retries
Messages that fail or timeout are not retried by the dracula client right now. There’s nothing stopping the application level from handling this. It may be added as an option later.
Garbage
While we have not yet experienced issues with dracula’s garbage collection, it’s worth noting that it exists. A subset of entries are crawled and expired on a schedule. On “count” commands, old entries are expired. The entire store is typically not locked, but it’s likely you would see a little slowdown when counting entires in very large namespaces, or when there are a lot of old entires to cleanup, while GC is running. In our testing it’s on the order of single digit miliseconds, but this can be expected to grow linearly with size.
Unknown scale
We’re working with low-tens-of-thousands entries per namespace, maximum. Above that, we’re unsure how it will perform.
Language support
Upon release, dracula has a reference client implementation in Golang. Node.js support is on our radar, but not finished. Please open an issue in the dracula repo to request support for a specific language. We’d be thrilled to receive links to community written drivers as well.
What’s next?
Hopefully you enjoyed learning a little bit about dracula and are ready to give it a try. Head over to Github https://github.com/mailsac/dracula where added examples of using the server, client library, and CLI.
Finally, Mailsac would love your feedback. Open a Github issue or head to forum.mailsac.com. If you’d like to see additional library languages supported, let us know.
On the US holiday Thanksgiving, November 25th at approximately 17:20, an email address [email protected] began sending tens of thousands of simultaneous emails to Mailsac. By 17:28, various alerts were sent to the devops team. Primary inbound mail services were exhausted of memory and locked up or ready to fall over. Soon the failover services were overrun and inbound mail stopped working entirely.
Recovery Actions
The devops team sprang into action and took evasive maneuvers. Grafana dashboards, which show key indicators of service health, were slow to load or unresponsive. Logging infrastructure was still working and showed that the sender was using a Reply-To address of[email protected] yet the envelope and FROM header address were generated from unique subdomains per inbound email address which exploited a previously unknown workaround of Mailsac’s multi-tier throttling infrastructure. All of these messages came from sandbox Salesforce subdomains – at least 6 subdomains deep.
Once the root cause was discovered, the sender’s mail was blocked and additional resources were allocated to inbound mail services to allow more memory to build up while blocklists were propagating across the network of inbound mail services. By 17:40, inbound mail was coming back online, and by 17:44 most alerts had resolved.
Lessons Learned
We monitor and throttle inbound mail in several custom systems. The goal of these systems is to keep pressure off our primary datastore and API services, and provide insight into system load and identify bad actors. The monitoring systems looked mostly at the domain and/or subdomain. Unfortunately we did not anticipate a sender with unique subdomains per message. This caused tens of thousands of superfluous Prometheus metrics which led to three things to be overwhelmed:
the metrics exporter inside the inbound mail server,
the prometheus metrics server running out of memory, and
grafana UI dashboard being non-responsive due to too many apparently unique senders.
All of the described issues have been fixed.
Non-Impacted Services
During the outage all other services remained up. The REST API, web sockets, outbound SMTP, SMTP capture, and more were unaffected.
We wanted to apologize to all of our paying customers. Mailsac is often integrated with automated tests in CI/CD systems. If our downtime also caused alerts for you, we’re very sorry about this! The root cause has been fixed and we’re continuing to monitor the situation.
Integration tests identify errors between systems. These tests can be slow to run because of the interactions between multiple systems.
Mailsac can facilitate integration testing between web apps and transactional email services.
This article explains how to use WebSockets to make your email integration tests faster and simpler than with REST API polling.
Explaining the differences: REST APIs vs WebSockets
A REST API call uses a HTTP request for creating, reading, updating, and deleting objects. The HTTP connection between the client and server is short lived. An example of this is the List Messages In Inbox endpoint. The endpoint will return JSON formatted information about email messages in a Mailsac Inbox. Each time a client checks for new messages a new HTTP connection will be used.
A WebSocket is a persistent connection between a client and server providing full-duplex communication. By reusing an established connection there is no need to poll the REST API for changes, instead data can be pushed to the client in real time. WebSockets often listen on port 80/443 but does not use HTTP, except for the initial connection handshake.
REST API Polling Examples
The examples below use the “old way” – hit the Mailsac REST API and “poll” the inbox for new messages.
Polling is reliable and familiar for API programmers.
However, this approach can result in significant delays between when the email was received by Mailsac and when the test checks for a new message. Every few seconds, you ask the server if there are new messages.
Using a Web Socket Instead of Polling
What if the server could notify you that there are new messages? That’s where WebSockets come in.
Steps to Validate Email Contents Using a WebSocket
Here’s how you can get notified of a new email message:
Establish a WebSocket connection with Mailsac
Send an email using SMTP to a private Mailsac address
Receive content of the email over the established WebSocket
Validate the content of the email
Send a second email using SMTP to a private Mailsac addrress
Receive content of second email over the established WebSocket
Validate the content of the second email
Delete both email messages
Close WebSocket connection
Test Configuration
This test requires several variables be defined. They can be set by editing the script or by setting environment variables.
const mailsacAPIKey = process.env.MAILSAC_API_KEY || ''; // Generated by mailsac. See https://mailsac.com/api-keys
const mailsacToAddress = process.env.MAILSAC_TO_ADDRESS || ''; // Mailsac email address where the email will be sent
const smtpUserName = process.env.SMTP_USER || ''; // Username for smtp server authentication
const smtpPassword = process.env.SMTP_PASSWORD || ''; // Password for smtp server authentication
const smtpHost = process.env.SMTP_HOST || ''; // hostname of the smtp server
const smtpPort = process.env.SMTP_PORT || 587; // port the smtp is listening on
Setup: Configure Mailsac Address for WebSocket Forwarding
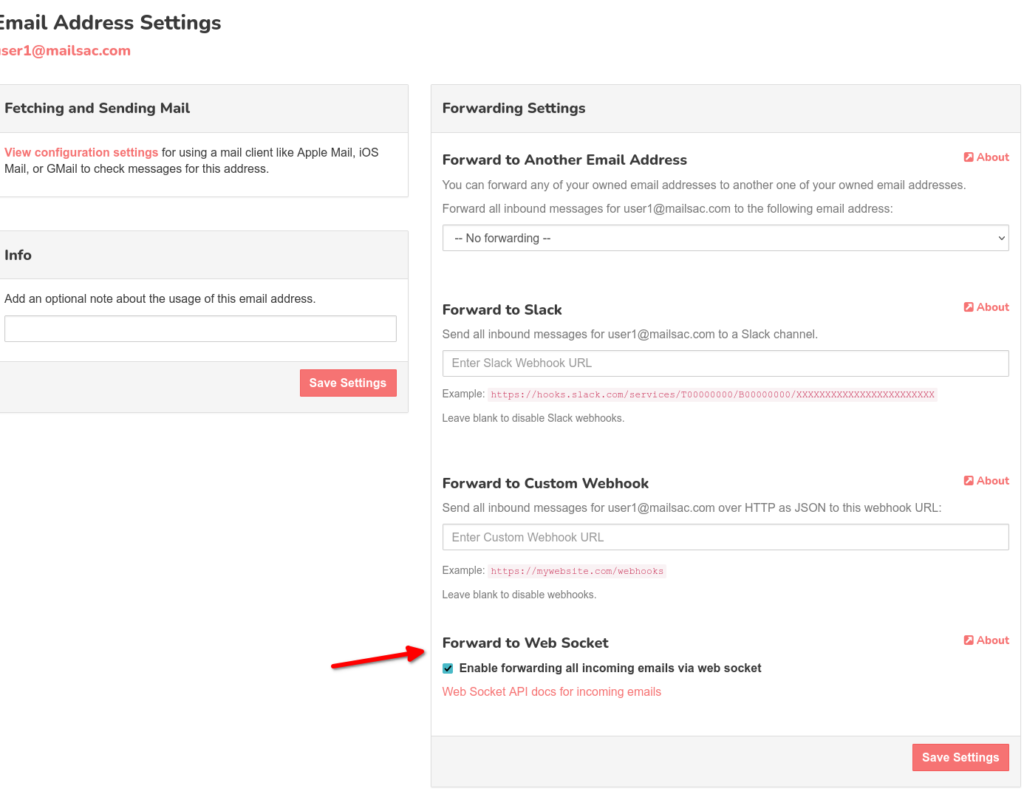
The Mailsac address used in this example needs to have WebSocket forwarding enabled on it. Any messages sent to the email address will be forwarded by the Mailsac WebSocket server.
To enable WebSocket forwarding the Mailsac address must be private. Private addresses have additional features such as forwarding to Slack, forwarding to a Webhook, and forwarding to a WebSocket. Select the “Settings” button next to the email address you want to configure from Manage Owned Email Addresses. Select the check box to “Enabled forwarding all incoming email via web socket” and select “Save Settings”.
The Websocket connection to Mailsac is established on lines 12-14. The ws package will only reject a Promise if it fails to connect to the WebSocket server due to a network error. Wrapping the connection in a Promise allows for additional validations.
The Mailsac WebSocket server will send the message ({"status":200,"msg":"Listening","addresses":["[email protected]"]}) after the initial connection. In lines 16-26 the initial message is parsed and checked for value of the property status. The Promise is rejected if the initial status message is not received or does not have a status code of 200.
const mailsacAPIKey = process.env.MAILSAC_API_KEY || ''; // Generated by mailsac. See https://mailsac.com/api-keys
const mailsacToAddress = process.env.MAILSAC_TO_ADDRESS || ''; // Mailsac email address where the email will be sent

describe("send email to mailsac", function () {

  // Open websocket waiting for email. This websocket will be reused for tests in this file.
  before(() => {
    return new Promise((resolve, reject) => {
      ws = new WebSocket(
        `wss://sock.mailsac.com/incoming-messages?key=${mailsacAPIKey}&addresses=${mailsacToAddress}`
      );
      let wsMessage; // message response object
      ws.on("message", (msg) => {
        try {
          wsMessage = JSON.parse(msg);
        } catch {
          assert(wsMessage, "Failed to parse JSON from websocket message");
        }
        if (wsMessage.status != 200) {
          reject(new Error("connection error: " + wsMessage.error));
          return;
        }
        resolve(wsMessage);
      });
      ws.on("error", (err) => {
        reject(err);
      });
    });
  });
});
The connection to the STMP server is configured in lines 4-10. Most SMTP servers will require authentication.
The email’s to, from, subject, and content are set in lines 14-18. The email will be sent to the address defined in the configuration at the beginning of the script or the environment variable MAILSAC_TO_ADDRESS. The email will include a link to the website https://example.com.
  it("sends email with link to example.com website", async () => {
    // create a transporter object using the default SMTP transport
    const transport = nodemailer.createTransport({
      host: smtpHost,
      port: smtpPort,
      auth: {
        user: smtpUserName,
        pass: smtpPassword,
      },
    });
    // send mail using the defined transport object
    const result = await transport.sendMail({
      from: smtpUserName, // sender address
      to: mailsacToAddress, // recipient address
      subject: "Hello!",
      text: "Check out https://example.com",
      html: "Check out <a href https://example.com>My website</a>",
    });
  });
3. Receive Message via WebSocket
Once the email arrives, Mailsac will send a JSON formatted version of the email on the WebSocket established earlier in this example. ws.on("message", (msg) => { ... } is a function that will run when new message is sent by the WebSocket server. The msg is parsed as JSON. Then the Promise will resolve if the message has a to property. The existence of the to property is checked to make sure the message sent by the WebSocket server was an email and not a status message. The await keyword will cause the test to wait until a message is sent over the WebSocket or the test times out.
The assert package is used to validate the contents of the email. The subject and text properties are assigned to new variables. assert.equal(subject, "Hello!"); will cause an exception if subject is not equal to Hello!. The test framework Mocha will interpret this as a failure and the test will fail. Likewise, if the variable email_text is not Check out https://example.com the test will fail.
The reason to send a second email is to demonstrate that the Mailsac WebSocket connection can be reused. This second test will reuse the WebSocket connection established (variable name ws) in the before() block in step 1. The only difference between the first and second test is the content of the email.
// Sends a second email reusing the websocket.
it("sends email with link to unsubscribe.example.com website", async () => {
const transport = nodemailer.createTransport({
host: smtpHost,
port: smtpPort,
auth: {
user: smtpUserName,
pass: smtpPassword,
},
});
const result = await transport.sendMail({
from: smtpUserName, // sender address
to: mailsacToAddress, // recipient address
subject: "Unsubscribe",
text: "Click the link to unsubscribe https://unsubscribe.example.com",
html: "Check out <a href https://example.com>My website</a>",
});
console.log("Sent email with messageId: ", result.messageId);
const wsMessage = await new Promise((resolve) => {
  ws.on("message", (msg) => {
    const wsResponse = JSON.parse(msg);
    if (wsResponse.to) {
      resolve(wsResponse);
    }
  });
});
assert(wsMessage, "Never received messages!");
const subject = wsMessage.subject;
const email_text = wsMessage.text;
assert.equal(subject, "Unsubscribe");
assert.equal(
email_text,
"Click the link to unsubscribe https://unsubscribe.example.com"
);
});
8. Delete Emails to Prevent Leaky Tests
An after() block will run after the tests have completed. The REST API Endpoint – Delete All Messages In An In Inbox is called to delete the test emails. By deleting all the test emails, it prevents these emails from being fetched in another test, which could impact the results of another test. It is best practice to clean up tests after they ran.
The NPM package supertest is used to make the REST call to delete the messages. Virtually any HTTP client library could be used to do this. Feel free to use the HTTP client library you feel most comfortable with.
An after() block is used to close the WebSocket connection after all the tests have completed. It is best practice to close all connections on the termination of the test.
// close websocket after all tests finish
after(() => ws.close());
Next Steps
The use of WebSockets helps speed up tests and uses API calls more efficiently.
See the WebSocket Test Page to see a WebSocket in action in your browser. This page includes a basic code example usage ofoffor a WebSocket client and is a great starting point before divining into integration testing using WebSockets.
If you have questions about this example or the Mailsac WebSocket service please post on https://forum.mailsac.com
Mailsac will no longer act as a mail transfer agent using the top level domain mail server mailsac.com. That means mail sent to the mail server mailsac.com on port 25 will no longer be accepted.
This change will go into effect on October 9th 2021.
Am I affected?
Almost certainly not. This is a legacy configuration that has not been published or referenced in any communication for several years. Our logs indicate this feature has not been used as far back as logs are stored.
Customers who setup a custom domain are sent instructions to use the mail servers in.mailsac.com and alt.mailsac.com during the initial configuration of their domain.
Instructions on our website for custom domains or the free hosting option instruct customers to use in.mailsac.com and alt.mailsac.com for their MX records. This has been the case for several years.
Why is this being deprecated?
Receiving mail using a mail transfer agent on the top level domain limits our ability to further scale our highly available mail services.
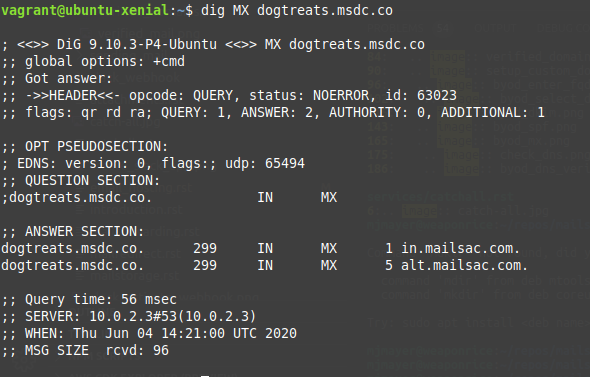
For those familiar with MX records, se the command line tool dig or a web based dig tool to verify your MX records are in.mailsac.com and alt.mailsac.com. If your MX records point to mailsac.com you will need to update them to use in.mailsac.com and alt.mailsac.com
dig example
Use the dig comand dig MX <domain_name> to view the MX records for a domain. In the answer section the hostnames in.mailsac.com and alt.mailsac.com should be listed.
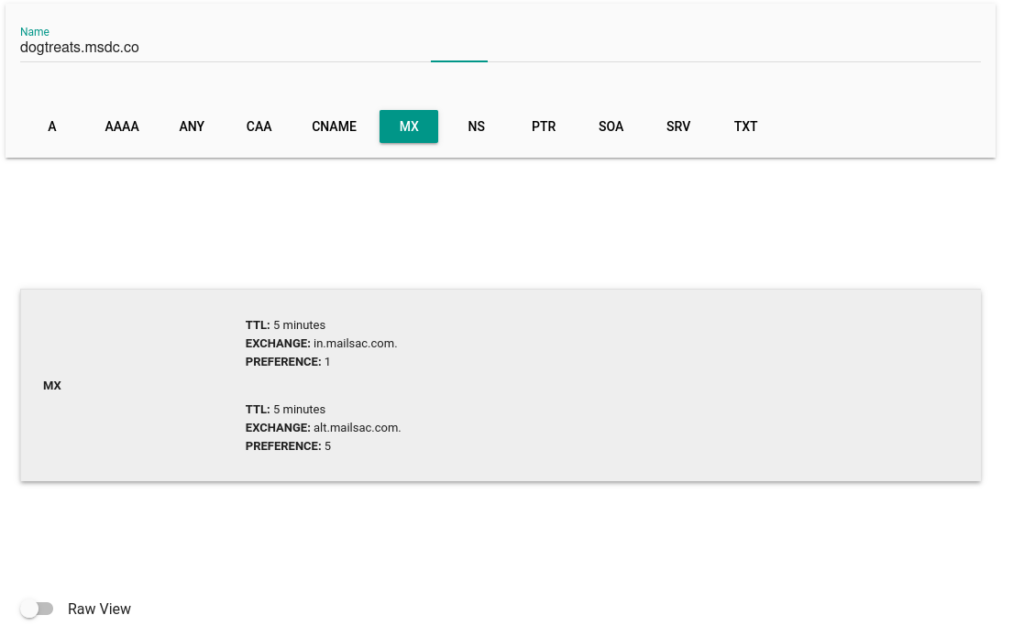
Web based dig
The web based dig tool can be used to verify MX records for a domain. The MX records should show in.mailsac.com and alt.mailsac.com
Our team will be performing database maintenance on Saturday May 22nd, 2021 from 14:00 – 16:00 UTC. During this period, API, email, and website services may be unavailable, intermittent, or slow to respond.
Updates during and on completion of the maintenance will be provided in this blog post.
UPDATE All maintenance has been completed and the team is standing by monitoring performance. No further impact is expected.
Selenium and Mailsac can be used to test the delivery and contents of a signup email sent by a web application.
This example will demonstrate how to configure Selenium and provide code examples to automate and integrate testing with Mailsac.
What is Selenium?
Selenium is an automation tool for testing website user interfaces. It is open-source and supports multiple programming languages such as Java, Python, Javascript etc.
Selenium is not a single tool but is composed a several tools. Our example will focus on the WebDriver component. This will allow us to test our application as if a real person were operating the web browser.
The Selenium WebDriver is installed during step 2 by running npm install.
Clone the selenium-js-example repository and change directories to the cloned repository git clone https://github.com/mailsac/selenium-js-example.git && cd ./selenium-js-example
Install the Selenium WebDriver by running npm install
Download browser driver for the browser that will be tested (see table for download links).
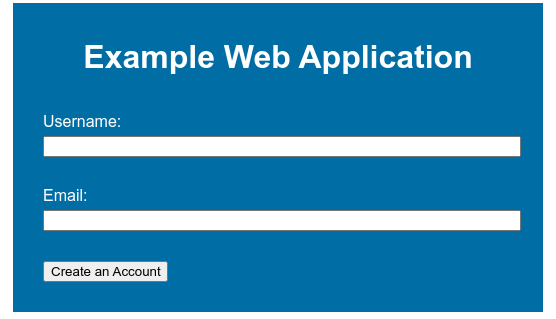
The example web application consists of a single page with a form. The form accepts a username and email address.
Configuring the Web Application
Email will be sent using the Mailsac Outbound Message REST API. You will need to update mailsacAPIKey with your API key. mailsacFromAddress is the address that this example will use are the from address.
const mailsacAPIKey = ""; // Generated by mailsac. See https://mailsac.com/api-keys
const mailsacFromAddress = "[email protected]";
Manual Test of Email Delivery
To manually test email delivery, launch the example web application by running npm start from the command line. Use a web browser to view http://localhost:3000/index.html
Enter a username and email address.
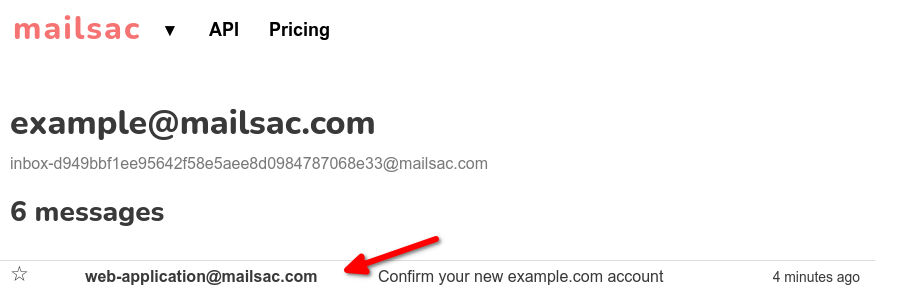
2. If everything went well you should see a confirmation.
3. Check the inbox of Mailsac address you send to using the form on https://mailsac.com
4. Verify the message you sent has been received.
Automated Testing Using Selenium
To automate UI testing a few different components are required:
Selenium WebDriver: Automates input into our web application’s form
Mocha: Test framework to run the tests
HTTP Requests Module: To interact with the Mailsac API
Assert Module: Validates if a given expression is true
Webserver: Runs our web application
All of these components are installed when running npm install
Configure Mailsac API Key
To interact with the Mailsac API an API Key is needed. To generate a new API Key sign in to Mailsac and go to the API Keys Page.
An API Key is available for free to all registered users of Mailsac.
Configure the test to work with your API Key by adding it to the following line in ./test/test.js
const mailsacAPIKey = ""; // Generated by mailsac. See https://mailsac.com/api-keys
Run the Test
Before running the tests your Mailsac API key needs to be configured in ./test/test.js and SMTP settings configured in app.js.
The tests can be executed by running npm test from the command line.
npm test

> [email protected] test /home/user/repos/selenium-js-example
> mocha


  http-server
    register new user
(node:838754) [DEP0066] DeprecationWarning: OutgoingMessage.prototype._headers is deprecated
      ✓ sends email with link to example.com website (1383ms)


  1 passing (1s)
The last line in the above code snippet 1 passing (1s) shows our test passed. If the test failed, an error message will be displayed.
If you are using a browser other than Firefox you will need to add an environment variable when running the tests (eg SELENIUM_BROWSER=chrome npm test).
Using Mocha and Selenium to Automate Tests
This section will cover how Mocha and Selenium work together in this code example to test email delivery.
The integration tests are located in ./test/test.js. The tests are written in Mocha, which uses a behavior driver development model. This allows for the description of tests in easy to understand language.
Mocha Test Introduction
In the following example, the describe block includes a description of what is being tested. The it block describes the expected result. assert is used to test the for truth. If the expected statement is not true, there will be an exception, and the test will fail.
describe("tests truth", () => {
    it('true equals true', function() {
        assert(true); // assert checks for truth
    });
    it('false equals false', () => {
        // assert equal checks the first and second parameter are equal
        assert.equal(false,false);
    });
})
Mocha and Selenium
This section is a line by line explanation of the Mocha tests in the example. The code example is available on GitHub.
Mocha is used to call the Selenium WebDriver to perform actions on the example Web Application. The describe block shows we are going to be testing the process of registering a new user. The it block tells us what we expect to happen.
Inside the it block Selenium WebDriver is instructed to:
open a web browser using the webapp’s localhost URL
find the html element with the id username and enter text in the field
find the html element with the id email and enter specified text in the field
find the html element with the id submitUserCreation and click on it
it("sends email with link to example.com website", async () => {
  await driver.get(webappUrl);
  await driver.findElement(webdriver.By.id("username")).sendKeys("webdriver", "ExampleUser");
  await driver.findElement(webdriver.By.id("email")).sendKeys("webdriver", signupEmailAddress);
  await driver.findElement(webdriver.By.id("submitUserCreation")).click();
...
Our webapp will then email the address submitted by Selenium.
There is a for loop, following the Selenium commands, that uses the Mailsac API to fetch the mail from the specified email address. If an email isn’t found, it will retry 10 times waiting about 5 seconds between tries.
let messages = [];
for (let i = 0; i < 10; i++) {
   // returns the JSON array of email message objects from mailsac.
   const res = await request("https://mailsac.com")
           .get(`/api/addresses/${signupEmailAddress}/messages`)
           .set("Mailsac-Key", mailsacAPIKey);
   messages = res.body;
   if (messages.length > 0) {
      break;
   }
   await wait(4500);
}
If no messages are received from the Mailsac API after 10 tries, assert will create an exception and throw the error Never received messages!. The contents of the email are checked to see if the link https://example.com is in the email. If, the link is not found, an exception is created stating Missing / Incorrect link in email
assert(messages.length, "Never received messages!");
const link = messages[0].links.find((l) => "https://example.com");
assert(link, "Missing / Incorrect link in email");
Next Steps
This example can be modified to automate your team’s UI testing procedures. For another example of Mocha tests using Mailsac see the Integration Tests Blog Post.
Our forums are a great place to discuss usage of Mailsac’s API.