Running Selenium Tests in GitHub actions Cover image

Run Selenium Tests in GitHub Actions

Browser automation is an invaluable tool. At a personal level, you can use it to automate repetitive tasks online. But browser automation can deliver so much more. At its best, it can run tasks with consistent results. Tasks that need lots of manual execution and complexity. Tasks like checking button placement, evaluating user login, and registration workflows. And in our modern era, we have our pick of browser automation frameworks.

We’ve covered browser automation before, but in this guide, we’ll do a deep dive into one of those frameworks. Additionally, we’ll cover using those testing frameworks alongside a specific continuous integration application.

In this guide we’ll walk through three testing scenarios using Selenium and GitHub Actions:

  • Check if a button rendered
  • Test a login workflow
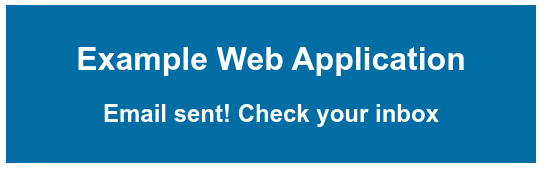
  • Ensure the contents of a sent email

We’ll use our sample application to make our examples concrete, informative, and useful.

Repo URL: https://github.com/mailsac/mailsac-capture-service-example-nextjs

With all that said, let’s get started!

First, let’s talk about what you need to enable GitHub Actions.

Getting started with GitHub Actions

First, if you’d like a primer on GitHub Actions their page is a great resource. To summarize, it’s an easy way to run tasks when someone takes an “action” against your repo.

Actions can be:

  • Pull request merges
  • Commits
  • Repo pushes

GitHub takes your action and runs a task like integration tests, unit tests, etc. All you need to do is create a .github/workflows/main.yml file. Note: Running tasks is just one of the many possibilities for GitHub Actions. You can encompass entire workflows and even produce packages.

We’ll introduce more details further along the guide. For now, you can start by adding an empty file at:

.github/workflows/main.yml

The Sample Application We’ll Use

We’ll fork our sample application at the URL:

https://github.com/mailsac/mailsac-capture-service-example-nextjs

We’ll use this repo to walk through the examples mentioned in the intro. These sample scenarios are not meant to be comprehensive, of course. They’re meant to kick-start your journey with GitHub Actions.

To start, you’ll need to run the standard node installation and run the command:

npm install
npm run dev

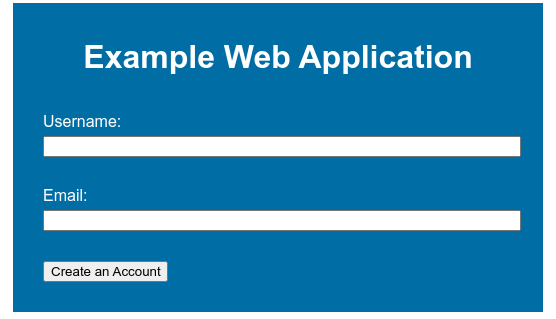
Navigate to http://localhost:3000 and see our application in action:

Our initial application

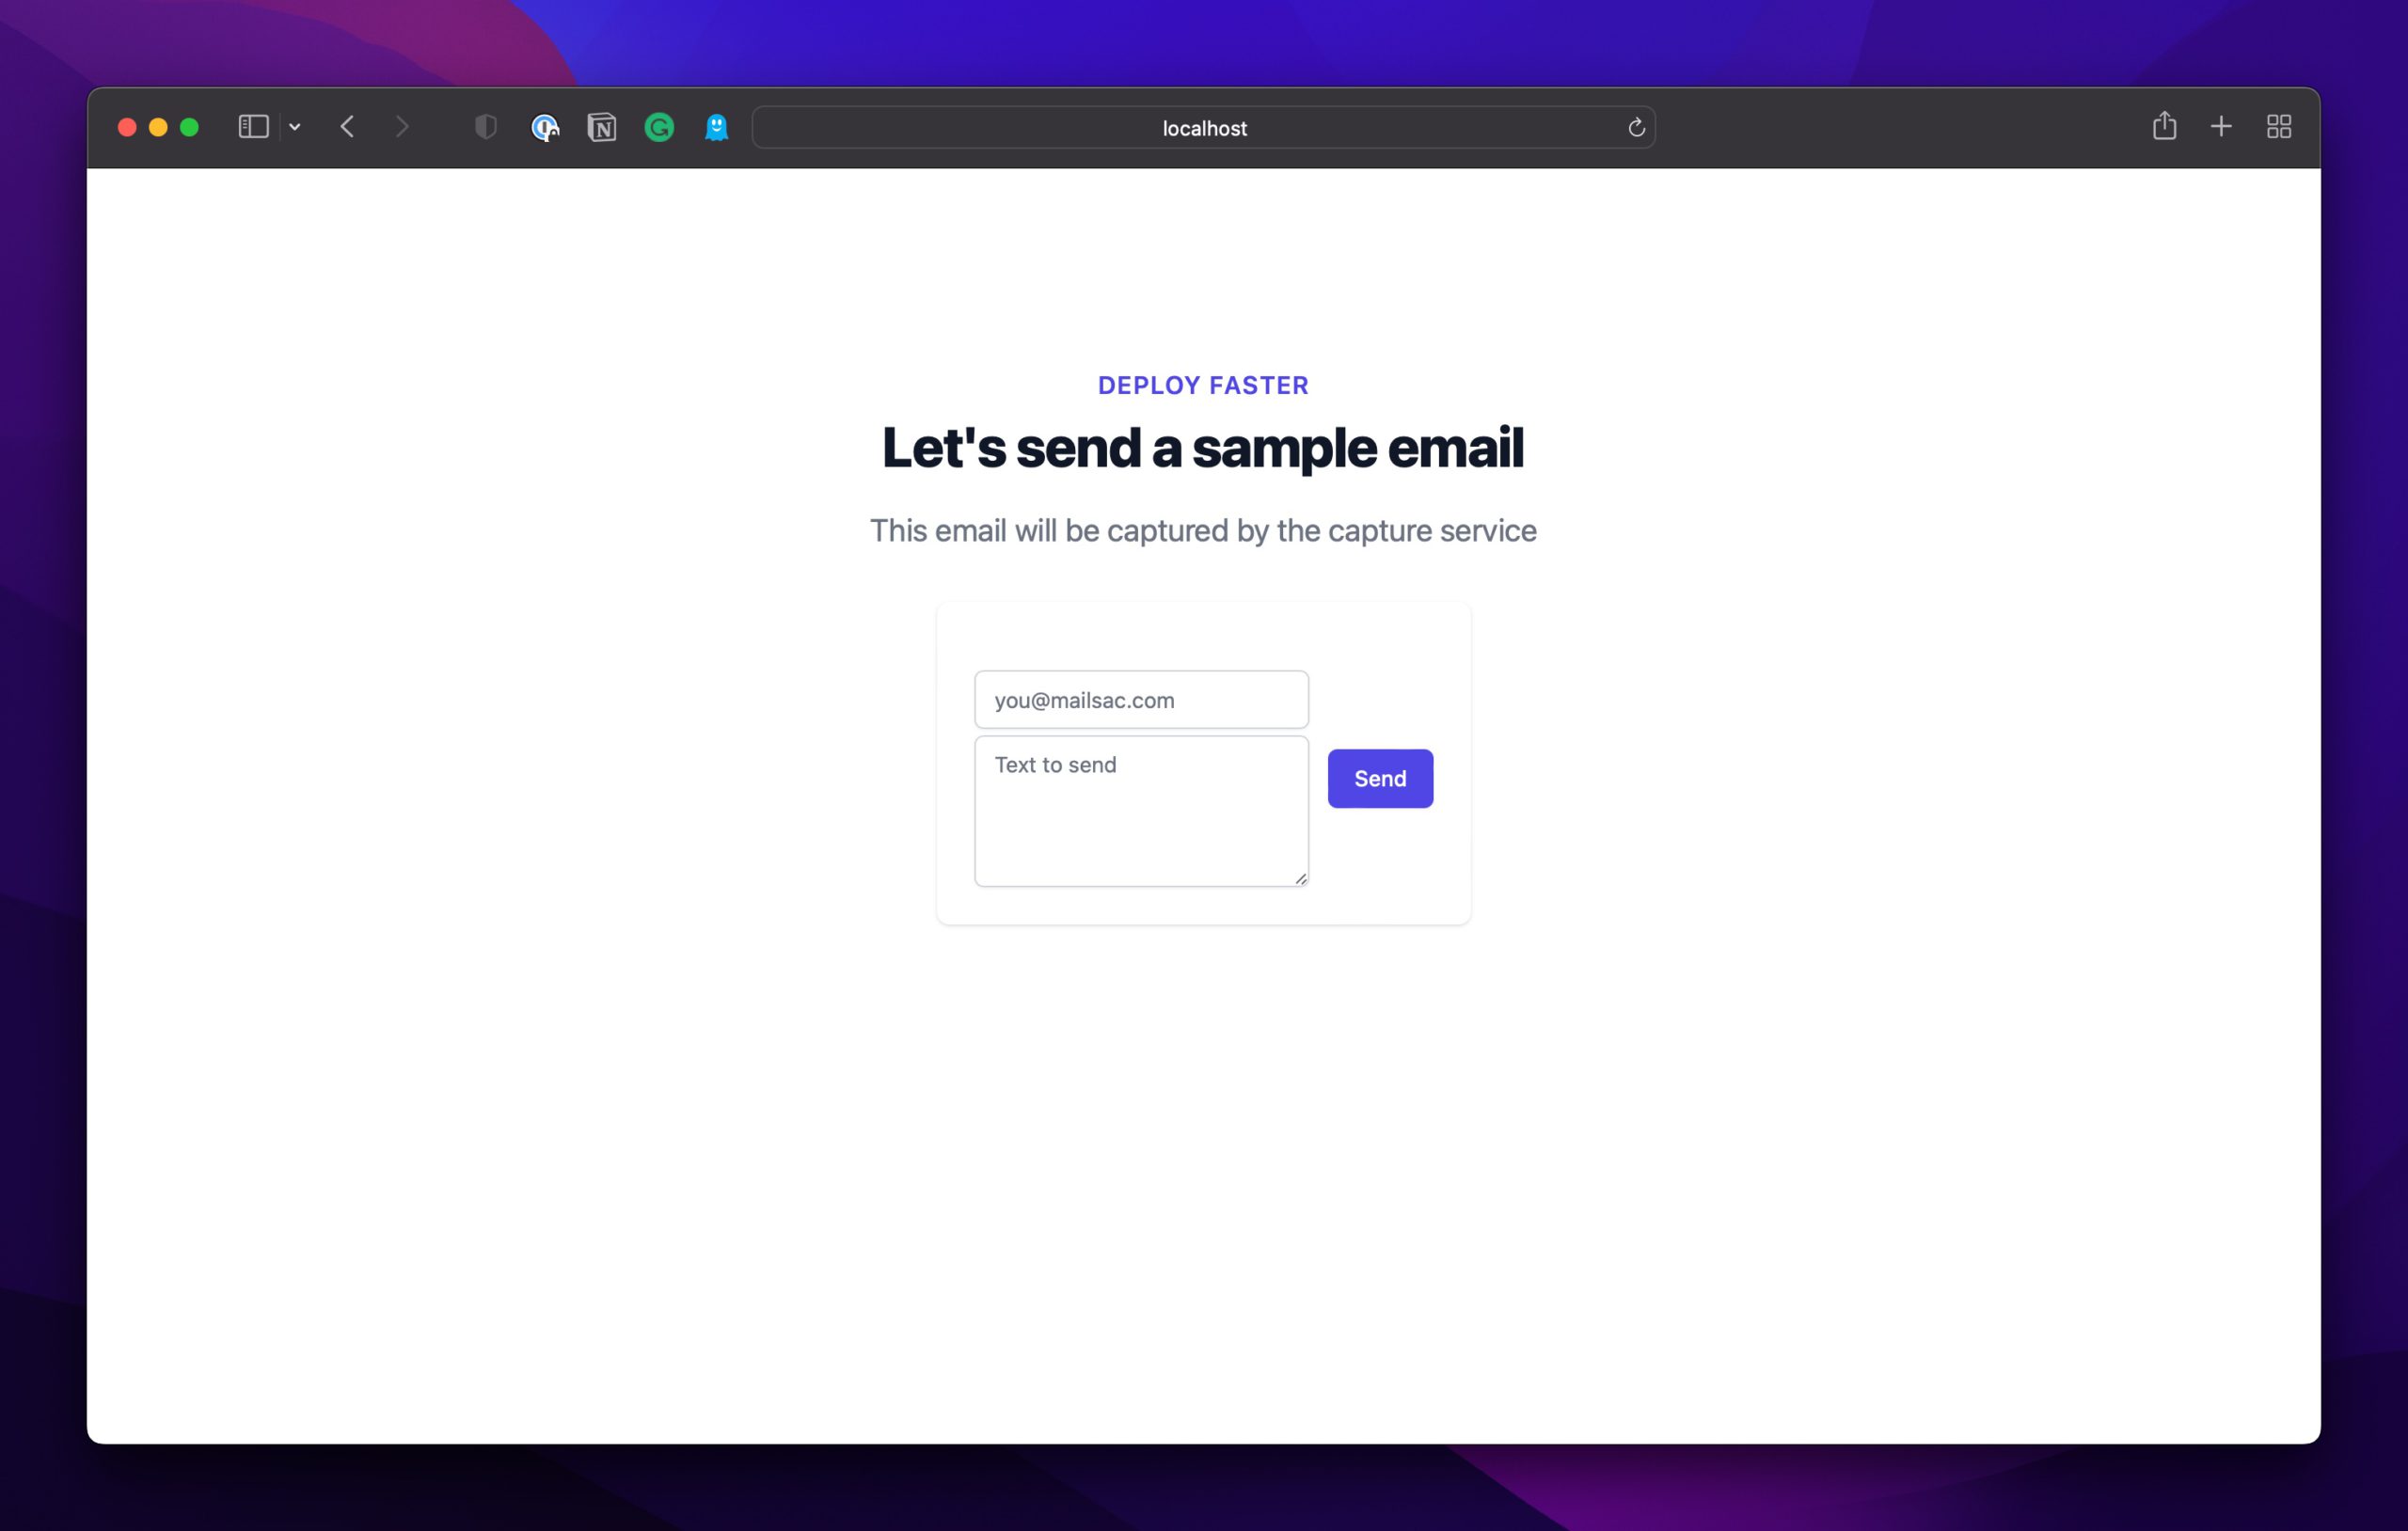
With the preliminary steps done, on to the tests.

First Selenium Test: Check if the button rendered

Let’s start with the simplest test, a button render assertion test.

For this first section, we will:

  1. Add the node packages required to test
  2. Add our selenium test
  3. Add testing scripts to our package.json so that GitHub Actions can call our tests
  4. Add a simple Github Actions workflow file

Let’s start by adding a new branch (or you can fork the repo if you’d like):

git checkout -B cicd-selenium-app-test

Now let’s move on to our sample packages.

Packages: Selenium WebDriver & Start-Server-And-Test

We’ll need to add selenium and a start-server-and-test package. start-server-and-test starts our application. Then it calls our selenium tests so they can run against our running application.

npm install --save-dev start-server-and-test selenium-webdriver

start-server-and-test is one of our most straightforward ways to add live server testing capabilities. If you need more flexible frameworks, you may want to investigate mocha or cypress.

We’ll just focus on the core GitHub actions and selenium testing in this guide.

Selenium Test: Button Render

On to the test itself.

Let’s create a test under tests/button-render.js using selenium and headless chrome:

const chrome = require('selenium-webdriver/chrome');
const {Builder, Browser, By } = require('selenium-webdriver');

const screen = {
  width: 1920,
  height: 1080
};

(async function buttonRender() {
  let driver = await new Builder()
    .forBrowser(Browser.CHROME)
    .setChromeOptions(new chrome.Options().headless().windowSize(screen))
    .build();

  try {
    await driver.get('<http://localhost:3000>');
    let didSendButtonRender = await driver.findElement(By.id('sendbutton')).isDisplayed()
    if (!didSendButtonRender){
      throw new Error(`Send button was not rendered properly.`);
    }
 
  } finally {
    await driver.quit();
  }
})();

tests/button-render.js

You can find the full usage guide on selenium’s documentation page.

To help the test out, we’ll add an ID attribute to the Send button:

...
<button
    onClick={sendEmail}
    id="sendbutton"
    className="mt-3 w-full inline-flex items-center justify-center px-4 py-2 border border-transparent shadow-sm font-medium rounded-md text-white bg-indigo-600 hover:bg-indigo-700 focus:outline-none focus:ring-2 focus:ring-offset-2 focus:ring-indigo-500 sm:mt-0 sm:ml-3 sm:w-auto sm:text-sm"
  >
    Send
</button>
...

pages/index.js

Telling GitHub Actions How to Run Our Tests

We’ll need to add a couple of testing scripts to package.json:

...
"scripts": {
    "dev": "next dev",
    "build": "next build",
    "start": "next start",
    "lint": "next lint",
    "test": "node tests/button-render.js",
    "e2e-test": "start-server-and-test dev <http://localhost:3000> test"
  },
...

package.json

Now let’s add the workflow main.yml file to the repo. This is the main file that kicks off a GitHub Action workflow. To keep things simple, we’ll execute our actions based on when a comitter pushes code. You can find the full list over at GitHub’s documentation pages.

on: [push]

jobs:
  tests:
    runs-on: ubuntu-latest
    name: Run Selenium Tests
    steps:
    - name: Start selenoid
      uses: Xotabu4/selenoid-github-action@v2

    - uses: actions/checkout@v1
    - run: npm ci  

    - name: Run end to end tests
      run: npm run e2e-test

.github/workflows/main.yml

For our project, we’ll use solenoid-github-action, a GitHub Action that starts a selenium grid instance in a docker container. Solenoid is a golang reimplementation of Selenium. It makes it very easy to integrate with any continuous integration/deployment environment.

In the last portion of the file, the npm run e2e-test section kicks off the end-to-end test that starts our server and runs the selenium tests.

That’s it! Before you commit and push your code, try running it locally:

npm run e2e-test

The test should pass in your local environment. If it fails due to chrome driver issues you can find a full guide on browser driver installations here.

Send it over to GitHub via git push.

git push --set-upstream origin cicd-selenium-app-test

Head over to your repo on GitHub and under the Actions tab you should now see a selenium test run

A GitHub Actions workflow results page

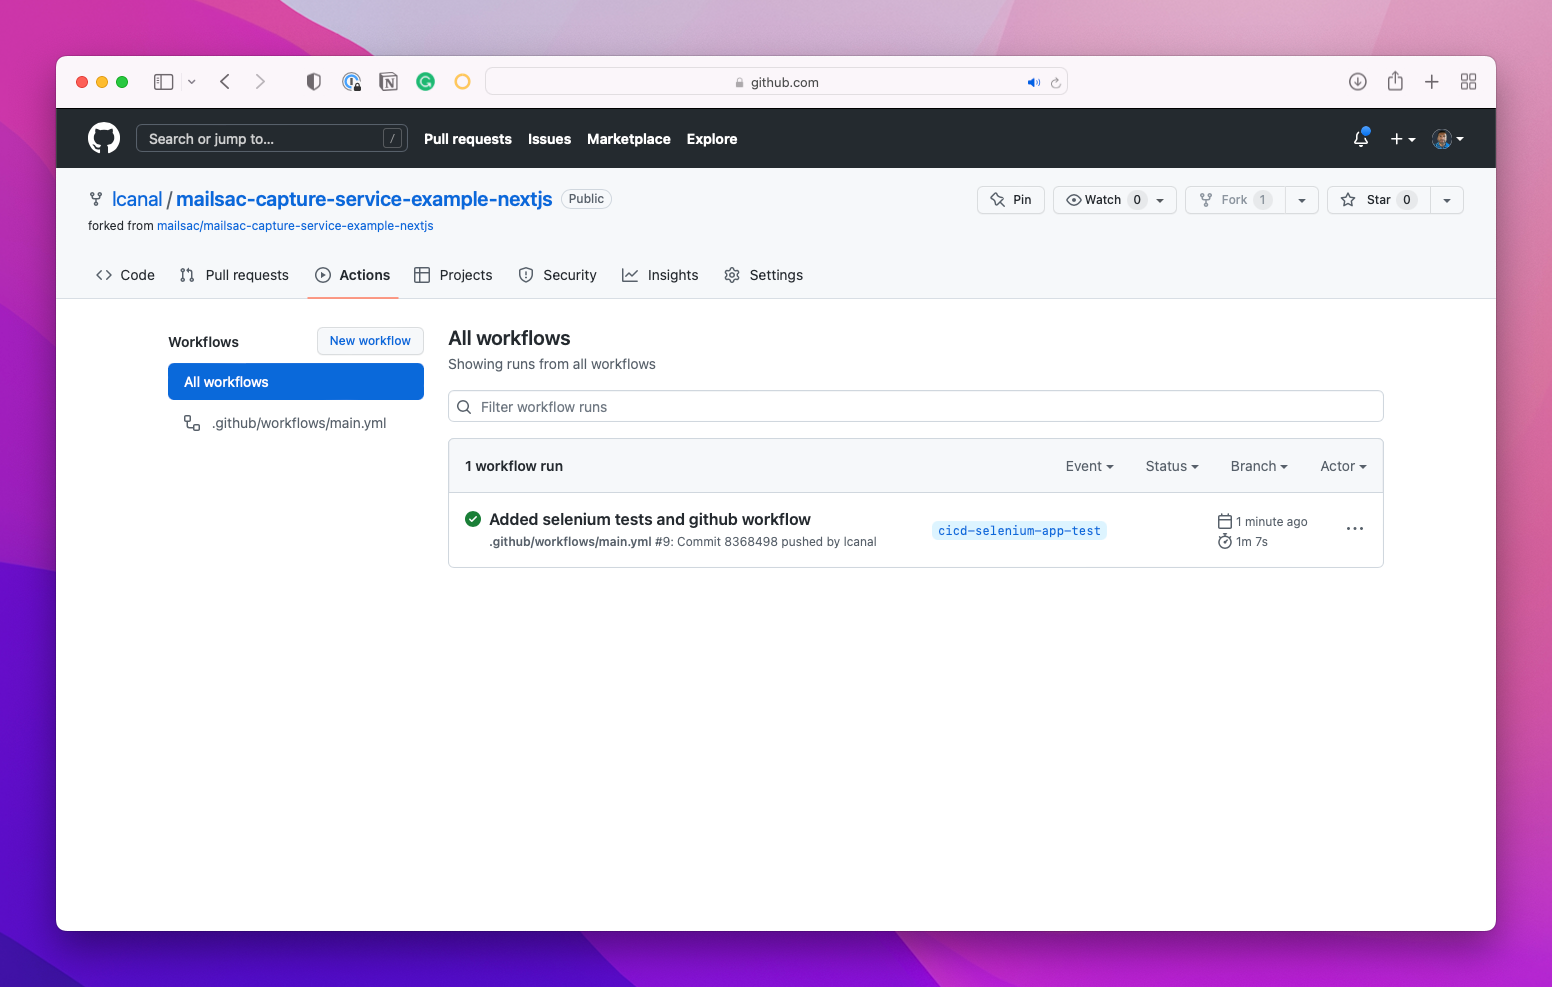
You can drill down and see where our specific tests ran

Congrats! That completes our first successful test using selenium and GitHub actions. Let’s move on to something a bit more useful.

Second Selenium Test: Open and login into a web app

Let’s expand on our tests a bit. Since we’re aiming for simplicity in this guide, I won’t add a whole authentication workflow to our application. Instead, let’s focus on an existing website and attempt (and fail) to log in.

We’ll start by adding a new test to our repo.

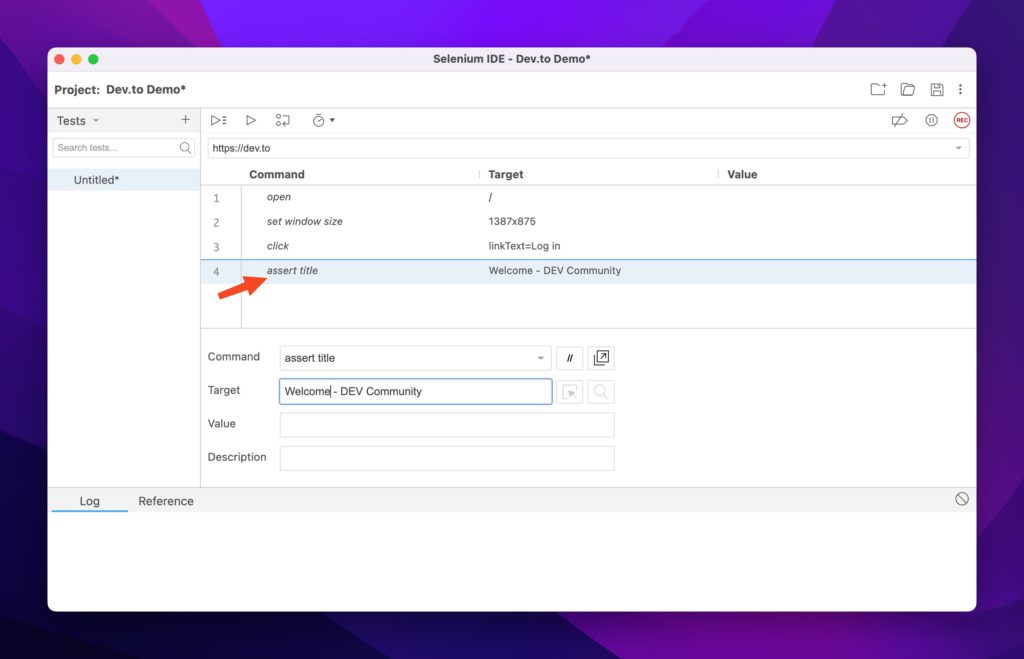
Selenium Test: Login to Dev.to

Let’s bring in our external login Selenium test, but slightly modified:

const chrome = require('selenium-webdriver/chrome');
const {Builder, Browser, By, until } = require('selenium-webdriver');

const screen = {
    width: 1920,
    height: 1080
  };

(async function externalLogin() {
  let driver = await new Builder()
  .forBrowser(Browser.CHROME)
  .setChromeOptions(new chrome.Options().headless().windowSize(screen))
  .build();

  try {
    await driver.get('<https://dev.to>');
    await driver.findElement(By.linkText('Log in')).click();
    await driver.wait(until.titleContains('Welcome - DEV Community'), 3000);
    await driver.findElement(By.name('commit')).click();
    await driver.wait(until.titleIs(''), 3000);
    let errorBox = await driver.findElement(By.className('registration__error-notice'));
    await driver.wait(until.elementIsVisible(errorBox));
    let errorText = await errorBox.getText();

    if (!errorText.includes('Unable to login')){
      throw new Error(`Error text does not contain expected value "${errorText}"`);
    }

  }
  finally {
    await driver.quit();
  }
})();

tests/external-login.js

Only real changes are that we added a headless option for chrome.

Modifying Our Tests

Keeping things simple, let’s just add a new test script:

....
"test": "node tests/button-render.js",
"external-tests": "node tests/external-login.js",
...

package.json

And add a separate testing task to our workflow:

...
- name: Run external login test
      run: npm run external-tests
...

.github/workflows/main.yml

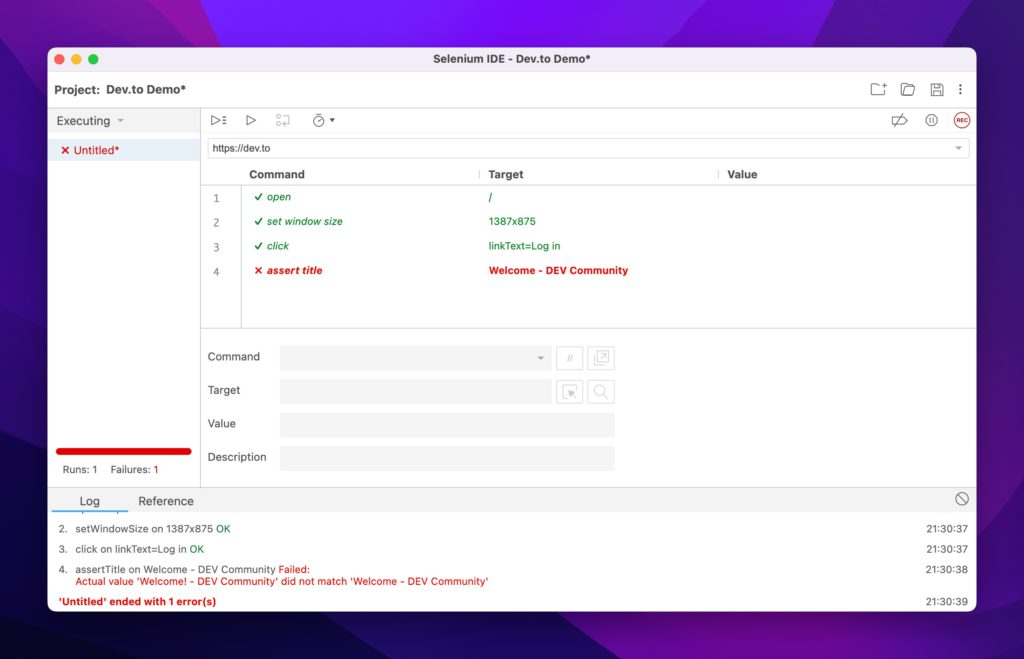
Let’s check our result on GitHub:

GitHub Action Failure example

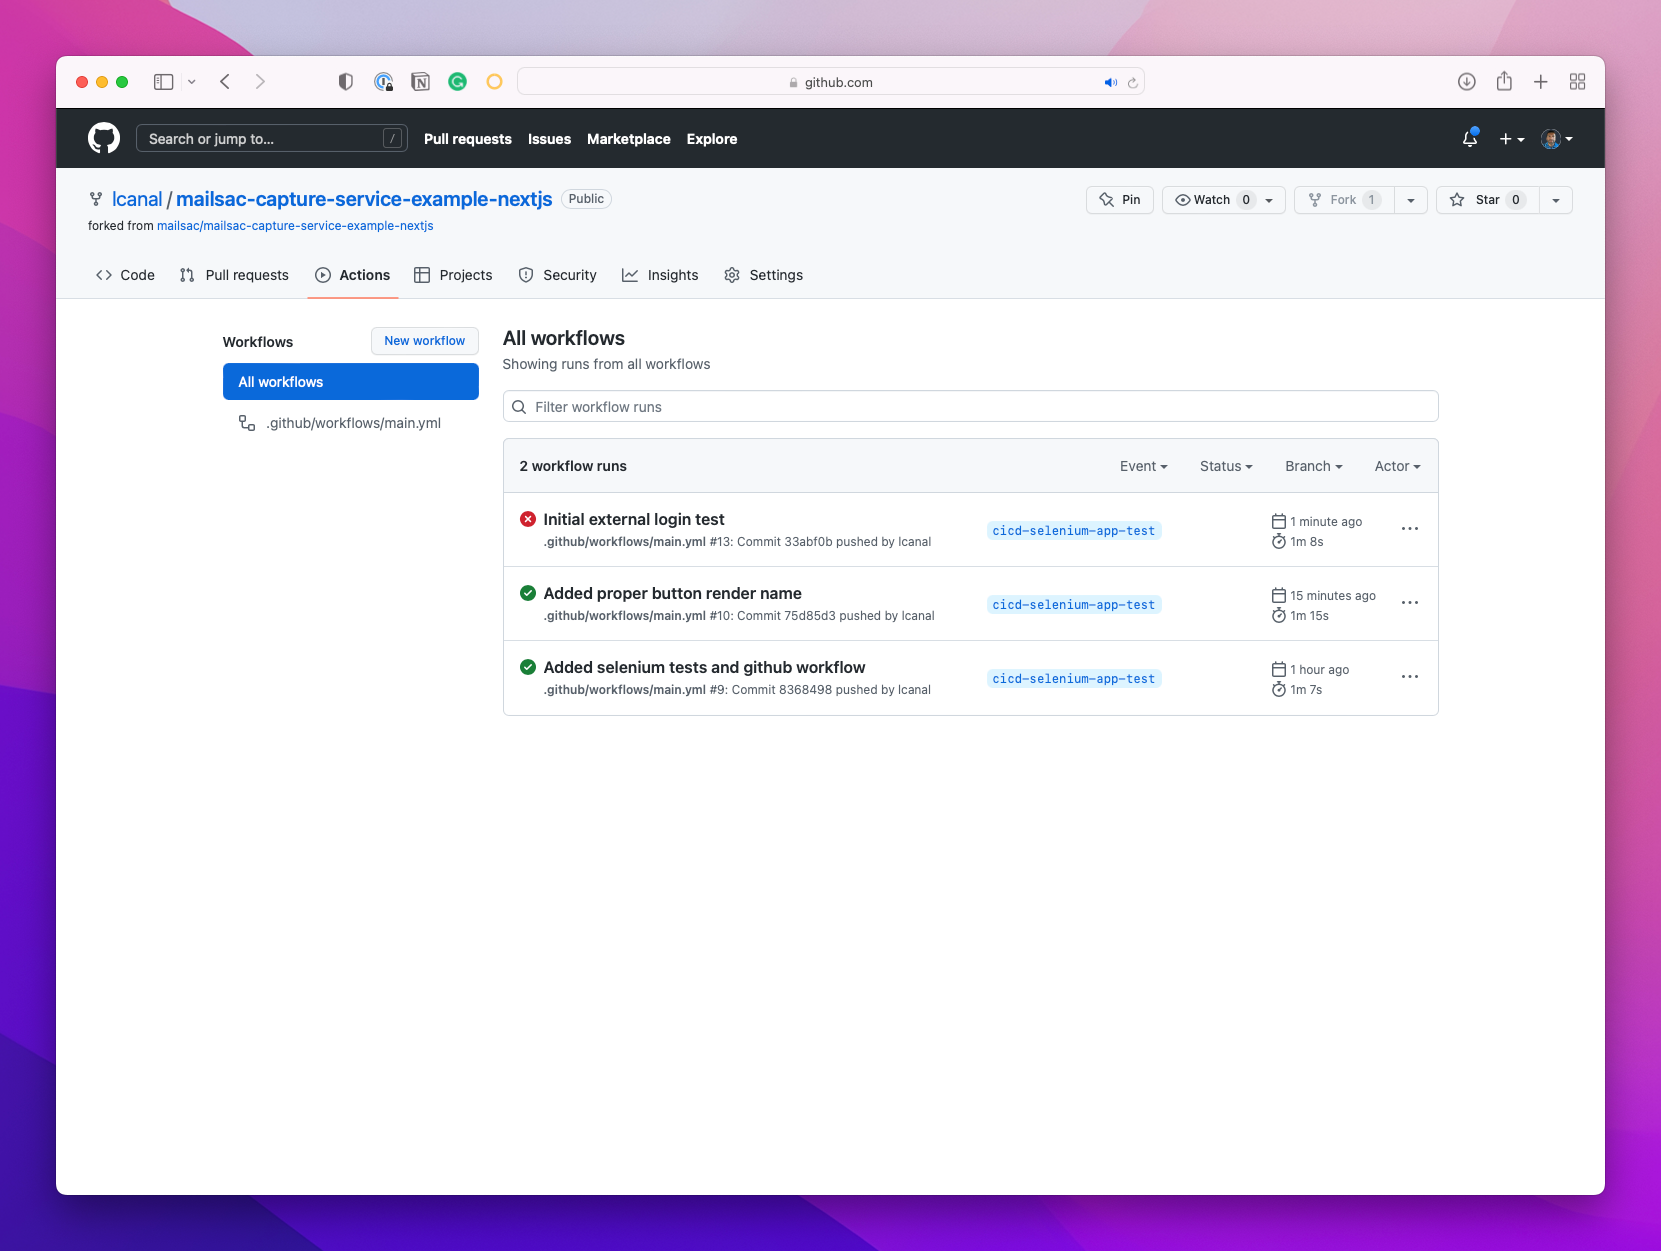
Looks like a failure due to an incorrect title.

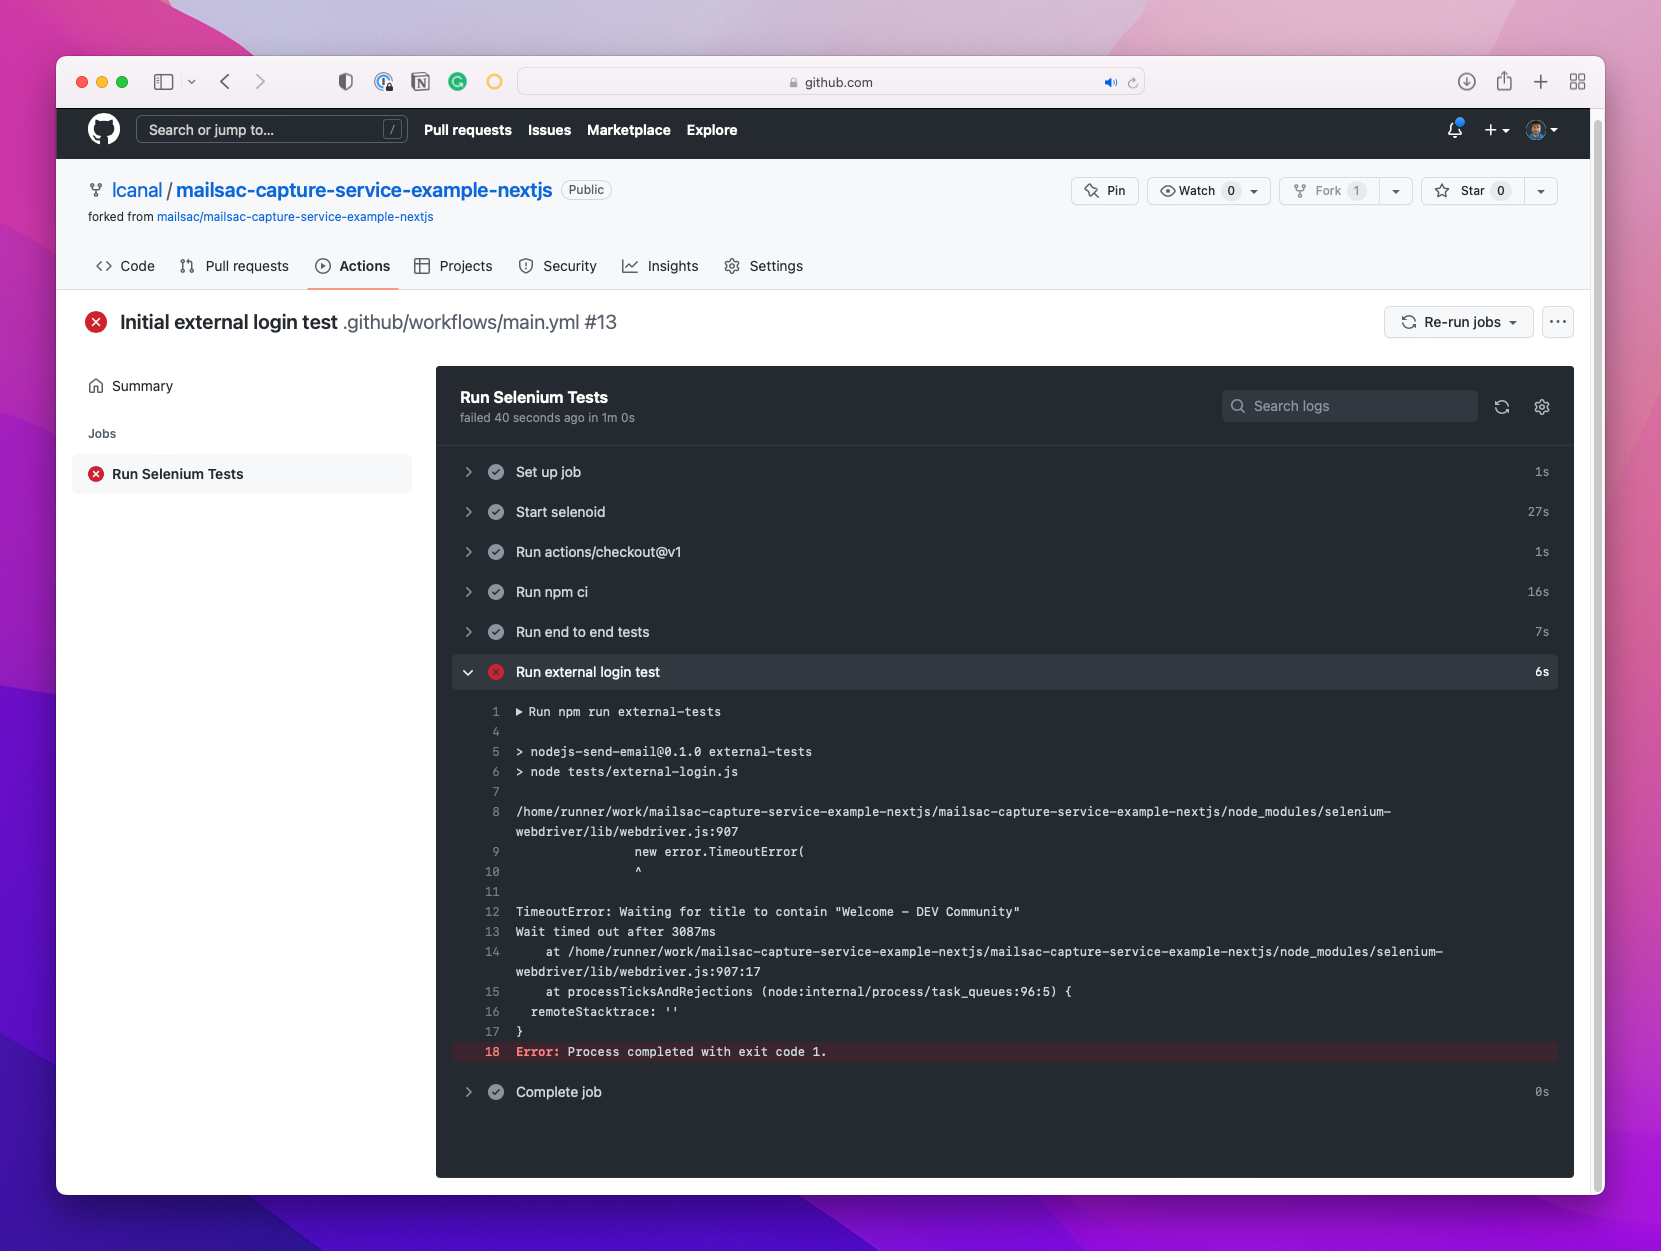
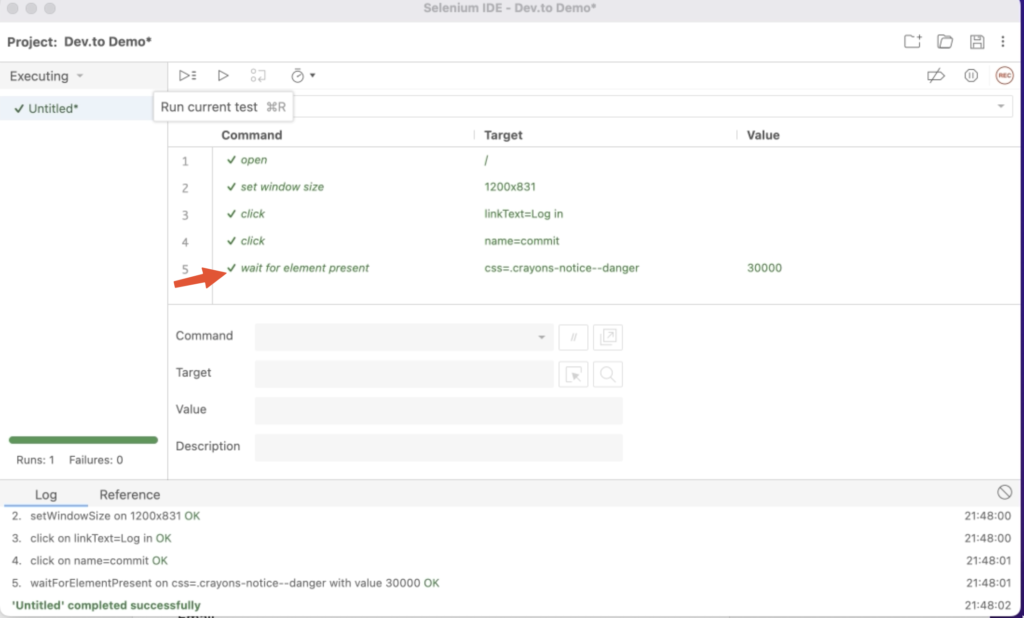
Let’s make the match less precise and rerun the test:

...
await driver.findElement(By.linkText('Log in')).click();
await driver.wait(until.titleContains('Welcome! - DEV Community'), 3000);
await driver.findElement(By.name('commit')).click();
...

tests/external-login.js

Let’s try another git push and..
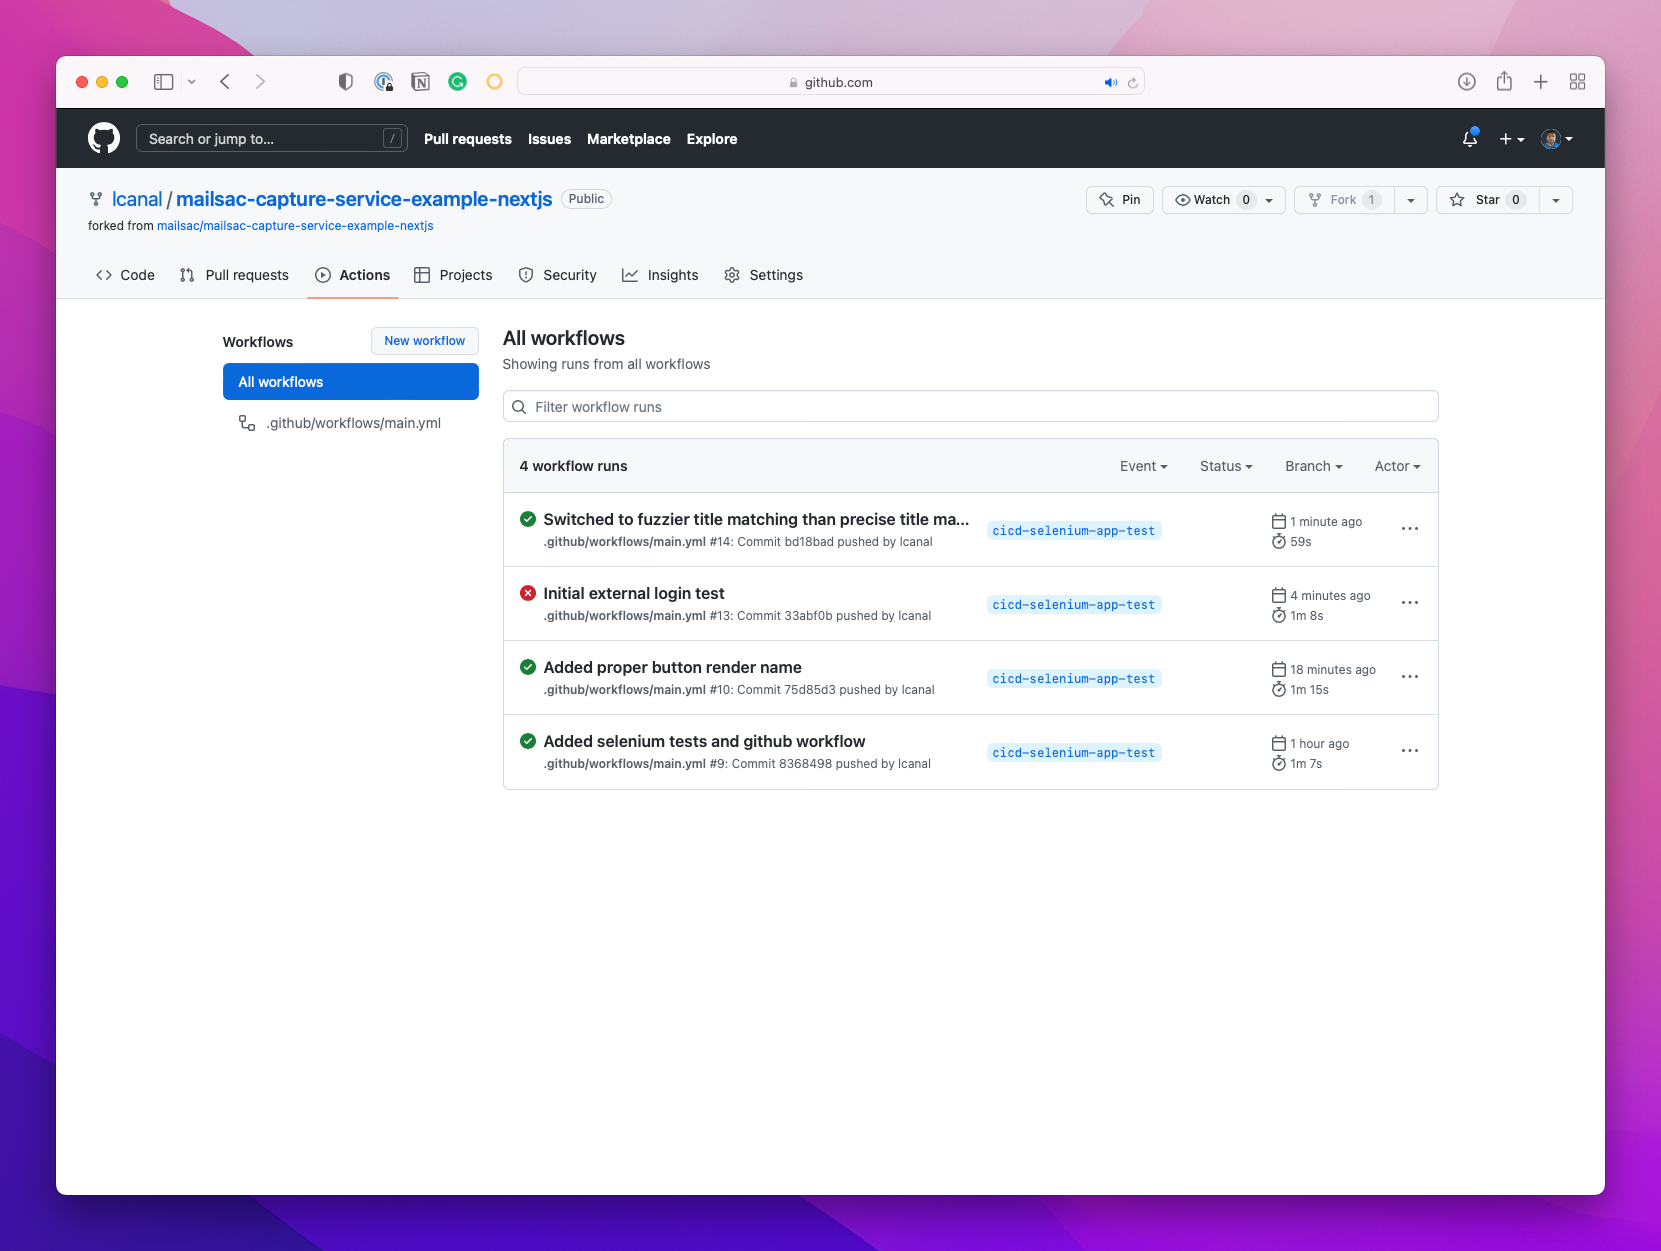
A full successful external login test screen/

Success!

Conclusion

This was the first part of a two-part series about diving into GitHub Actions and Selenium tests. In the second part, we’ll run through:

  1. running our application in GitHub actions
  2. sending emails via our web form
  3. reading and comparing the email contents
  4. deleting the email contents afterward

All are driven by our selenium tests.

We hope you enjoyed the guide, and hope to hear from you on our forums or follow our other content on LinkedIn.

Blog Cover

Automate the Testing Pain Away with Browser Automation

When I say “You need to test your code”, do you wince? Is it a feeling of guilt, one of “I know I should, but…”. Testing may not conjure up the sexiest of images. We as developers frequently put tests off until the end of our feature cycle. Or respond to a production bug by issuing a quick patch. Or worse, just bury our heads in the sand and pretend that we don’t have any bugs in our code at all. (Note: All code has bugs).

The reality is that testing is an incredible investment in your code’s future. Investing in tests is like an insurance policy: hedging your bets against an unknown future. An unknown future consisting of bitrot, dependency deprecations, or service API changes. Testing provides the ability to patch those unknowns through refactoring or flat-out removing stale dependencies. Testing can also buffer against those risks, providing peace of mind.

In this post, I’ll outline 3 different types of testing tools:

  • Selenium WebDriver
  • Selenium IDE
  • Puppeteer

To do an apples-to-apples comparison the testing scenario will be the same for all three tools. I’ll also model my testing after a user’s typical behavior. Behaviors like login attempts, searching, and form submissions. They also try to hit every layer of the application, from the user interface to the database.

Benefits of Testing a User Interface

Testing isn’t just limited to the backend. Testing your interface can provide complete end-to-end testing scenarios such as:

  1. Repeated calls to your modal. Does the modal come back after the first call?
  2. Does your submit button produce an error if the form has an incorrect value?
  3. Does the UI load after a successful login to an empty state in your application?
  4. Does a specific result come back after a form search?

I’m going to walk through a straightforward testing scenario with three tools. Not to rank them, but to touch on the nuances of each. Some of these tools allow you to create tests through simple browsing. Others are headless, allowing you to drive through programming languages.

What’s a headless browser?

Conventional browsing involves rendering forms, buttons, and images to the user. A headless browser interacts with websites through code without displaying any controls. Headless browsing opens up possibilities that are tough to achieve with conventional browsers like:

  • Integration with your build systems
  • Consistency in testing
  • Decreasing the duration of your tests
  • Layout screen captures and comparisons

Tools of the Automated Browser Trade

Onto the good stuff: The tools and testing scenarios.

The Most Popular – Selenium WebDriver

Selenium is by far the most popular testing tool out there. It covers headless testing and both local and remote tests.

WebDriver targets as its core base Developers and QA Team members who can write code.

The Easiest To Get Started with – Selenium IDE

Selenium designed the IDE version for exploratory testing and bug replication. It’s perfect for walking through a bug with someone else or creating a recording of a bug for your ticketing system.

The NodeJS Fan Favorite – Puppeteer

Puppeteer is a favorite of the NodeJS community due to its easy integration into your existing build system. It automates form submission, UI testing, keyboard inputs, and more. It’s main limitation however is the browsers it supports. As of this writing Puppeteer only supports Chrome. Firefox support is, as of this writing, experimental.

Puppeteer’s killer feature is that it installs the browser binary for you, making the integrating into your build system easy.

Testing Scenario: A Failed Login to dev.to

Here’s our testing scenario:

  1. Load https://dev.to
  2. Click the “Log in” button
  3. Load a page with “Welcome! – DEV Community” in its title.
  4. Click on the “Continue” button
  5. Ensure an “Unable to login” banner appears on the page.

For consistency throughout the walkthrough, I’ll use:

  1. Chrome as my browser
  2. Javascript as the programming language of choice

Test Case 1 – Selenium WebDriver

Let’s begin with an empty directory and selenium package installation:

npm init tests
cd tests
npm install selenium-webdriver

Next, download a browser driver. You can find the full supported list in selenium’s code repository. You can place the binary anywhere. For this walkthrough, I’ll place it in the current project directory under the bin/ path.

Set your specific browser driver path:

export PATH=$PATH:$PWD/bin

I’ll be using this quick test setup (selenium.js):

const {Builder, Browser, By, Key, until} = require('selenium-webdriver');

(async function example() {
  let driver = await new Builder().forBrowser(Browser.CHROME).build();
  try {
    await driver.get('http://dev.to');
    await driver.findElement(By.linkText('Log in')).click();
    await driver.wait(until.titleIs('Welcome! - DEV Community'), 3000);
    await driver.findElement(By.name('commit')).click();
    await driver.wait(until.titleIs(''), 3000);
    let errorBox = await driver.findElement(By.className('registration__error-notice'));
    await driver.wait(until.elementIsVisible(errorBox));
    let errorText = await errorBox.getText();

    if (!errorText.includes('Error')){
      throw new Error(`Error text does not contain expected value: ${errorText}`);
    }

  } finally {
    await driver.quit();
  }
})();

Set your driver and run the file

SELENIUM_BROWSER=chrome node selenium.js
A failed Selenium Test

In general I like to ensure my tests fail from the start, followed by working towards passing the tests:

const {Builder, Browser, By, Key, until} = require('selenium-webdriver');

(async function example() {
  let driver = await new Builder().forBrowser(Browser.CHROME).build();
  try {
    await driver.get('http://dev.to');
    await driver.findElement(By.linkText('Log in')).click();
    await driver.wait(until.titleIs('Welcome! - DEV Community'), 3000);
    await driver.findElement(By.name('commit')).click();
    await driver.wait(until.titleIs(''), 3000);
    let errorBox = await driver.findElement(By.className('registration__error-notice'));
    await driver.wait(until.elementIsVisible(errorBox));
    let errorText = await errorBox.getText();

    if (!errorText.includes('Unable to login')){
      throw new Error(`Error text does not contain expected value "${errorText}"`);
    }

  } catch(e) {
    console.error(`Error running test suite: ${e.message}`)
  }
  finally {
    await driver.quit();
  }
})();

With line 15 fixed, rerun the script:

A successful Selenium Test

Success!

The above was a taste of what you can do with Selenium. You can even break out of the testing mindset and use Selenium for scraping and populating activity trackers.

On to the next tool.

Test Case 2 – Selenium IDE

While the previous test requires some programming ability, Selenium IDE is friendly to anyone who can drive a browser. The IDE version’s main use case is bug discovery, recording and profiling.

First, download the package from the Selenium page.

After installing the plugin, start a new project:

Selenium IDE introduction screen.
New Project Page
Selenium IDE's project base URL, where all of your tests will start.
Set our base url to dev.to

After you hit “Start Recording”, Selenium will launch a new Chrome window and redirect you to dev.to

Initial Dev.To Walkthrough with Selenium IDE

From the video, we:

  1. Let the initial dev.to page load
  2. Clicked on the “Log in” button
  3. Clicked on the Selenium IDE extension
  4. Stopped the Extension recording
  5. Arrived at the Commands window below
Selenium IDE's properties loaded automatically
Selenium testing properties loaded automatically

To continue our test scenario, let’s ensure that the page title is Welcome! - DEV Community and that our login attempt fails with an empty submission.

Again, I always like to have my tests fail first, so let’s start with that case. Use Selenium’s assert title command to ensure the title is what we expect. Add it to the command list:

Selenium IDE's asserting that the title fails.
Asserting the page title to fail

If you run the test, it should fail:

Failed automation testing in Selenium IDE.
Example of a failed test

Let’s go ahead and fix it with the correct title and rerun the test:

Successful Title Check

And success! Now let’s add the login check:

Walking through a complete test to success.

To summarize the video, we:

  1. Started a new recording
  2. Hit the Log in button
  3. Clicked Continue without supplying credentials
  4. Used the Selenium element picker to pick out the element we were interested in asserting.

The Commands window should now look like this:

Successful automation testing in Selenium IDE.
Added Command Check

Success!

The IDE version is the simplest to get started with and I recommend it for initial test write-ups. It can help you identify which elements you need to test against, think about app flow and what counts as a failure.

One question remains: Rendering the browser is nice, but I want to hook this into my continuous integration system. How can I do that when every test wants to load an application that requires a windowing system?

The answer is to go headless.

Test Case 3 – Puppeteer

Puppeteer is the perfect match to test web UI components inside a continuous integration system. It’s fast, headless, brings its own dependencies and runs the latest versions of Chrome and Firefox.

Let’s start by installing puppeteer on a new project:

mkdir tests
npm i puppeteer

Keep in mind that this automatically installs the chrome driver we had to manually download in the Selenium example. From Puppeteer’s documents:

When you install Puppeteer, it downloads a recent version of Chromium (~170MB Mac, ~282MB Linux, ~280MB Win) that is guaranteed to work with the API (customizable through Environment Variables).

https://pptr.dev/#installation

With that said, let’s create a test file that will run (and fail) our test scenario (puppeteer.js):

const puppeteer = require('puppeteer');

(async () => {
  const browser = await puppeteer.launch({headless: false});
  const page = await browser.newPage();
  const loginSelector = 'a[href="/enter"]';
  const submitLoginSelector = '[name="commit"]';
  const errorBoxSelector = '.bad notice';
  try {
    await page.goto('https://dev.to');
    await page.waitForSelector(loginSelector,{ timeout: 3000 });
    await page.click(loginSelector);
    const pageTitle = await page.title();

    if (pageTitle !== 'Welcome! - DEV Community'){
      throw new Error(`Page title ${pageTitle} does not match expected value`);
    }
    await page.waitForSelector(submitLoginSelector,{ timeout: 3000 });
    await page.click(submitLoginSelector);
    await page.waitForSelector(errorBoxSelector,{ timeout: 3000 });
    
  }catch(e){
    console.error(`Error in test suite: ${e.message}`)
  }finally {
    await browser.close();
  }
})();
Failed test due to incorrect error box selection

Some notes on the above code:

  • Lines 6-8 are Puppeteer’s method of selecting elements on the page.
  • Like Selenium WebDriver, you have to manually check a page’s attributes and decide on what to do should they fail
    • In the above code it’s line 15, asserting the title matches the expected value
    • It’ll also implicitly fail on line 20, due to the error div class not matching what dev.to sends to the browser.
  • I’ve disabled the headless feature to show that Puppeteer lets you do that!

Let’s fix the test. Change it to the correct value *and* turn on headless mode:

const puppeteer = require('puppeteer');

(async () => {
  const browser = await puppeteer.launch({headless: true});
  const page = await browser.newPage();
  const loginSelector = 'a[href="/enter"]';
  const submitLoginSelector = '[name="commit"]';
  const errorBoxSelector = '.registration__error-notice';
  try {
    await page.goto('https://dev.to');
    await page.waitForSelector(loginSelector,{ timeout: 3000 });
    await page.click(loginSelector);
    const pageTitle = await page.title();

    if (pageTitle !== 'Welcome! - DEV Community'){
      throw new Error(`Page title ${pageTitle} does not match expected value`);
    }

    await page.waitForSelector(submitLoginSelector,{ timeout: 3000 });
    await page.click(submitLoginSelector);
    await page.waitForSelector(errorBoxSelector,{ timeout: 3000 });
  }catch(e){
    console.error(`Error in test suite: ${e.message}`)
  }finally {
    await browser.close();
  }
})();

Now rerunning the test simply gets you the empty prompt:

tests:DreamMachine % node puppeteer.js
tests:DreamMachine % 

Nice, simple, and clean.

Conclusion

I’ve gone through three different sets of tools for different needs. The best part about these tools is that you can string them all together or pick and choose the ones that are right for you.

I hope the main takeaway is the same: Testing can be painless and even fun!

Selenium can also be used to test email signups with Mailsac.

Questions or comments? Stop by the Mailsac Forums, we’d love to hear from you!

Using Selenium To Test Account Email Signups

All the code shown in this article is published at
https://github.com/mailsac/selenium-js-example

Selenium and Mailsac can be used to test the delivery and contents of a signup email sent by a web application.

This example will demonstrate how to configure Selenium and provide code examples to automate and integrate testing with Mailsac.

What is Selenium?

Selenium is an automation tool for testing website user interfaces. It is open-source and supports multiple programming languages such as Java, Python, Javascript etc.

Selenium is not a single tool but is composed a several tools. Our example will focus on the WebDriver component. This will allow us to test our application as if a real person were operating the web browser.

Prerequisites

Installing Selenium

The Selenium WebDriver is installed during step 2 by running npm install.

  1. Clone the selenium-js-example repository and change directories to the cloned repository
    git clone https://github.com/mailsac/selenium-js-example.git && cd ./selenium-js-example
  2. Install the Selenium WebDriver by running npm install
  3. Download browser driver for the browser that will be tested (see table for download links).
  4. Place the browser driver in the system PATH
BrowserDriver
Chromechromedriver(.exe)
Internet ExplorerIEDriverServer.exe
EdgeMicrosoftWebDriver.msi
Firefoxgeckodriver(.exe)
Safarisafaridriver

The safaridriver is included with Safari 10 for OSX El Capitan and macOS Sierra. It does require Remote Automation in the Develop Menu to be enabled.

Configure the Browser for Selenium to Use

This example will default to using Firefox. In order to use a different browser set the SELENIUM_BROWSER environment variable.

List of supported SELENIUM_BROWSER values

SELENIUM_BROWSER=chrome
SELENIUM_BROWSER=firefox
SELENIUM_BROWSER=internet_explorer
SELENIUM_BROWSER=safari
SELENIUM_BROWSER=edge
SELENIUM_BROWSER=opera

Web Application Overview

The example web application consists of a single page with a form. The form accepts a username and email address.

Configuring the Web Application

Email will be sent using the Mailsac Outbound Message REST API. You will need to update mailsacAPIKey with your API keymailsacFromAddress is the address that this example will use are the from address.

const mailsacAPIKey = ""; // Generated by mailsac. See https://mailsac.com/api-keys
const mailsacFromAddress = "[email protected]";

Manual Test of Email Delivery

To manually test email delivery, launch the example web application by running npm start from the command line. Use a web browser to view http://localhost:3000/index.html

  1. Enter a username and email address.

2. If everything went well you should see a confirmation.

3. Check the inbox of Mailsac address you send to using the form on https://mailsac.com

4. Verify the message you sent has been received.

Automated Testing Using Selenium

To automate UI testing a few different components are required:

  • Selenium WebDriver: Automates input into our web application’s form
  • Mocha: Test framework to run the tests
  • HTTP Requests Module: To interact with the Mailsac API
  • Assert Module: Validates if a given expression is true
  • Webserver: Runs our web application

All of these components are installed when running npm install

Configure Mailsac API Key

To interact with the Mailsac API an API Key is needed. To generate a new API Key sign in to Mailsac and go to the API Keys Page.

An API Key is available for free to all registered users of Mailsac.

Configure the test to work with your API Key by adding it to the following line in ./test/test.js

const mailsacAPIKey = ""; // Generated by mailsac. See https://mailsac.com/api-keys

Run the Test

Before running the tests your Mailsac API key needs to be configured in ./test/test.js and SMTP settings configured in app.js.

The tests can be executed by running npm test from the command line.

npm test

> [email protected] test /home/user/repos/selenium-js-example
> mocha


  http-server
    register new user
(node:838754) [DEP0066] DeprecationWarning: OutgoingMessage.prototype._headers is deprecated
      ✓ sends email with link to example.com website (1383ms)


  1 passing (1s)

The last line in the above code snippet 1 passing (1s) shows our test passed. If the test failed, an error message will be displayed.

If you are using a browser other than Firefox you will need to add an environment variable when running the tests (eg SELENIUM_BROWSER=chrome npm test).

Using Mocha and Selenium to Automate Tests

This section will cover how Mocha and Selenium work together in this code example to test email delivery.

The integration tests are located in ./test/test.js. The tests are written in Mocha, which uses a behavior driver development model. This allows for the description of tests in easy to understand language.

Mocha Test Introduction

In the following example, the describe block includes a description of what is being tested. The it block describes the expected result. assert is used to test the for truth. If the expected statement is not true, there will be an exception, and the test will fail.

describe("tests truth", () => {
    it('true equals true', function() {
        assert(true); // assert checks for truth
    });
    it('false equals false', () => {
        // assert equal checks the first and second parameter are equal
        assert.equal(false,false);
    });
})

Mocha and Selenium

This section is a line by line explanation of the Mocha tests in the example. The code example is available on GitHub.

Mocha is used to call the Selenium WebDriver to perform actions on the example Web Application. The describe block shows we are going to be testing the process of registering a new user. The it block tells us what we expect to happen.

Inside the it block Selenium WebDriver is instructed to:

  • open a web browser using the webapp’s localhost URL
  • find the html element with the id username and enter text in the field
  • find the html element with the id email and enter specified text in the field
  • find the html element with the id submitUserCreation and click on it
it("sends email with link to example.com website", async () => {
  await driver.get(webappUrl);
  await driver.findElement(webdriver.By.id("username")).sendKeys("webdriver", "ExampleUser");
  await driver.findElement(webdriver.By.id("email")).sendKeys("webdriver", signupEmailAddress);
  await driver.findElement(webdriver.By.id("submitUserCreation")).click();
...

Our webapp will then email the address submitted by Selenium.

There is a for loop, following the Selenium commands, that uses the Mailsac API to fetch the mail from the specified email address. If an email isn’t found, it will retry 10 times waiting about 5 seconds between tries.

let messages = [];
for (let i = 0; i < 10; i++) {
   // returns the JSON array of email message objects from mailsac.
   const res = await request("https://mailsac.com")
           .get(`/api/addresses/${signupEmailAddress}/messages`)
           .set("Mailsac-Key", mailsacAPIKey);
   messages = res.body;
   if (messages.length > 0) {
      break;
   }
   await wait(4500);
}

If no messages are received from the Mailsac API after 10 tries, assert will create an exception and throw the error Never received messages!. The contents of the email are checked to see if the link https://example.com is in the email. If, the link is not found, an exception is created stating Missing / Incorrect link in email

assert(messages.length, "Never received messages!");
const link = messages[0].links.find((l) => "https://example.com");
assert(link, "Missing / Incorrect link in email");

Next Steps

This example can be modified to automate your team’s UI testing procedures. For another example of Mocha tests using Mailsac see the Integration Tests Blog Post.

Our forums are a great place to discuss usage of Mailsac’s API.

Github repository for all source code in this example:
https://github.com/mailsac/selenium-js-example