Blog cover

Own Your Software Testing Workflow With Subdomains

When the topic of domains and email comes up most people begin and end the conversation at the top domain level. Subdomains seem to be left out of the conversation in their entirety. Are we trapped in our thinking about subdomains as mere marketing and newsletter features? Maybe it’s too difficult to use subdomains without an IT team involved. Maybe no one has brought up subdomains outside of meme-filled newsletters. Maybe you just haven’t thought about subdomains in general.

Why use subdomains in your testing suite?

Well, let’s break up that thinking. Subdomains have a lot to offer. Do you have trouble testing 10 different email features in your application? Does the thought of accidentally sending an email to thousands of users that says “Test” make you break into a cold sweat? Subdomains can help.

We’ll show you some of the possibilities of subdomains and walk through some use cases. We’ll also provide a quick 15-second walkthrough at the end that will setup up 2 new subdomains for development and testing purposes.

And we’ll do all this using Mailsac’s Zero-Config subdomain feature.

But before we show you some of the juicy scenarios, let’s do a quick rundown of what a subdomain actually is.

What’s the difference between an email domain and a subdomain?

Breaking down what a subdomain really means in an email

Subdomains are a way to slice up domains for specific functions like newsletters and blogs. The advantage of a subdomain is having a clear purpose tied to the name. Receiving emails from [email protected] and [email protected] show their intent from their name alone. Receiving emails from [email protected] and [email protected] is a lot vaguer. The former set clearly sends memes and educational nuggets. The latter could be a friendly name for our billing bots.

Subdomains = an easy way to differentiate email by function.

Alright, sorry about that. Had to make sure everyone was on the same page on subdomains. Let’s move on to 3 different subdomain scenarios.

Subdomain Use Case 1: Developers Get Their Own Email Domains

You work on a team of developers, and each of you needs to test the same features on a few different applications. Additionally, each feature has an email workflow attached to it.  The usual response to this is to have a shared inbox, for example, [email protected]. But the pain around that approach comes fast. Issues like:

  • Difficulty in separating out each developer’s testing scenarios
  • Having to sift through 1000 other unrelated emails while looking for that 1 workflow email is painful
  • Complex workflows are pretty difficult to track
An example of how you can pin an app to a a particular subdomain inbox.
A domain for me, a domain for you

Creating an email subdomain per developer is an effective way to isolate these emails across systems:

Remember that you don’t need to create these inboxes ahead of time. They are made on the fly and removed when they make sense for you, the person knee-deep in the application.

Also not shown above just yet: Mailsac’s unified inbox in action.

Subdomain Use Case 2: Company-Wide Domains per Environment

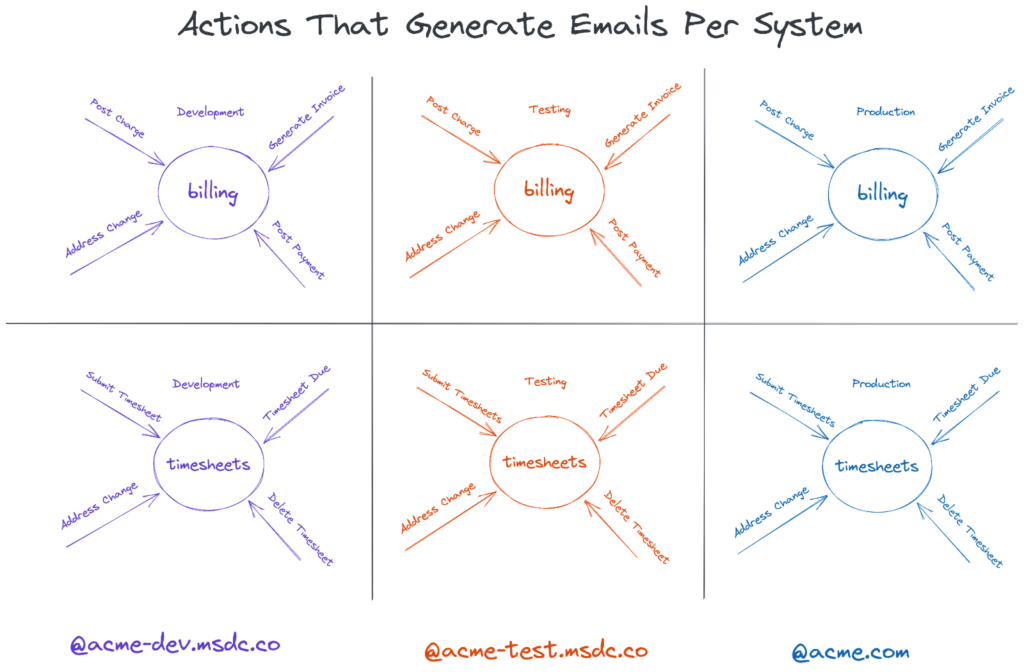
Example of segmenting via subdomains in your software testing suite.
Ensure emails stay in their zone

Environments for each set of applications are a pretty common scenario amongst enterprises. A sample above shows 2 applications split between 3 environments:

The upside of this approach is having predefined email subdomains for each environment. Developers, QA teams, and operations all know which environment the emails are associated with. QA testers can review the messages easily knowing which environment sent the emails. Operations and developers know which email address and domain to use as variables when configuring tests or environments. Ultimately, this saves time for all the teams involved.

Subdomain Use Case 3: Email Driven API Workflow

An example of how you can use subdomains in targeting specific inboxes in a subdomain.

An email-driven API workflow is a workflow that kicks off when an email arrives. The approach resembles the first scenario, where each developer gets their own domain. The difference is the usernames are less flexible. You pin it once to an API and use it for the long term. For example:

  • An email to [email protected] can trigger a Submit API action that can create a case in the HR management system
  • An email to [email protected] can trigger an Integration API action that can automatically create a ticketing workflow in your Incident Management system.

You can even string together a received email to a webhook using Mailsac’s webhook service. If you’d like to poll for updates instead we have websocket for close to real-time processing or the rest API for polling.

Alright, enough theory let’s do a walkthrough.

Walkthrough: Company-Wide Environments

Using the company-wide scenario we can have a working subdomain in a few seconds using Mailsac. A partner video will walk through the individual developer scenario.

You also have the option of using your own domain. This requires an external domain service provider. There are lots of guides out there on which domain registrar is the best

But let’s make this easy. Let’s use Mailsac’s Zero-Config Subdomain tool and bring up a new subdomain in 2 clicks. Note that you will need at least a Business Plan to make this scenario work. You can still enjoy the benefits of a single subdomain through the Indie Plan.

Zero-Click Subdomain

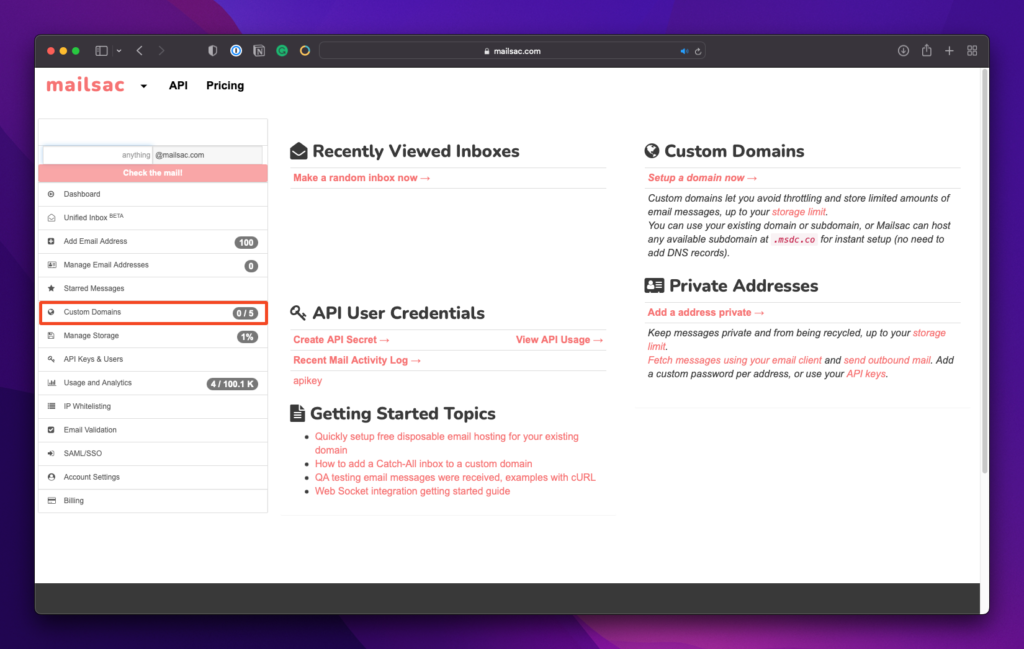
After creating a Mailsac account, navigate to “Custom Domains” from your dashboard:

Custom subdomain location in Mailsac's dashboard.

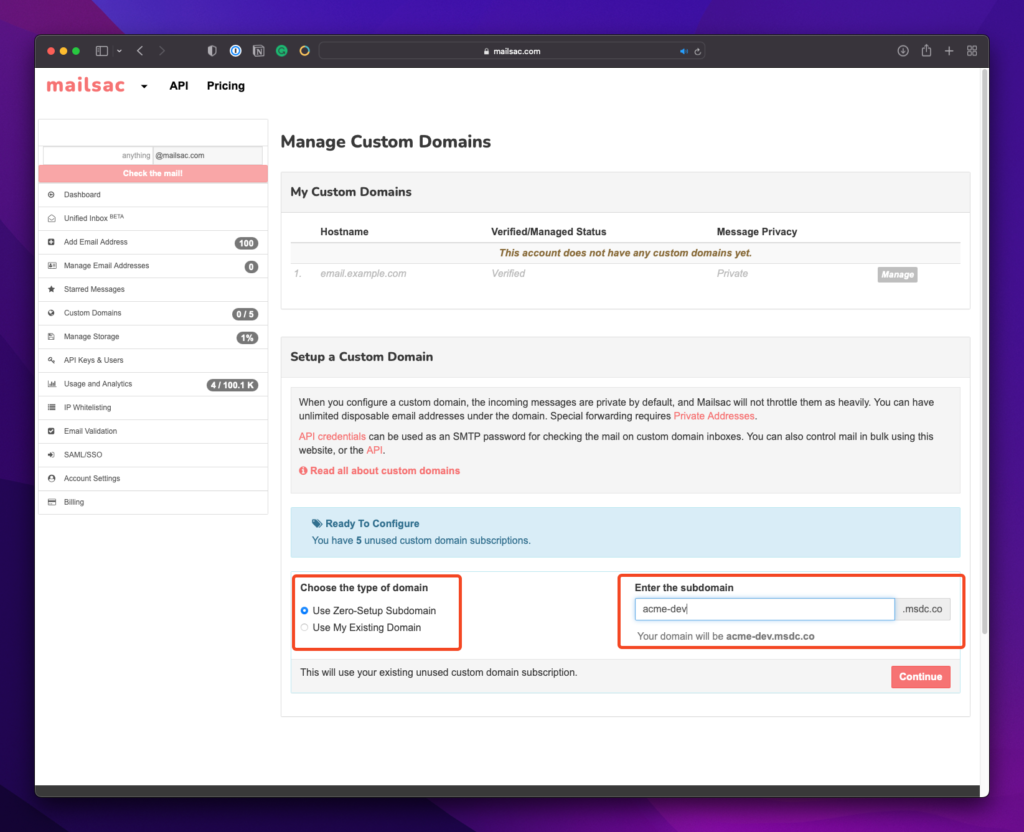
Type the name of the subdomain you’d like, in our case acme-dev and acme-test

Custom subdomain location and naming input in Mailsac's dashboard.

And that’s it! You should have 2 custom subdomains ready to use. Let’s put it them rough their paces. We’ll send out these emails from any client (I’ll use Gmail):

  1. To: [email protected]
    Subject: Email sent to Billing (DEV)
    Content: This is meant for dev
  2. To: [email protected]
    Subject: Timesheet Submission (DEV)
    Content: Sample timesheet submission
  3. To: [email protected]
    Subject: Timesheet Submission (TEST)
    Content: Sample timesheet submission
A manual approach to firing off emails to specific inboxes.
Nothing special here, just simulating a programmatic email

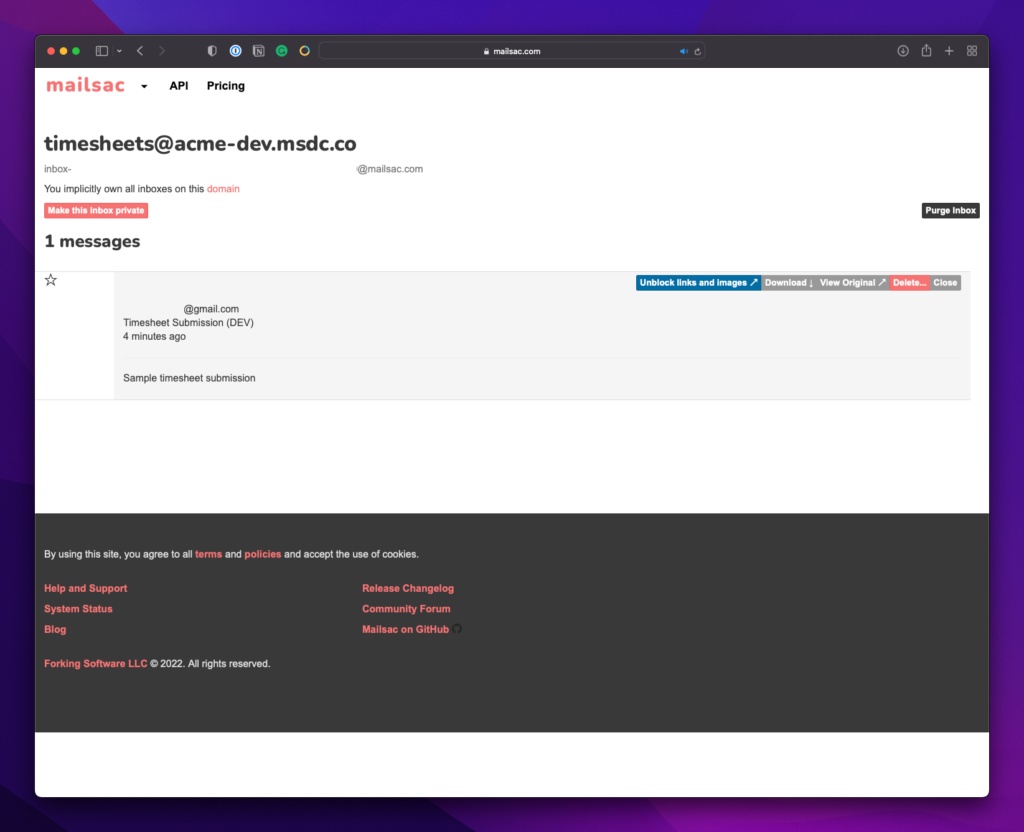
After submitting your set of emails, you *could* just check [email protected] and [email protected] individually…

Mailsac inbox where testing emails were directed to.
This is already looking painful…

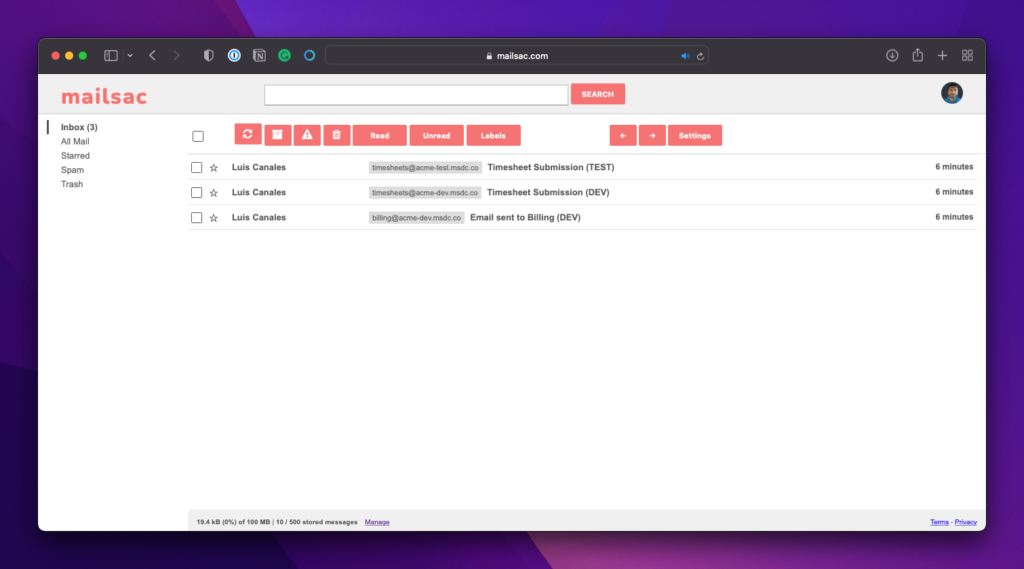
…or you could use the Unified Inbox feature that displays all of your custom domains, subdomains, and private addresses in one convenient location:

Mailsac's unified inbox tool.
Much better

It’s just that easy!

Wrap Up

With this new superpower, you should be able to conjure up lots of different use cases for subdomains. The friction of creating and importing domains is completely taken care of for you. No need to register a domain with an external registrar, or manage an IT team to handle registration for you.

We’re always looking for feedback, so let us know what you think or if you run into any problems on our forums.

Blog Cover

Automate the Testing Pain Away with Browser Automation

When I say “You need to test your code”, do you wince? Is it a feeling of guilt, one of “I know I should, but…”. Testing may not conjure up the sexiest of images. We as developers frequently put tests off until the end of our feature cycle. Or respond to a production bug by issuing a quick patch. Or worse, just bury our heads in the sand and pretend that we don’t have any bugs in our code at all. (Note: All code has bugs).

The reality is that testing is an incredible investment in your code’s future. Investing in tests is like an insurance policy: hedging your bets against an unknown future. An unknown future consisting of bitrot, dependency deprecations, or service API changes. Testing provides the ability to patch those unknowns through refactoring or flat-out removing stale dependencies. Testing can also buffer against those risks, providing peace of mind.

In this post, I’ll outline 3 different types of testing tools:

  • Selenium WebDriver
  • Selenium IDE
  • Puppeteer

To do an apples-to-apples comparison the testing scenario will be the same for all three tools. I’ll also model my testing after a user’s typical behavior. Behaviors like login attempts, searching, and form submissions. They also try to hit every layer of the application, from the user interface to the database.

Benefits of Testing a User Interface

Testing isn’t just limited to the backend. Testing your interface can provide complete end-to-end testing scenarios such as:

  1. Repeated calls to your modal. Does the modal come back after the first call?
  2. Does your submit button produce an error if the form has an incorrect value?
  3. Does the UI load after a successful login to an empty state in your application?
  4. Does a specific result come back after a form search?

I’m going to walk through a straightforward testing scenario with three tools. Not to rank them, but to touch on the nuances of each. Some of these tools allow you to create tests through simple browsing. Others are headless, allowing you to drive through programming languages.

What’s a headless browser?

Conventional browsing involves rendering forms, buttons, and images to the user. A headless browser interacts with websites through code without displaying any controls. Headless browsing opens up possibilities that are tough to achieve with conventional browsers like:

  • Integration with your build systems
  • Consistency in testing
  • Decreasing the duration of your tests
  • Layout screen captures and comparisons

Tools of the Automated Browser Trade

Onto the good stuff: The tools and testing scenarios.

The Most Popular – Selenium WebDriver

Selenium is by far the most popular testing tool out there. It covers headless testing and both local and remote tests.

WebDriver targets as its core base Developers and QA Team members who can write code.

The Easiest To Get Started with – Selenium IDE

Selenium designed the IDE version for exploratory testing and bug replication. It’s perfect for walking through a bug with someone else or creating a recording of a bug for your ticketing system.

The NodeJS Fan Favorite – Puppeteer

Puppeteer is a favorite of the NodeJS community due to its easy integration into your existing build system. It automates form submission, UI testing, keyboard inputs, and more. It’s main limitation however is the browsers it supports. As of this writing Puppeteer only supports Chrome. Firefox support is, as of this writing, experimental.

Puppeteer’s killer feature is that it installs the browser binary for you, making the integrating into your build system easy.

Testing Scenario: A Failed Login to dev.to

Here’s our testing scenario:

  1. Load https://dev.to
  2. Click the “Log in” button
  3. Load a page with “Welcome! – DEV Community” in its title.
  4. Click on the “Continue” button
  5. Ensure an “Unable to login” banner appears on the page.

For consistency throughout the walkthrough, I’ll use:

  1. Chrome as my browser
  2. Javascript as the programming language of choice

Test Case 1 – Selenium WebDriver

Let’s begin with an empty directory and selenium package installation:

npm init tests
cd tests
npm install selenium-webdriver

Next, download a browser driver. You can find the full supported list in selenium’s code repository. You can place the binary anywhere. For this walkthrough, I’ll place it in the current project directory under the bin/ path.

Set your specific browser driver path:

export PATH=$PATH:$PWD/bin

I’ll be using this quick test setup (selenium.js):

const {Builder, Browser, By, Key, until} = require('selenium-webdriver');

(async function example() {
  let driver = await new Builder().forBrowser(Browser.CHROME).build();
  try {
    await driver.get('http://dev.to');
    await driver.findElement(By.linkText('Log in')).click();
    await driver.wait(until.titleIs('Welcome! - DEV Community'), 3000);
    await driver.findElement(By.name('commit')).click();
    await driver.wait(until.titleIs(''), 3000);
    let errorBox = await driver.findElement(By.className('registration__error-notice'));
    await driver.wait(until.elementIsVisible(errorBox));
    let errorText = await errorBox.getText();

    if (!errorText.includes('Error')){
      throw new Error(`Error text does not contain expected value: ${errorText}`);
    }

  } finally {
    await driver.quit();
  }
})();

Set your driver and run the file

SELENIUM_BROWSER=chrome node selenium.js
A failed Selenium Test

In general I like to ensure my tests fail from the start, followed by working towards passing the tests:

const {Builder, Browser, By, Key, until} = require('selenium-webdriver');

(async function example() {
  let driver = await new Builder().forBrowser(Browser.CHROME).build();
  try {
    await driver.get('http://dev.to');
    await driver.findElement(By.linkText('Log in')).click();
    await driver.wait(until.titleIs('Welcome! - DEV Community'), 3000);
    await driver.findElement(By.name('commit')).click();
    await driver.wait(until.titleIs(''), 3000);
    let errorBox = await driver.findElement(By.className('registration__error-notice'));
    await driver.wait(until.elementIsVisible(errorBox));
    let errorText = await errorBox.getText();

    if (!errorText.includes('Unable to login')){
      throw new Error(`Error text does not contain expected value "${errorText}"`);
    }

  } catch(e) {
    console.error(`Error running test suite: ${e.message}`)
  }
  finally {
    await driver.quit();
  }
})();

With line 15 fixed, rerun the script:

A successful Selenium Test

Success!

The above was a taste of what you can do with Selenium. You can even break out of the testing mindset and use Selenium for scraping and populating activity trackers.

On to the next tool.

Test Case 2 – Selenium IDE

While the previous test requires some programming ability, Selenium IDE is friendly to anyone who can drive a browser. The IDE version’s main use case is bug discovery, recording and profiling.

First, download the package from the Selenium page.

After installing the plugin, start a new project:

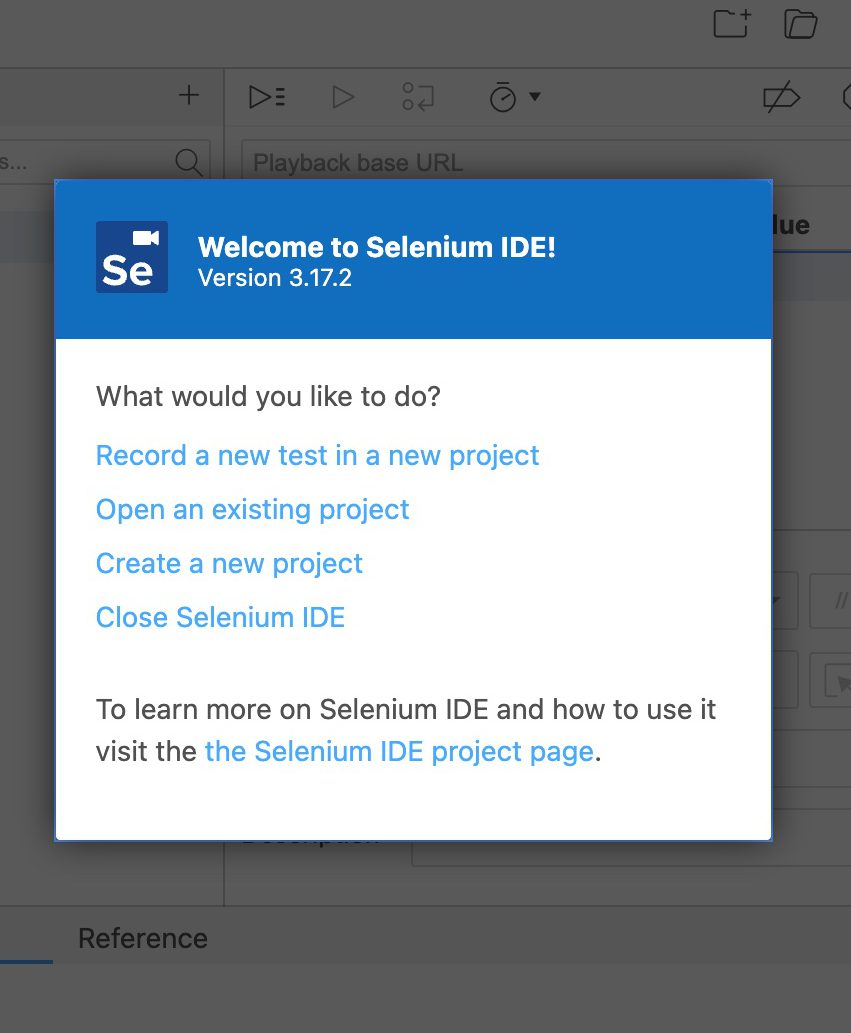
Selenium IDE introduction screen.
New Project Page
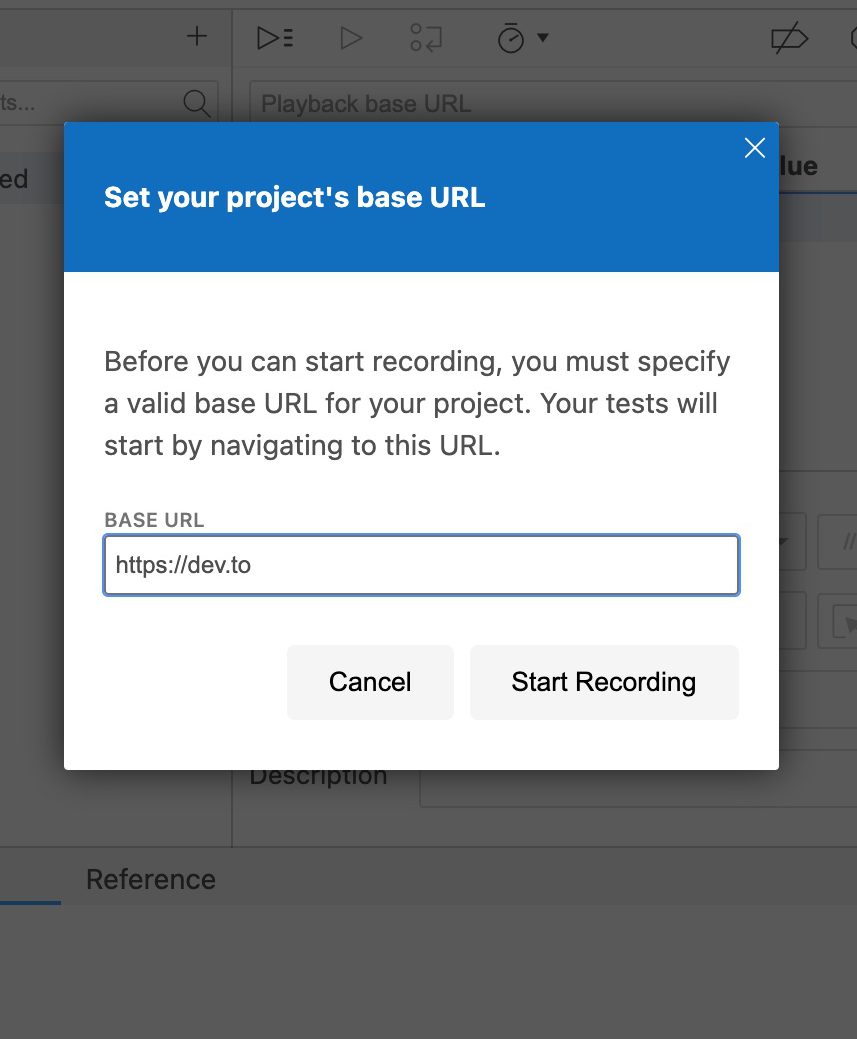
Selenium IDE's project base URL, where all of your tests will start.
Set our base url to dev.to

After you hit “Start Recording”, Selenium will launch a new Chrome window and redirect you to dev.to

Initial Dev.To Walkthrough with Selenium IDE

From the video, we:

  1. Let the initial dev.to page load
  2. Clicked on the “Log in” button
  3. Clicked on the Selenium IDE extension
  4. Stopped the Extension recording
  5. Arrived at the Commands window below
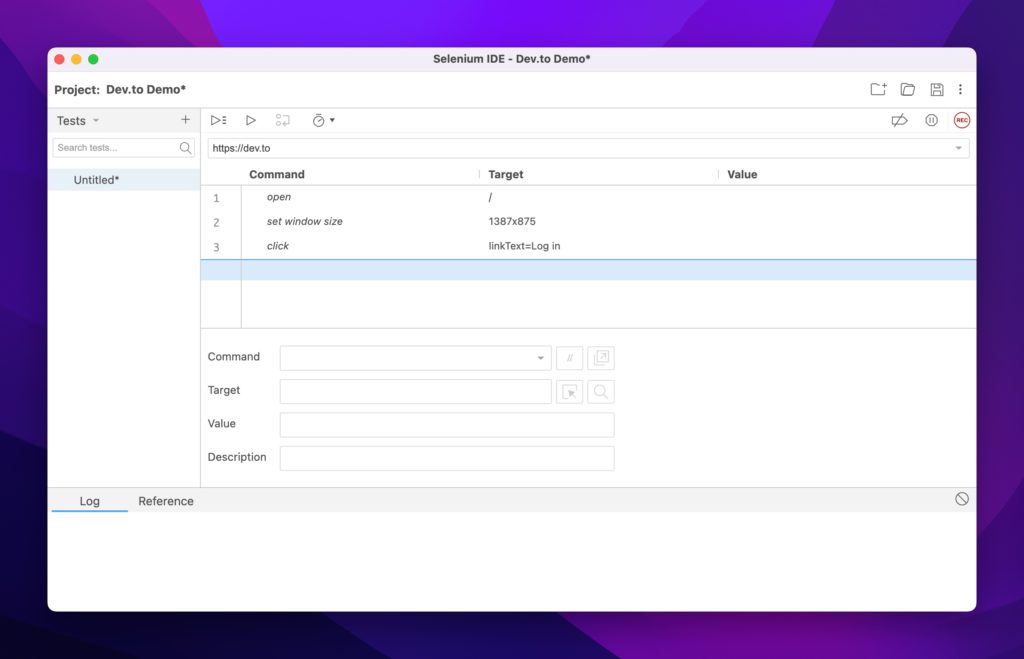
Selenium IDE's properties loaded automatically
Selenium testing properties loaded automatically

To continue our test scenario, let’s ensure that the page title is Welcome! - DEV Community and that our login attempt fails with an empty submission.

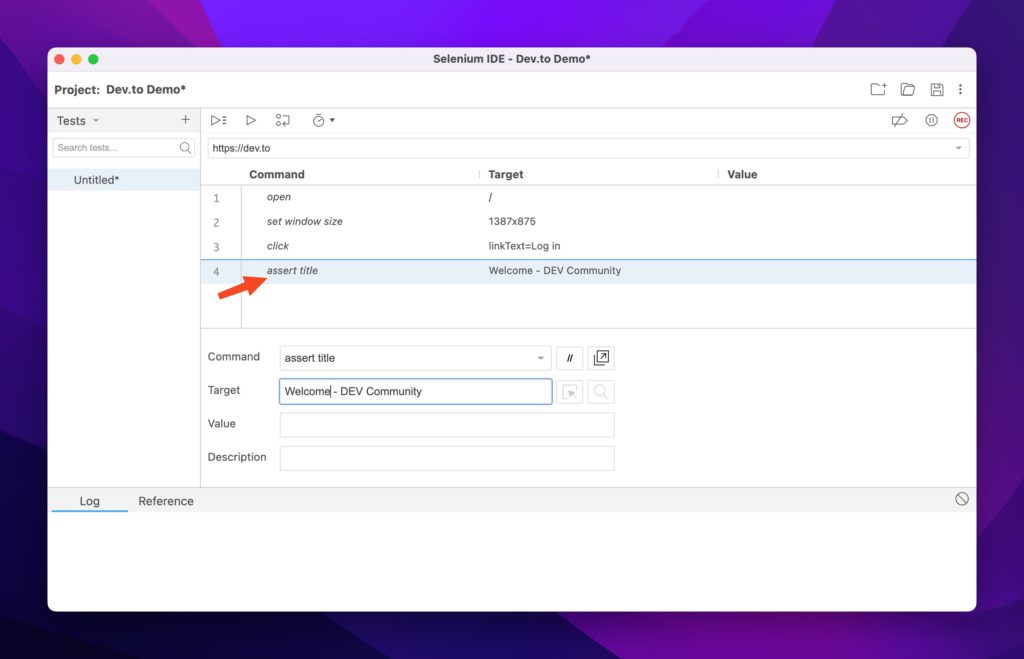
Again, I always like to have my tests fail first, so let’s start with that case. Use Selenium’s assert title command to ensure the title is what we expect. Add it to the command list:

Selenium IDE's asserting that the title fails.
Asserting the page title to fail

If you run the test, it should fail:

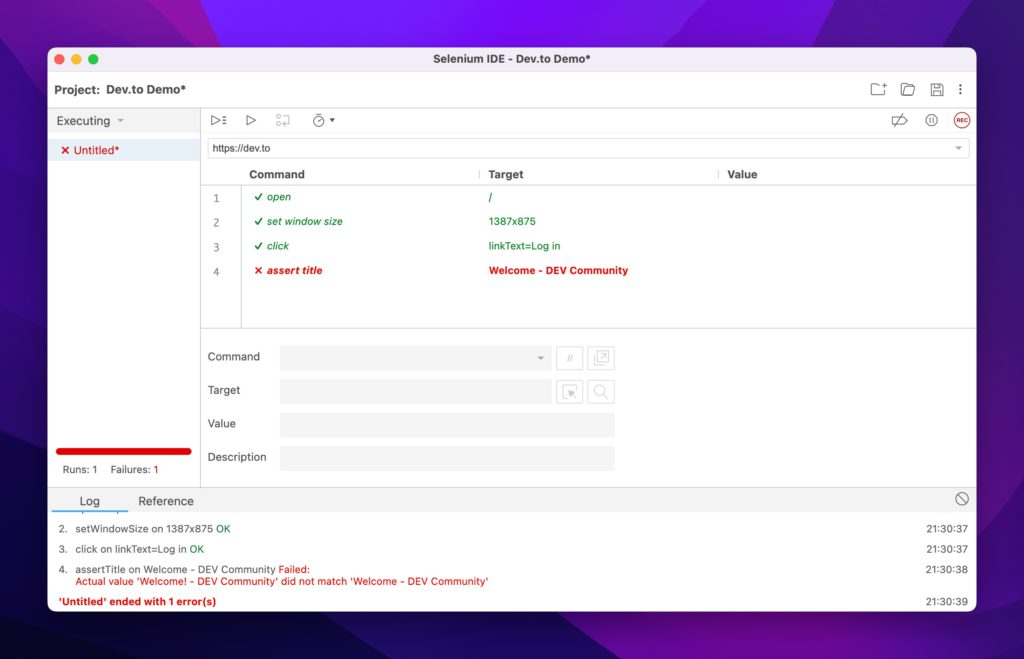
Failed automation testing in Selenium IDE.
Example of a failed test

Let’s go ahead and fix it with the correct title and rerun the test:

Successful Title Check

And success! Now let’s add the login check:

Walking through a complete test to success.

To summarize the video, we:

  1. Started a new recording
  2. Hit the Log in button
  3. Clicked Continue without supplying credentials
  4. Used the Selenium element picker to pick out the element we were interested in asserting.

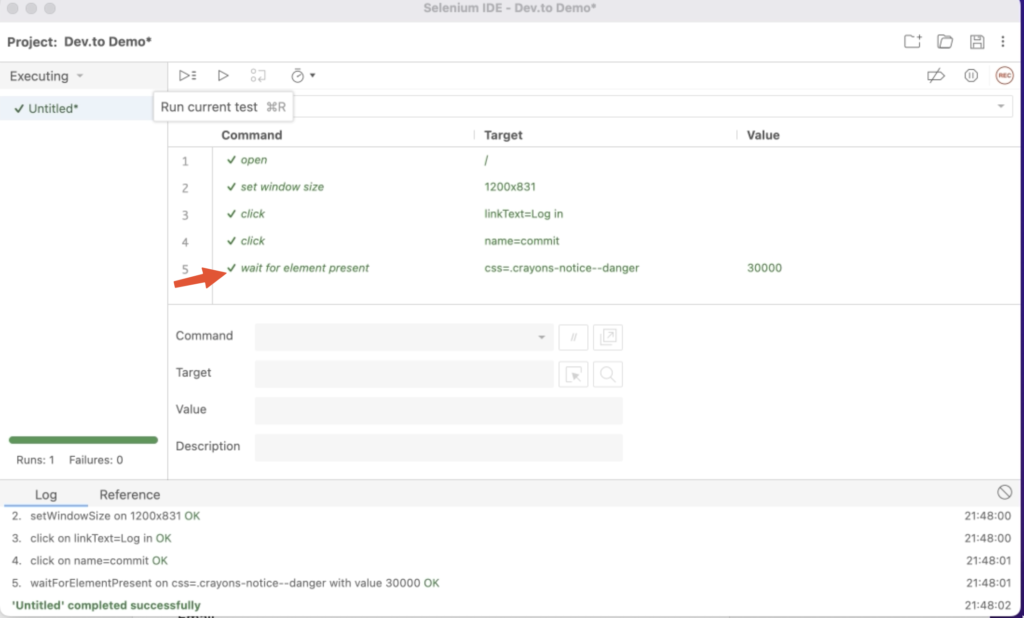
The Commands window should now look like this:

Successful automation testing in Selenium IDE.
Added Command Check

Success!

The IDE version is the simplest to get started with and I recommend it for initial test write-ups. It can help you identify which elements you need to test against, think about app flow and what counts as a failure.

One question remains: Rendering the browser is nice, but I want to hook this into my continuous integration system. How can I do that when every test wants to load an application that requires a windowing system?

The answer is to go headless.

Test Case 3 – Puppeteer

Puppeteer is the perfect match to test web UI components inside a continuous integration system. It’s fast, headless, brings its own dependencies and runs the latest versions of Chrome and Firefox.

Let’s start by installing puppeteer on a new project:

mkdir tests
npm i puppeteer

Keep in mind that this automatically installs the chrome driver we had to manually download in the Selenium example. From Puppeteer’s documents:

When you install Puppeteer, it downloads a recent version of Chromium (~170MB Mac, ~282MB Linux, ~280MB Win) that is guaranteed to work with the API (customizable through Environment Variables).

https://pptr.dev/#installation

With that said, let’s create a test file that will run (and fail) our test scenario (puppeteer.js):

const puppeteer = require('puppeteer');

(async () => {
  const browser = await puppeteer.launch({headless: false});
  const page = await browser.newPage();
  const loginSelector = 'a[href="/enter"]';
  const submitLoginSelector = '[name="commit"]';
  const errorBoxSelector = '.bad notice';
  try {
    await page.goto('https://dev.to');
    await page.waitForSelector(loginSelector,{ timeout: 3000 });
    await page.click(loginSelector);
    const pageTitle = await page.title();

    if (pageTitle !== 'Welcome! - DEV Community'){
      throw new Error(`Page title ${pageTitle} does not match expected value`);
    }
    await page.waitForSelector(submitLoginSelector,{ timeout: 3000 });
    await page.click(submitLoginSelector);
    await page.waitForSelector(errorBoxSelector,{ timeout: 3000 });
    
  }catch(e){
    console.error(`Error in test suite: ${e.message}`)
  }finally {
    await browser.close();
  }
})();
Failed test due to incorrect error box selection

Some notes on the above code:

  • Lines 6-8 are Puppeteer’s method of selecting elements on the page.
  • Like Selenium WebDriver, you have to manually check a page’s attributes and decide on what to do should they fail
    • In the above code it’s line 15, asserting the title matches the expected value
    • It’ll also implicitly fail on line 20, due to the error div class not matching what dev.to sends to the browser.
  • I’ve disabled the headless feature to show that Puppeteer lets you do that!

Let’s fix the test. Change it to the correct value *and* turn on headless mode:

const puppeteer = require('puppeteer');

(async () => {
  const browser = await puppeteer.launch({headless: true});
  const page = await browser.newPage();
  const loginSelector = 'a[href="/enter"]';
  const submitLoginSelector = '[name="commit"]';
  const errorBoxSelector = '.registration__error-notice';
  try {
    await page.goto('https://dev.to');
    await page.waitForSelector(loginSelector,{ timeout: 3000 });
    await page.click(loginSelector);
    const pageTitle = await page.title();

    if (pageTitle !== 'Welcome! - DEV Community'){
      throw new Error(`Page title ${pageTitle} does not match expected value`);
    }

    await page.waitForSelector(submitLoginSelector,{ timeout: 3000 });
    await page.click(submitLoginSelector);
    await page.waitForSelector(errorBoxSelector,{ timeout: 3000 });
  }catch(e){
    console.error(`Error in test suite: ${e.message}`)
  }finally {
    await browser.close();
  }
})();

Now rerunning the test simply gets you the empty prompt:

tests:DreamMachine % node puppeteer.js
tests:DreamMachine % 

Nice, simple, and clean.

Conclusion

I’ve gone through three different sets of tools for different needs. The best part about these tools is that you can string them all together or pick and choose the ones that are right for you.

I hope the main takeaway is the same: Testing can be painless and even fun!

Selenium can also be used to test email signups with Mailsac.

Questions or comments? Stop by the Mailsac Forums, we’d love to hear from you!

Blog Cover

Guide To Stress Free Email Testing with Next.js

Developing an application that sends emails is straightforward but not without its risks. Ensuring deliverability but not actually having any of those emails land inside real inboxes is a top concern for any developer. Which leads to questions like: “How do you test your application’s outbound email capabilities?” or “How do I manage email testing for free?”

Enter email capture services. While the term “email capture service” tends to focus on the marketing aspects (capturing information from your calls to action, ensuring emails don’t get caught in spam, etc) they also include SMTP deliverability. Mailsac offers an email capture service that addresses the deliverability aspect, specifically not delivering any email to its intended recipient. Effectively a “black hole” where no email should escape to the outside world.

In this post, we’ll walk through a sample application in Next.js that will generate emails and have those emails captured by Mailsac’s email sandboxing service.

Do I Really Need To Do Email Testing?

Some frameworks do come with email previewing capabilities like Rails’ ActionMailer. Said frameworks don’t actually attempt to send anything but instead preview the email on your machine. We recommend real testing during the development and quality assurance phase by using an external SMTP server to mimic the application’s behavior in production.

Testing that capability has to be done safely unless you want to land on Twitter’s trending page for accidentally sending customers an integration test email.

Test Email Sending With A Next.js Application

For the rest of this guide, we’ll focus on wiring up a simple application that will allow users to send an email when a button is pushed from a UI. We’ll then demonstrate the capture of those emails in our development environment.

The components we’ll use are:

Application Creation

While the focus of this guide isn’t a line-by-line walkthrough of the sample code, we’ll focus on the key aspects of the application that mainly involve emailing capabilities.

The application source can be found in our git repository.

1. Application setup

Let’s start by creating a quick next app with tailwind support:

mailsac % npx create-next-app
…
Success! Created nodejs-send-email at /Users/mailsac/code/nodejs-send-email

cd nodejs-send-email
npm install -D tailwindcss postcss autoprefixer @tailwindcss/forms
npm install @headlessui/react@latest @heroicons/react
npx tailwindcss init -p

The above is the recommended way to install tailwind on Next.js according to their guide.

Configure tailwind.config.js by adding the highlighted lines:

module.exports = {
  content: [
	"./pages/**/*.{js,ts,jsx,tsx}",
	"./components/**/*.{js,ts,jsx,tsx}",
  ],
  theme: {
	extend: {},
  },
  plugins: [
    require('@tailwindcss/forms'),
  ],
}

and then add tailwind itself to the global CSS file inside styles/global.css and comment out some default CSS created by npx:

/* @media (prefers-color-scheme: dark) {
  html {
    color-scheme: dark;
  }
  body {
    color: white;
    background: black;
  }
}
*/

@tailwind base;
@tailwind components;
@tailwind utilities;

Tailwind is strictly optional but recommended for easy styling of the frontend.

2. Add the front page UI

Feel free to add your custom frontend code or use the index.js and components/notifications.js react component samples inside our repo.

index.js

import { useEffect, useState } from "react";
import Notification from "../components/notifications";

export default function Index() {
  const [sentEmail, setSentEmail] = useState(false);
  const [emailTo, setEmailTo] = useState("");
  const [emailBody,setEmailBody] = useState("");
  const [resultMessage, setResultMessage] = useState("");

  const sendEmail = () => {
    setSentEmail(true);
  }

  useEffect( () => {
    fetch('/api/send-email',{
      method: 'POST',
      body: JSON.stringify({ to: emailTo, body: emailBody})
    })
    .then( res => res.json())
    .then(response => {
      setResultMessage(response.message)
    })
    .catch(error => console.log(error));    

  },[sentEmail]);

  const SentEmailBanner = sentEmail === true? <Notification message={resultMessage} /> : null;

The second line brings in a component that takes in a message and formats it as a pop-up notification. The useEffect() method sends your email recipient and body input to the backend, which will forward that data to Mailsac’s servers.

3. Sign up for Mailsac’s Email Capture

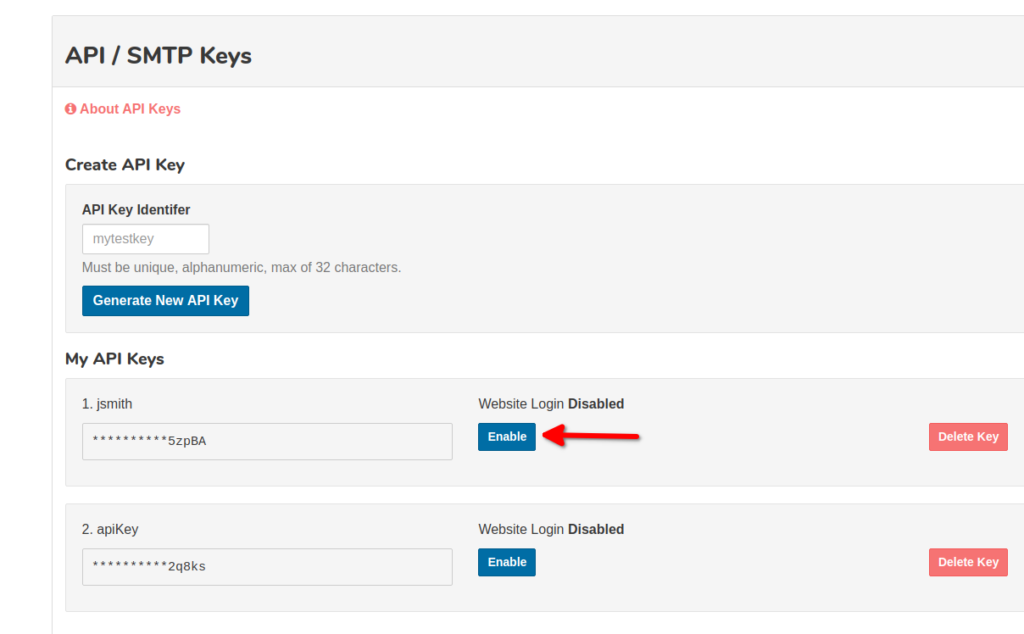
Mailsac has a free email capture service. All you need is to sign up for an account and generate a key:

Mailsac dashboard
Mailsac Dashboard

4. Add a backend mail handler route

Once you’ve generated and saved your keys, you can place them in a .env file:

.env

MAILSAC_USERNAME=lcanal
MAILSAC_API_KEY=Key generated from above

Following our email capture documentation, we’ll create a backend API route for Next to handle the request:

pages/api/send-email.js

const nodemailer = require("nodemailer");

export default async function handler(req, res) {
  let emailEnvelope = JSON.parse(req.body)
  if (
        req.method === 'POST' 
        && typeof(emailEnvelope.to) !== 'undefined' 
        && emailEnvelope.to !== ''
  ){
    const mailsaUserName = process.env.MAILSAC_USERNAME
    const mailsacAPIKey  = process.env.MAILSAC_API_KEY
  
    const transporter = nodemailer.createTransport({
      host: 'capture.mailsac.com',
      port: 5587,
      // will use TLS by upgrading later in the connection with STARTTLS
      secure: false,
      auth: {
        user: mailsaUserName,
        pass: mailsacAPIKey
      }
    })
  
    try {
      const results = await transporter.sendMail({
        from: '"Sample App" [email protected]',
        to: emailEnvelope.to,
        subject: 'Sample App Send',
        text: emailEnvelope.body
      })
      res.status(200).json(
        { 
          message: "You should now see an email in Mailsac's capture service", 
          response: results.data 
        }
      )
    } catch (error){
      console.log(`ERROR ${error}`)
      res.status(500).json({ message: `${error.response}`, response: error })
    }
  } else {
    return res.status(200).json({message: "No data"});
  }
}

In the highlighted line, we’re ensuring the useEffect() hook gets called with input data before we allow the rest of the function to continue. useEffect() gets called a variety of times in the component lifecycle, and this check is to ensure it was initiated by an end user and not as part of the component mounting.

5. Test driving the app

Fire up the application via

npm run dev

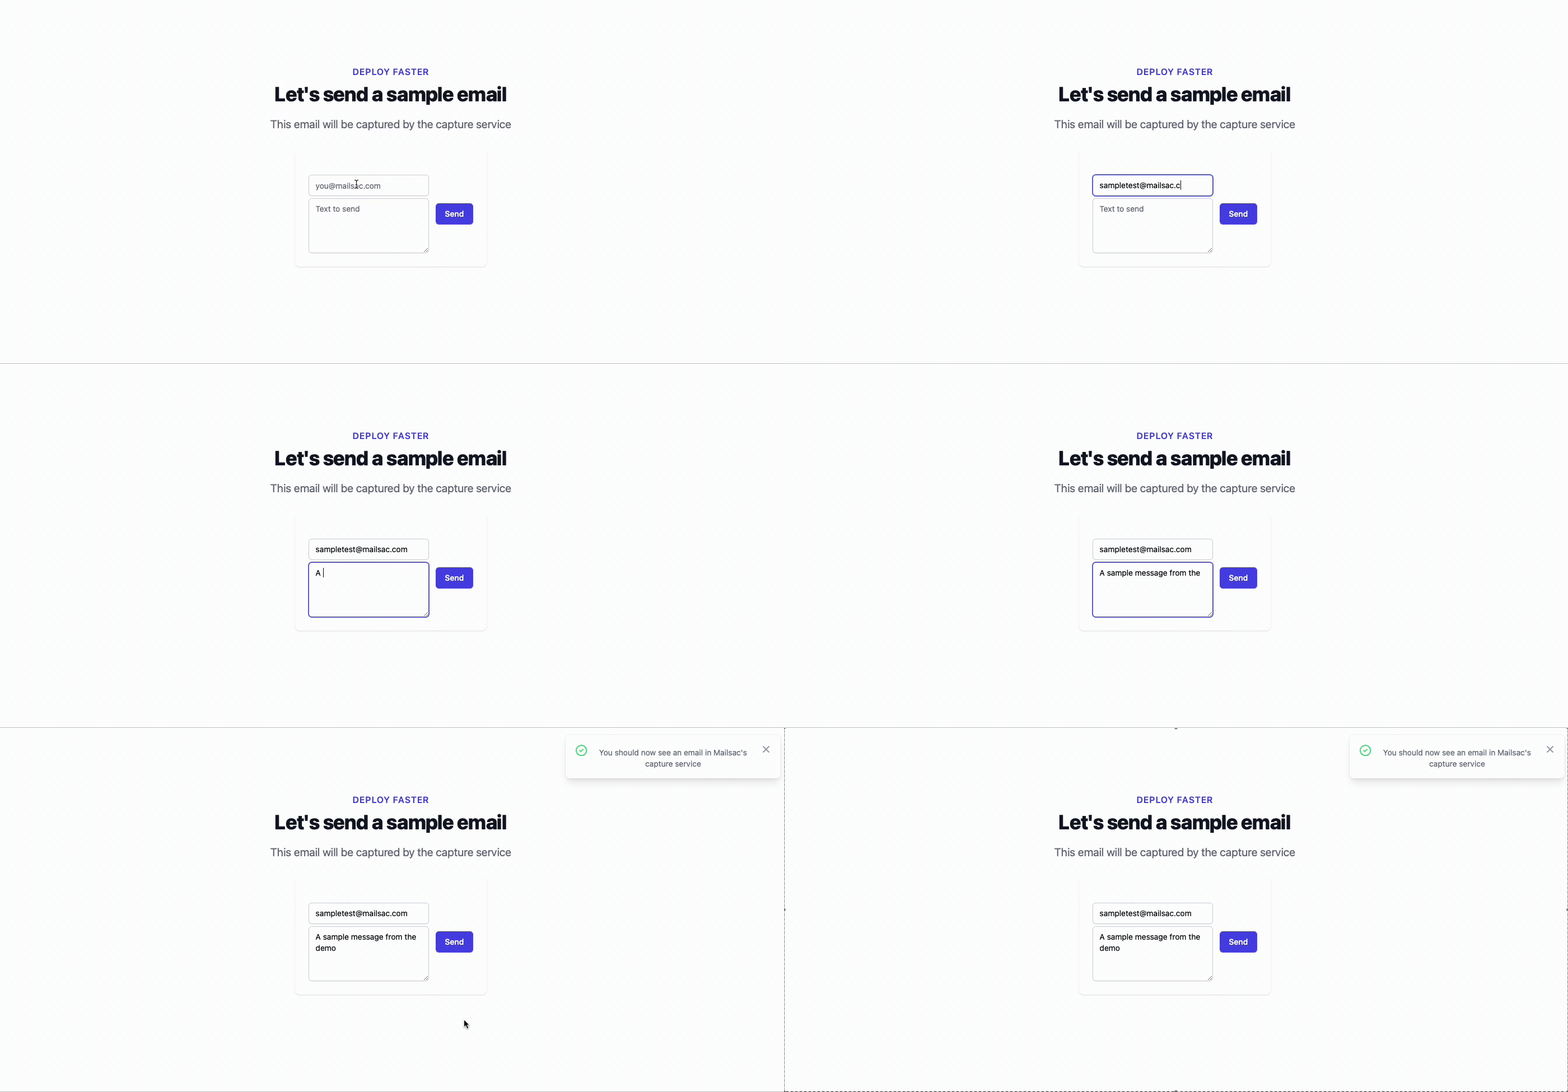
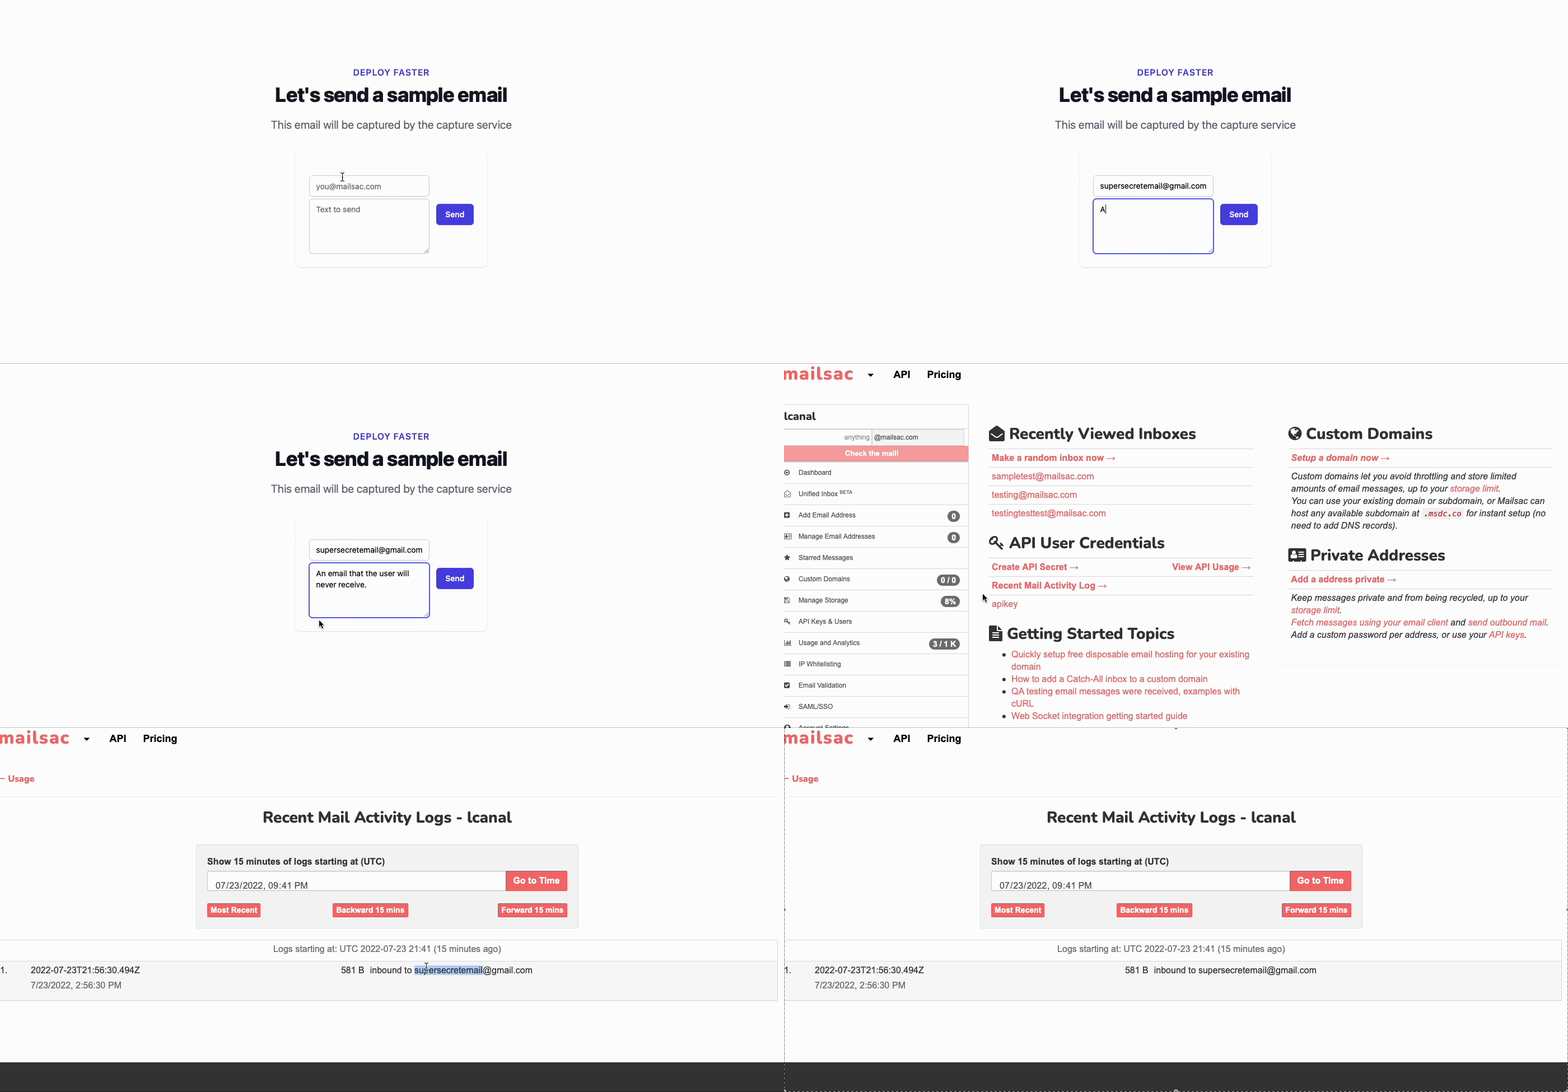
Navigate to http://localhost:3000 and type a text message:

Walking through our sample application form.

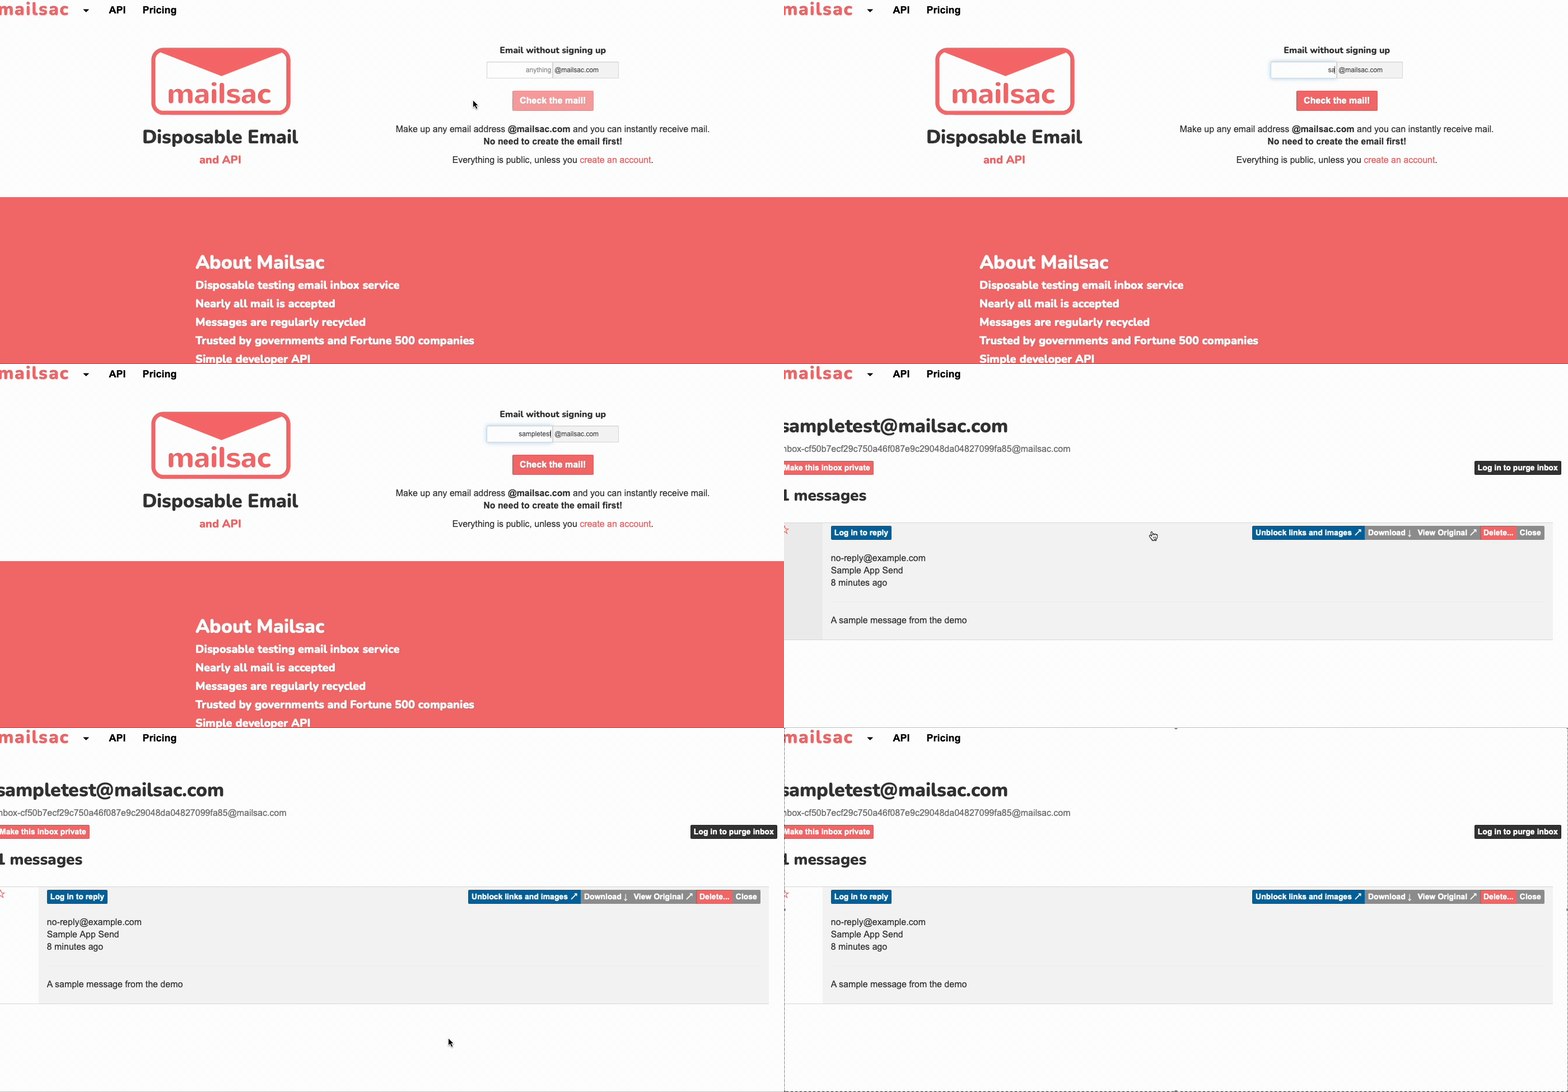
Then navigate over to mailsac.com to view the message

Checking the inbox at mailsac.com

6. Capturing other email domains

While that works well as a contrived example, the real value comes when using any arbitrary email in the recipient field:

Full application walkthrough demo, with a free check at mailsac.

Capturing emails outside the mailsac.com domain is extremely valuable when switching between different environments. For example, in the demo application example above, the .env environment file could instead look like

MAILSAC_USERNAME=$MAILSAC_NAME
MAILSAC_API_KEY=$MAILSAC_KEY
MAILSAC_HOST=capture.mailsac.com
MAILSAC_PORT=5587

With the updated send-email.js

const nodemailer = require("nodemailer");

export default async function handler(req, res) {
  let emailEnvelope = JSON.parse(req.body)
  if (
        req.method === 'POST' 
        && typeof(emailEnvelope.to) !== 'undefined' 
        && emailEnvelope.to !== ''
  ){
    const mailsaUserName = process.env.MAILSAC_USERNAME
    const mailsacAPIKey  = process.env.MAILSAC_API_KEY
  
    const transporter = nodemailer.createTransport({
      host: process.env.MAILSAC_HOST,
      port: process.env.MAILSAC_PORT,
      // will use TLS by upgrading later in the connection with STARTTLS
      secure: false,
      auth: {
        user: mailsaUserName,
        pass: mailsacAPIKey
      }
    })
  
    try {
      const results = await transporter.sendMail({
        from: '"Sample App" [email protected]',
        to: emailEnvelope.to,
        subject: 'Sample App Send',
        text: emailEnvelope.body
      })
      res.status(200).json(
        { 
          message: "You should now see an email in Mailsac's capture service", 
          response: results.data 
        }
      )
    } catch (error){
      res.status(500).json({ message: `${error.response}`, response: error })
    }
  } else {
    return res.status(200).json({message: "No data"});
  }
}

The above edits would allow you to deploy to a testing or production environment and the only changes required would be in the .env file. Specifically, the SMTP host and authentication settings.

Conclusion

The above guide just scratches the surface of what you can do with our email services. We provide a unified inbox that allows testers to view their bulk email testing in one unified view and custom domains for those who do not have their own domains with zero setup configurations.

Additionally, we have a guide on using both custom domains and a unified inbox in your system testing. Check it out and tell us what you think on our forums!

Self-Hosted Mailsac UI

This tutorial references code published at https://github.com/mailsac/mailsac-self-hosted-ui

The Mailsac Self-Hosted Temporary Email User Interface is available in a GitHub repository. This project provides a self-hosted user interface for viewing disposable email. It uses mailsac.com as the backend email service.

Mailsac.com Limitations

Mailsac already offers disposable email without a need to sign up for an account. What need does this application meet that Mailsac doesn’t already provide?

Mailsac has limitations on what can be viewed without signing up for an account. Only the latest email in a public mailbox can be viewed without signing in. Mail in a private domain cannot be viewed without signing in with an account that has permissions to the private domain.

Use Cases

There are two use cases that customer’s have brought to our attention that Mailsac’s service doesn’t satisfy. Both stem from a requirement to allow users read-only access to an inbox without the requirement of creating a Mailsac account.

Class Room Use Case

An instructor may want students, who are young in age and don’t have an email address, to sign up for an account with a web service used in the class. The Mailsac Self-Hosted Temporary Email User Interface application provides a simplified interface for students to view email sent to a private mailsac hosted domain without the need to sign up for a mailsac account or email address.

Acceptance Tester Use Case

As part of the sofware development lifecycle there is a need to have software tested by users. Temporary email has long been beneficial to testing. The Mailsac Self-Hosted Temporary Email User Interface makes this easier. Users can test applications using email addresses in a Mailsac hosted private domain without the need to sign up for a Mailsac account. Furthermore, because the application is self-hosted companies can use a reverse proxy to enforce IP allow lists or put the application behind basic authentication.

Running the Mailsac Self-Hosted Email User Interface

Local

With NodeJS installed this application can be run with the following commands.

npm install && npm run build
MAILSAC_KEY=YOUR_MAILSAC_API_KEY npm run start

You will need to generate a Mailsac API key. To generate or manage API Keys use the API Keys page.

The application is now running and can be accessed via a web browser at http://localhost:3000 .

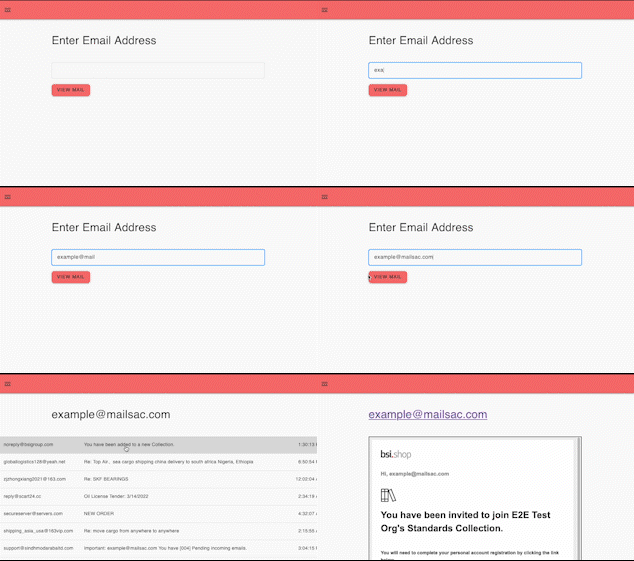
Any public or private Mailsac hosted address the API key has access to can be viewed by entering the email address in the text box and selecting “view mail”.

Screenshot of Application with no domain defined

Domain Option

You can prepopulate the domain by using the NEXT_PUBLIC_MAILSAC_CUSTOM_DOMAIN environment variable.

NEXT_PUBLIC_MAILSAC_CUSTOM_DOMAIN=example.mailsac.com npm run build
MAILSAC_KEY=YOUR_MAILSAC_API_KEY npm run start
Screenshot of pre-populated domain

Vercel Hosted

Vercel is a platform as a service provider. Their service makes running your own Next.js application easy.

The Vercel Getting Started guide is easy to follow.

  1. Fork this repo.
  2. Sign up for a Vercel account
  3. Grant Vercel permissions to read all your repos or choose to grant permission on the forked repo
  4. Import forked repository into Vercel
Screenshot showing import of forked repo
  1. Configure MAILSAC_KEY environment variable
Screenshot of environment variables

  1. Deploy application
Screenshot showing deployment success

After a successful deployment you can click on the image of the application to be taken to the live application.

NOTE There is currently no authentication on this application. Anyone with the URL will be able to view emails and domains associated with the Mailsac API key that was used. Operations will be tracked in the Mailsac account in which the API key is associated with.

You are free to deploy this app however you like. Please keep the attribution to Mailsac.

Email Integration Tests Using Java

Mailsac provides a REST API to fetch and read email. The REST API also allows you to reserve an email address that can forward messages to another mailsac email address, Slack, WebSocket, or webhook

This article describes how to integrate with Mailsac using Java and the JUnit testing framework. The JavaMail API will be used to send email via SMTP.

What is JUnit?

JUnit is a unit testing framework for the Java programming language. The latest version of the framework, JUnit 5, requires Java 8 or above. It supports testing using a command-line interface, build automation tools, and IDEs.

JUnit can be used to test individual components of code to ensure that each unit is performing as intended.

Setting Up the Environment

Depending on the environment, there are multiple ways to run tests. Testing using the command and JUnit are included in this example.

Testing Using Command-Line

Running tests from the command-line requires the ConsoleLauncher application(junit-platform-console-standalone-1.7.2.jar). JUnit ConsoleLauncher is published in the Maven Central repository under the junit-platform-console-standalone directory.

  1. Navigate to the Maven Central directory
  2. Download junit-platform-console-standalone-1.7.2.jar.
  3. Create a directory for the project: mkdir mailsac-tests.
  4. Move the jar file you downloaded into the directory mailsac-tests.
  5. Create a directory inside mailsac-testsmkdir test.

    Note: mailsac-tests/test will contain your source code.

JUnit Testing Introduction

This code example shows basic usage of the JUnit testing framework.

Inside the directory mailsac-tests/test, create a java file: touch TestClass.java.

Add the following code snippet to ./mailsac-tests/test/TestClass.java

import static org.junit.jupiter.api.Assertions.assertTrue;
import static org.junit.jupiter.api.Assertions.assertEquals;
import org.junit.jupiter.api.DisplayName;
import org.junit.jupiter.api.Test;

@DisplayName("tests truth")
class TestClass {

    @Test
    @DisplayName("true equals true")
    void trueEqualsTrue() {
        // The assertTrue method asserts that the supplied condition is true.
        // static void assertTrue(condition)
        assertTrue(true);
    }

    @Test
    @DisplayName("false equals false")
    void falseEqualsFalse() {
        // The assertEquals method asserts that expected and actual are equal.
        // static void assertEquals(expected, actual)
        assertEquals(false, false);
    }

}

@Test Denotes that a method is a test.

@DisplayName Declares a custom display name for the test class or test method.

Refer to JUnit annotations and JUnit Assertions for further reading.

Running JUnit Tests From The Command-Line

  1. Inside the directory mailsac-tests, compile the test:javac -verbose -cp junit-platform-console-standalone-1.7.2.jar -d test test/TestClass.java.
  2. Then run:java -jar junit-platform-console-standalone-1.7.2.jar --class-path test --scan-class-path.

The output should appear similar to this:

╷
├─ JUnit Jupiter ✔
│  └─ tests truth ✔
│     ├─ false equals false ✔
│     └─ true equals true ✔
└─ JUnit Vintage ✔

Test run finished after 92 ms
[         3 containers found      ]
[         0 containers skipped    ]
[         3 containers started    ]
[         0 containers aborted    ]
[         3 containers successful ]
[         0 containers failed     ]
[         2 tests found           ]
[         0 tests skipped         ]
[         2 tests started         ]
[         0 tests aborted         ]
[         2 tests successful      ]
[         0 tests failed          ]

The first section of output shows the name of the unit test (tests truth) and the test names (true equals true and false equals false). The checkmark next to the test name indicates it was successful.

The second section of output shows a summary of the test results.

Testing Using Build Tools

Testing from build automation tools, like Maven, is another option. In many ways, using build tools is the best option. For instance, they provide a standard directory layout that encourages industry standard naming conventions.

Maven abstracts many underlying mechanisms allowing developers to run a single command for validating, compiling, testing, packaging, verifying, installing, and deploying code.

This section will describe how to set up Maven for building, managing, and testing a project.

  1. Navigate to the Apache Maven download page and follow the installation instructions. If you have Homebrew you can install Maven using the command: brew install maven.
  2. After installing Maven, run on the command-line to initialize the directory mailsac-integration-test-java as a maven managed project:
mvn archetype:generate \
    -DgroupId=com.mailsac.api \
    -DartifactId=mailsac-integration-test-java \
    -DarchetypeArtifactId=maven-archetype-quickstart \
    -DarchetypeVersion=1.4 \
    -DinteractiveMode=false
  1. Navigate into the directory: cd mailsac-integration-test-java
  2. Update the <dependencies> and <build> sections of pom.xml with the following xml.
<!-- ... -->
<dependencies>
  <dependency>
    <groupId>org.junit.jupiter</groupId>
    <artifactId>junit-jupiter-api</artifactId>
    <version>5.7.2</version>
    <scope>test</scope>
  </dependency>
  <dependency>
    <groupId>org.junit.jupiter</groupId>
    <artifactId>junit-jupiter-engine</artifactId>
    <version>5.7.2</version>
    <scope>test</scope>
  </dependency>
</dependencies>
<!-- ... -->
<build>
  <pluginManagement>
    <!-- ... -->
    <plugins>
      <plugin>
        <artifactId>maven-surefire-plugin</artifactId>
        <version>2.22.2</version>
      </plugin>
      <plugin>
        <artifactId>maven-failsafe-plugin</artifactId>
        <version>2.22.2</version>
      </plugin>
    </plugins>
    <!-- ... -->
  </pluginManagement>
</build>
<!-- ... -->
  1. Edit the AppTest.java file: $EDITOR src/test/java/com/mailsac/api/AppTest.java
package com.mailsac.api;

import static org.junit.jupiter.api.Assertions.assertTrue;
import static org.junit.jupiter.api.Assertions.assertEquals;
import org.junit.jupiter.api.Test;

class TestClass {

    @Test
    void trueEqualsTrue() {
        // The assertTrue method asserts that the supplied condition is true.
        // static void assertTrue(condition)
        assertTrue(true);
    }

    @Test
    void falseEqualsFalse() {
        // The assertEquals method asserts that expected and actual are equal.
        // static void assertEquals(expected, actual)
        assertEquals(false, false);
    }

}
  1. In the directory mailsac-integration-test-java, run mvn clean package. This command deletes the folder target , packages the project into a new target folder, and runs a unit test.
  2. Tests can be manually run using the command mvn test in the mailsac-integration-test-java directory.The output should appear similar to:
[INFO] -------------------------------------------------------
[INFO]  T E S T S
[INFO] -------------------------------------------------------
[INFO] Running com.mailsac.api.TestClass
[INFO] Tests run: 2, Failures: 0, Errors: 0, Skipped: 0, Time elapsed: 0.029 s - in com.mailsac.api.TestClass
[INFO] 
[INFO] Results:
[INFO] 
[INFO] Tests run: 2, Failures: 0, Errors: 0, Skipped: 0

Mailsac Java Integration Test

This section describes how to leverage Mailsac and JUnit to test mail delivery. Emails will be sent to Mailsac using SMTP and email delivery will be validated with JUnit.

There are 3 additional libraries that will be used:

Integration Test Example

  1. With Maven, add the following dependencies to pom.xml
    If you are not using Maven include the JAR files in the classpath:

https://mvnrepository.com/artifact/com.mashape.unirest/unirest-java/1.4.9

https://mvnrepository.com/artifact/com.sun.mail/javax.mail/1.6.2

https://mvnrepository.com/artifact/com.fasterxml.jackson.core/jackson-databind/2.12.5

<!-- ... -->
<dependencies>
  <!-- ... -->
  <dependency>
    <groupId>com.mashape.unirest</groupId>
    <artifactId>unirest-java</artifactId>
    <version>1.4.9</version>
  </dependency>
  <dependency>
    <groupId>com.sun.mail</groupId>
    <artifactId>javax.mail</artifactId>
    <version>1.6.2</version>
  </dependency>
  <dependency>
    <groupId>com.fasterxml.jackson.core</groupId>
    <artifactId>jackson-databind</artifactId>
    <version>2.12.5</version>
  </dependency>
</dependencies>
<!-- ... -->
  1. Edit the AppTest.java file: $EDITOR src/test/java/com/mailsac/api/AppTest.java

    Import the required modules
package com.mailsac.api;

import com.fasterxml.jackson.core.JsonProcessingException;
import com.fasterxml.jackson.databind.JsonNode;
import com.fasterxml.jackson.databind.ObjectMapper;
import com.mashape.unirest.http.HttpResponse;
import com.mashape.unirest.http.Unirest;
import com.mashape.unirest.http.exceptions.UnirestException;
import org.junit.jupiter.api.AfterEach;
import org.junit.jupiter.api.BeforeAll;
import org.junit.jupiter.api.BeforeEach;
import org.junit.jupiter.api.Test;

import javax.mail.Message;
import javax.mail.MessagingException;
import javax.mail.Session;
import javax.mail.internet.InternetAddress;
import javax.mail.internet.MimeMessage;
import java.io.IOException;
import java.io.UnsupportedEncodingException;
import java.util.Date;
import java.util.Properties;

import static org.junit.jupiter.api.Assertions.assertTrue;
import static org.junit.jupiter.api.Assertions.fail;
  1. Acquire a Mailsac API key and configure SMTP sending. Export these parameters as environment variables:
export MAILSAC_API_KEY=your_mailsac_key;
export [email protected]
export SMTP_USERNAME=your_smtp_username
export SMTP_PASSWORD=your_smtp_password
export SMTP_HOST=smtp.example.com
public class AppTest {
    // MAILSAC_API_KEY environment variable. Generated by mailsac. See
    // https://mailsac.com/api-keys
    static String mailsacAPIKey = "";
    // MAILSAC_TO_ADDRESS environment variable. Who you're sending an email to.
    static String mailsacToAddress = "";
    // SMTP_FROM_ADDRESS environment variable. Necessary if you are sending
    // through out.mailsac.com (unlikely - you most likely will replace
    // sendMail() below.
    static String fromAddress = "";
    // SMTP_USERNAME environment variable. Required for authenticated SMTP sending
    static String smtpUserName = "";
    // SMTP_PASSWORD environment variable. Required for authenticated SMTP sending
    static String smtpPassword = "";
    // SMTP_HOST environment variable. Hostname of your SMTP server
    static String smtpHost = "";
    // SMTP_PORT environment variable. Port used for SMTP sending
    static int smtpPort = 587;

    @BeforeAll
    static void setup() throws Exception {
        mailsacAPIKey = System.getenv().get("MAILSAC_API_KEY");
        mailsacToAddress = System.getenv().get("MAILSAC_TO_ADDRESS");
        fromAddress = System.getenv().get("SMTP_FROM_ADDRESS");
        smtpUserName = System.getenv().get("SMTP_USERNAME");
        smtpPassword = System.getenv().get("SMTP_PASSWORD");
        smtpHost = System.getenv().get("SMTP_HOST");
        if (System.getenv().get("SMTP_PORT") != null) {
            Integer.parseInt(System.getenv().get("SMTP_PORT"));
        }
        if (mailsacAPIKey == null || mailsacToAddress == null || fromAddress == null) {
            throw new Exception("Missing environment variable setup!");
        }
        if (smtpUserName == null || smtpPassword == null || smtpHost == null) {
            throw new Exception("Missing SMTP environment variables");
        }
        System.out.println(mailsacAPIKey);
        System.out.println(mailsacToAddress);
        System.out.println(fromAddress);
    }
}
  1. Add a purgeInbox() method which makes a DELETE request to api/addresses/{email}/messages/(messageId}.

    This section of code should be added to the existing AppTest class.
public class AppTest {
  //...
 @BeforeEach
 @AfterEach
 // purgeInbox cleans up all messages in the inbox before and after running each
 // test,
 // so there is a clean state.
 void purgeInbox() throws UnirestException, JsonProcessingException {
     HttpResponse<String> response = Unirest
             .get(String.format("https://mailsac.com/api/addresses/%s/messages", mailsacToAddress))
             .header("Mailsac-Key", mailsacAPIKey)
             .asString();

     // Parse JSON
     ObjectMapper objectMapper = new ObjectMapper();
     Object[] messagesArray = objectMapper.readValue(response.getBody(), Object[].class);

     for (int i = 0; i < messagesArray.length; i++) {
         JsonNode m = objectMapper.convertValue(messagesArray[i], JsonNode.class);
         String id = m.get("_id").asText();
         System.out.printf("Purging inbox message %s\n", id);
         Unirest.delete(String.format("https://mailsac.com/api/addresses/%s/messages/%s", mailsacToAddress, id))
                 .header("Mailsac-Key", mailsacAPIKey)
                 .asString();
     }
 }
  //...
}
  1. Implement a sendMail() method which sends an email. This section will likely likely be different depending on your use case. For example, you may be sending emails via your web application or via an email campaign.
public class AppTest {
    //...
    static void sendMail(String subject, String textMessage, String htmlMessage)
            throws UnsupportedEncodingException, MessagingException {
        Session session = Session.getDefaultInstance(new Properties());
        javax.mail.Transport transport = session.getTransport("smtp");
        MimeMessage msg = new MimeMessage(session);

        // set message headers
        msg.addHeader("Content-type", "text/HTML; charset=UTF-8");
        msg.addHeader("format", "flowed");
        msg.addHeader("Content-Transfer-Encoding", "8bit");

        msg.setFrom(fromAddress);
        msg.setReplyTo(InternetAddress.parse(fromAddress));
        msg.setSubject(subject, "UTF-8");
        msg.setText(textMessage, "UTF-8");
        msg.setContent(htmlMessage, "text/html");

        msg.setSentDate(new Date());

        msg.setRecipients(Message.RecipientType.TO, mailsacToAddress);
        msg.saveChanges();
        System.out.println("Email message is ready to send");
        transport.connect(smtpHost, smtpPort, smtpUserName, smtpPassword);
        transport.sendMessage(msg, msg.getAllRecipients());

        System.out.println("Email sent successfully");
    }
    // ...
}
  1. Add test. Use a for loop to check if the message was received by scanning the recipient inbox periodically. If the recipient inbox is not empty, and a message was found, the test verifies the message content:

    This test uses the Mailsac API endpoint /api/addresses/{email}/messages which lists all messages in an inbox.
public class AppTest {
    //...
    @Test
    void checkEmailWithLink() throws MessagingException, UnirestException, IOException, InterruptedException {
        sendMail("Hello!", "Check out https://example.com", "Check out <a href='https://example.com'>My website</a>");
        // Check inbox for the message up to 10x, waiting 5 seconds between checks.
        found: {
            for (int i = 0; i < 10; i++) {
                // Send request to fetch a JSON array of email message objects from mailsac
                HttpResponse<String> response = Unirest
                        .get(String.format("https://mailsac.com/api/addresses/%s/messages", mailsacToAddress))
                        .header("Mailsac-Key", mailsacAPIKey)
                        .asString();

                // Parse JSON
                ObjectMapper objectMapper = new ObjectMapper();
                Object[] messagesArray = objectMapper.readValue(response.getBody(), Object[].class);

                System.out.printf("Fetched %d messages from Mailsac for address %s\n", messagesArray.length,
                        mailsacToAddress);
                eachMessage: {
                    for (int m = 0; m < messagesArray.length; m++) {
                        // Convert object into JSON to fetch a field
                        JsonNode thisMessage = objectMapper.convertValue(messagesArray[m], JsonNode.class);

                        // After a message is found, the JSON object is checked to see if the link was
                        // sent correctly
                        assertTrue(thisMessage.get("links").toString().contains("https://example.com"),
                                "Missing / Incorrect link in email");

                        System.out.printf("Message id %s contained the correct link\n",
                                thisMessage.get("_id").asText());

                        return; // end the tests
                    }
                }

                System.out.println("Message not found yet, waiting 5 secs");
                Thread.sleep(5000);
            }

            // Fail the test if we haven't reached assertTrue above
            fail("Never received expected message!");
        }
    }
    // ..
}
  1. At this point, the code is complete. Package the project: mvn clean package. This will also run a test.

    Subsequent changes to the source file do not require you to run mvn clean package again. Instead, run mvn test.

    The output should appear similar to this:
[INFO] -------------------------------------------------------
[INFO]  T E S T S
[INFO] -------------------------------------------------------
[INFO] Running com.mailsac.api.AppTest
[INFO] Tests run: 1, Failures: 0, Errors: 0, Skipped: 0, Time elapsed: 9.148 s s - in com.mailsac.api.AppTest
[INFO] 
[INFO] Results:
[INFO] 
[INFO] Tests run: 1, Failures: 0, Errors: 0, Skipped: 0

GitHub Repository

If you encounter any difficulties, git clone https://github.com/mailsac/mailsac-integration-test-java. Make edits as necessary, and run mvn package.

Alternatively, if your tests fail because of error codes when making requests to the Mailsac API, please refer to the API Specification for further reading.

Next Steps

The Mailsac API Specification has generated code examples in Java + Unirest for making requests. It also has code examples in other languages.

This example can be adjusted to get all private email addresses for an account and purge their inboxes if necessary.

Please visit our forums if you have any questions!

Plus-addressing is supported by all Mailsac inboxes

When you send to any inbox @mailsac.com, if a + plus symbol is included, we remove that symbol and everything after it.

jeff+12345asdf@mailsac.com

will be delivered to

[email protected]

Many email services including Gmail, iCloud and Fastmail support stripping the + plus symbol and everything after it in the local-part of the address (everything before the @ symbol).

Plus-addressing has long been a useful feature to segment user accounts across services. At Mailsac we offer a variety of disposable email and forwarding utilities that are designed for software QA engineers and developers. Things like forwarding all messages in a domain to a single address, or automatically routing email to webhooks or slack, are really easy – may not even require DNS setup.

Speed Up Integration Tests Using WebSockets

All the code shown in this article is published at https://github.com/mailsac/mailsac-integration-test-examples

Integration tests identify errors between systems. These tests can be slow to run because of the interactions between multiple systems.

Mailsac can facilitate integration testing between web apps and transactional email services.

This article explains how to use WebSockets to make your email integration tests faster and simpler than with REST API polling.

Explaining the differences: REST APIs vs WebSockets

A REST API call uses a HTTP request for creating, reading, updating, and deleting objects. The HTTP connection between the client and server is short lived. An example of this is the List Messages In Inbox endpoint. The endpoint will return JSON formatted information about email messages in a Mailsac Inbox. Each time a client checks for new messages a new HTTP connection will be used.

A WebSocket is a persistent connection between a client and server providing full-duplex communication. By reusing an established connection there is no need to poll the REST API for changes, instead data can be pushed to the client in real time. WebSockets often listen on port 80/443 but does not use HTTP, except for the initial connection handshake.

REST API Polling Examples

The examples below use the “old way” – hit the Mailsac REST API and “poll” the inbox for new messages.

Polling is reliable and familiar for API programmers.

However, this approach can result in significant delays between when the email was received by Mailsac and when the test checks for a new message. Every few seconds, you ask the server if there are new messages.

Using a Web Socket Instead of Polling

What if the server could notify you that there are new messages? That’s where WebSockets come in.

This code example uses Node.js and Mocha test framework. Portions of the code example are presented below.

Steps to Validate Email Contents Using a WebSocket

Here’s how you can get notified of a new email message:

  1. Establish a WebSocket connection with Mailsac
  2. Send an email using SMTP to a private Mailsac address
  3. Receive content of the email over the established WebSocket
  4. Validate the content of the email
  5. Send a second email using SMTP to a private Mailsac addrress
  6. Receive content of second email over the established WebSocket
  7. Validate the content of the second email
  8. Delete both email messages
  9. Close WebSocket connection

Test Configuration

This test requires several variables be defined. They can be set by editing the script or by setting environment variables.

const mailsacAPIKey = process.env.MAILSAC_API_KEY || ''; // Generated by mailsac. See https://mailsac.com/api-keys
const mailsacToAddress = process.env.MAILSAC_TO_ADDRESS || ''; // Mailsac email address where the email will be sent
const smtpUserName = process.env.SMTP_USER || ''; // Username for smtp server authentication
const smtpPassword = process.env.SMTP_PASSWORD || ''; // Password for smtp server authentication
const smtpHost = process.env.SMTP_HOST || ''; // hostname of the smtp server
const smtpPort = process.env.SMTP_PORT || 587; // port the smtp is listening on

Setup: Configure Mailsac Address for WebSocket Forwarding

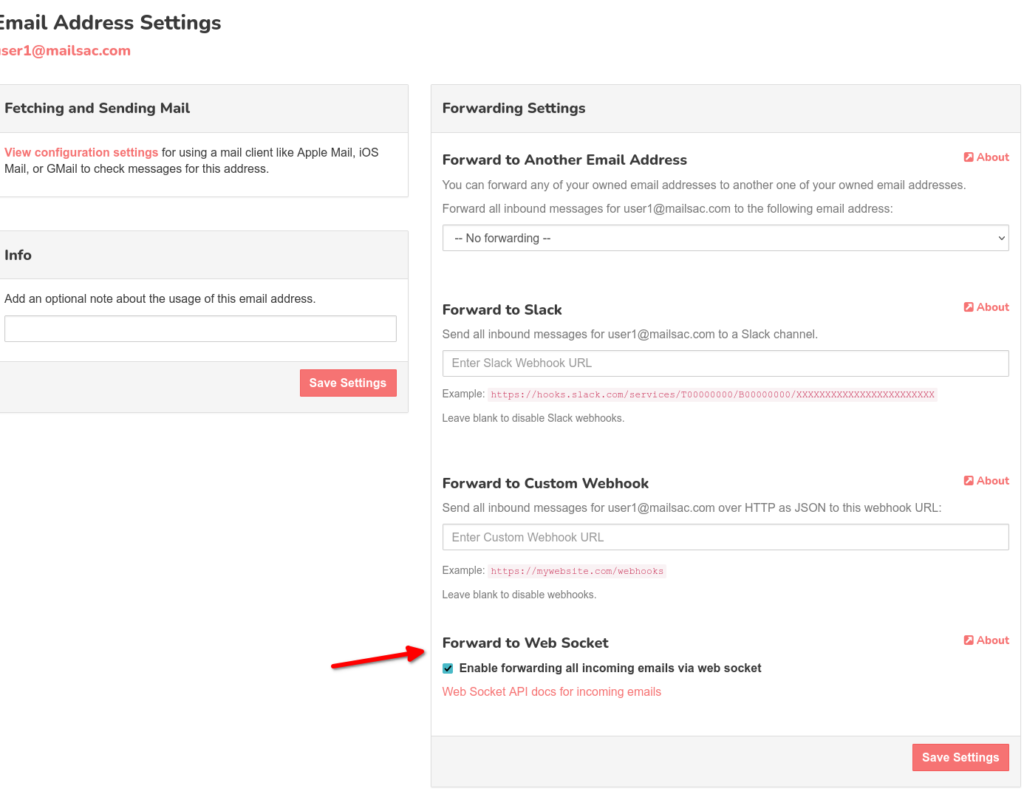
The Mailsac address used in this example needs to have WebSocket forwarding enabled on it. Any messages sent to the email address will be forwarded by the Mailsac WebSocket server.

To enable WebSocket forwarding the Mailsac address must be private. Private addresses have additional features such as forwarding to Slack, forwarding to a Webhook, and forwarding to a WebSocket. Select the “Settings” button next to the email address you want to configure from Manage Owned Email Addresses. Select the check box to “Enabled forwarding all incoming email via web socket” and select “Save Settings”.

1. Establish WebSocket Connection

The NPM package ws is a WebSocket client used to connect to the Mailsac WebSocket service.

The Websocket connection to Mailsac is established on lines 12-14. The ws package will only reject a Promise if it fails to connect to the WebSocket server due to a network error. Wrapping the connection in a Promise allows for additional validations.

The Mailsac WebSocket server will send the message ({"status":200,"msg":"Listening","addresses":["[email protected]"]}) after the initial connection. In lines 16-26 the initial message is parsed and checked for value of the property status. The Promise is rejected if the initial status message is not received or does not have a status code of 200.

const mailsacAPIKey = process.env.MAILSAC_API_KEY || ''; // Generated by mailsac. See https://mailsac.com/api-keys
const mailsacToAddress = process.env.MAILSAC_TO_ADDRESS || ''; // Mailsac email address where the email will be sent

describe("send email to mailsac", function () {

  // Open websocket waiting for email. This websocket will be reused for tests in this file.
  before(() => {
    return new Promise((resolve, reject) => {
      ws = new WebSocket(
        `wss://sock.mailsac.com/incoming-messages?key=${mailsacAPIKey}&addresses=${mailsacToAddress}`
      );
      let wsMessage; // message response object
      ws.on("message", (msg) => {
        try {
          wsMessage = JSON.parse(msg);
        } catch {
          assert(wsMessage, "Failed to parse JSON from websocket message");
        }
        if (wsMessage.status != 200) {
          reject(new Error("connection error: " + wsMessage.error));
          return;
        }
        resolve(wsMessage);
      });
      ws.on("error", (err) => {
        reject(err);
      });
    });
  });
});

2. Send email using SMTP

The NPM package nodemailer is used to send a test email via SMTP.

The connection to the STMP server is configured in lines 4-10. Most SMTP servers will require authentication.

The email’s to, from, subject, and content are set in lines 14-18. The email will be sent to the address defined in the configuration at the beginning of the script or the environment variable MAILSAC_TO_ADDRESS. The email will include a link to the website https://example.com.

  it("sends email with link to example.com website", async () => {
    // create a transporter object using the default SMTP transport
    const transport = nodemailer.createTransport({
      host: smtpHost,
      port: smtpPort,
      auth: {
        user: smtpUserName,
        pass: smtpPassword,
      },
    });
    // send mail using the defined transport object
    const result = await transport.sendMail({
      from: smtpUserName, // sender address
      to: mailsacToAddress, // recipient address
      subject: "Hello!",
      text: "Check out https://example.com",
      html: "Check out <a href https://example.com>My website</a>",
    });
  });

3. Receive Message via WebSocket

Once the email arrives, Mailsac will send a JSON formatted version of the email on the WebSocket established earlier in this example. ws.on("message", (msg) => { ... } is a function that will run when new message is sent by the WebSocket server. The msg is parsed as JSON. Then the Promise will resolve if the message has a to property. The existence of the to property is checked to make sure the message sent by the WebSocket server was an email and not a status message. The await keyword will cause the test to wait until a message is sent over the WebSocket or the test times out.

const wsMessage = await new Promise((resolve) => {
  ws.on("message", (msg) => {
    const wsResponse = JSON.parse(msg);
    if (wsResponse.to) {
      resolve(wsResponse);
    }
  });
});

Example JSON formatted message

{

    "status": 200,
    "email": 

{

    "text": "string",
    "body": "string",
    "raw": "string",
    "headers": { },
    "_id": "m3phnJ2ag3example-0",
    "from": 

[

    {
        "name": "string",
        "address": "string"
    }

],
"to": 
[

    {
        "name": "string",
        "address": "string"
    }

],
"cc": 
[

    {
        "name": "string",
        "address": "string"
    }

],
"bcc": 
[

    {
        "name": "string",
        "address": "string"
    }

],
"subject": "string",
"savedBy": "string",
"originalInbox": "string",
"inbox": "[email protected]",
"domain": "example.com",
"received": "1985-04-12T23:20:50.52Z",
"size": 0,
"attachments": 
[

    "5ea9c924627e68f988c9c7ca44340892"

],
"ip": "string",
"via": "string",
"folder": "inbox",
"labels": 
[

    "string"

],
"read": true,
"rtls": true,
"links": 

        [
            "string"
        ],
        "spam": 0.345
    }

}

4. Validate Content of the Email

The assert package is used to validate the contents of the email. The subject and text properties are assigned to new variables. assert.equal(subject, "Hello!"); will cause an exception if subject is not equal to Hello!. The test framework Mocha will interpret this as a failure and the test will fail. Likewise, if the variable email_text is not Check out https://example.com the test will fail.

const subject = wsMessage.subject;
const email_text = wsMessage.text;
assert.equal(subject, "Hello!");
assert.equal(email_text, "Check out https://example.com");

5-7. Send Another Email and Validate Its Content

The reason to send a second email is to demonstrate that the Mailsac WebSocket connection can be reused. This second test will reuse the WebSocket connection established (variable name ws) in the before() block in step 1. The only difference between the first and second test is the content of the email.

// Sends a second email reusing the websocket.
it("sends email with link to unsubscribe.example.com website", async () => {
  const transport = nodemailer.createTransport({
    host: smtpHost,
    port: smtpPort,
    auth: {
      user: smtpUserName,
      pass: smtpPassword,
    },
  });
  const result = await transport.sendMail({
    from: smtpUserName, // sender address
    to: mailsacToAddress, // recipient address
    subject: "Unsubscribe",
    text: "Click the link to unsubscribe https://unsubscribe.example.com",
    html: "Check out <a href https://example.com>My website</a>",
  });

  console.log("Sent email with messageId: ", result.messageId);

  const wsMessage = await new Promise((resolve) => {
    ws.on("message", (msg) => {
      const wsResponse = JSON.parse(msg);
      if (wsResponse.to) {
        resolve(wsResponse);
      }
    });
  });

  assert(wsMessage, "Never received messages!");

  const subject = wsMessage.subject;
  const email_text = wsMessage.text;
  assert.equal(subject, "Unsubscribe");
  assert.equal(
    email_text,
    "Click the link to unsubscribe https://unsubscribe.example.com"
  );
});

8. Delete Emails to Prevent Leaky Tests

An after() block will run after the tests have completed. The REST API Endpoint – Delete All Messages In An In Inbox is called to delete the test emails. By deleting all the test emails, it prevents these emails from being fetched in another test, which could impact the results of another test. It is best practice to clean up tests after they ran.

The NPM package supertest is used to make the REST call to delete the messages. Virtually any HTTP client library could be used to do this. Feel free to use the HTTP client library you feel most comfortable with.

afte(() =>
  request("https://mailsac.com")
    .delete(`/api/addresses/${mailsacToAddress}/messages`)
    .set("Mailsac-Key", mailsacAPIKey)
    .expect(204)
);

9. Close WebSocket Connection

An after() block is used to close the WebSocket connection after all the tests have completed. It is best practice to close all connections on the termination of the test.

// close websocket after all tests finish
after(() => ws.close());

Next Steps

The use of WebSockets helps speed up tests and uses API calls more efficiently.

See the WebSocket Test Page to see a WebSocket in action in your browser. This page includes a basic code example usage ofoffor a WebSocket client and is a great starting point before divining into integration testing using WebSockets.

If you have questions about this example or the Mailsac WebSocket service please post on https://forum.mailsac.com

Using Selenium To Test Account Email Signups

All the code shown in this article is published at
https://github.com/mailsac/selenium-js-example

Selenium and Mailsac can be used to test the delivery and contents of a signup email sent by a web application.

This example will demonstrate how to configure Selenium and provide code examples to automate and integrate testing with Mailsac.

What is Selenium?

Selenium is an automation tool for testing website user interfaces. It is open-source and supports multiple programming languages such as Java, Python, Javascript etc.

Selenium is not a single tool but is composed a several tools. Our example will focus on the WebDriver component. This will allow us to test our application as if a real person were operating the web browser.

Prerequisites

Installing Selenium

The Selenium WebDriver is installed during step 2 by running npm install.

  1. Clone the selenium-js-example repository and change directories to the cloned repository
    git clone https://github.com/mailsac/selenium-js-example.git && cd ./selenium-js-example
  2. Install the Selenium WebDriver by running npm install
  3. Download browser driver for the browser that will be tested (see table for download links).
  4. Place the browser driver in the system PATH
BrowserDriver
Chromechromedriver(.exe)
Internet ExplorerIEDriverServer.exe
EdgeMicrosoftWebDriver.msi
Firefoxgeckodriver(.exe)
Safarisafaridriver

The safaridriver is included with Safari 10 for OSX El Capitan and macOS Sierra. It does require Remote Automation in the Develop Menu to be enabled.

Configure the Browser for Selenium to Use

This example will default to using Firefox. In order to use a different browser set the SELENIUM_BROWSER environment variable.

List of supported SELENIUM_BROWSER values

SELENIUM_BROWSER=chrome
SELENIUM_BROWSER=firefox
SELENIUM_BROWSER=internet_explorer
SELENIUM_BROWSER=safari
SELENIUM_BROWSER=edge
SELENIUM_BROWSER=opera

Web Application Overview

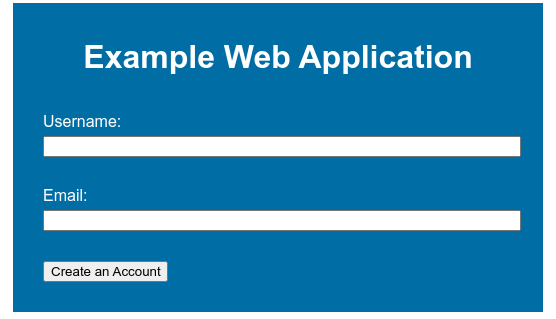
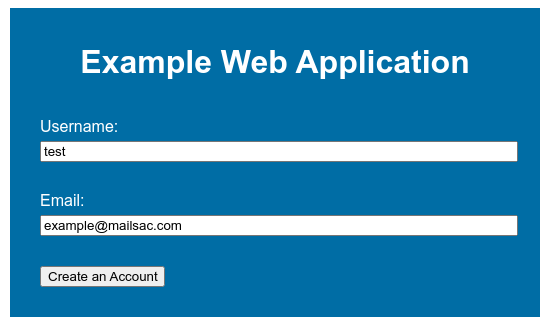
The example web application consists of a single page with a form. The form accepts a username and email address.

Configuring the Web Application

Email will be sent using the Mailsac Outbound Message REST API. You will need to update mailsacAPIKey with your API keymailsacFromAddress is the address that this example will use are the from address.

const mailsacAPIKey = ""; // Generated by mailsac. See https://mailsac.com/api-keys
const mailsacFromAddress = "[email protected]";

Manual Test of Email Delivery

To manually test email delivery, launch the example web application by running npm start from the command line. Use a web browser to view http://localhost:3000/index.html

  1. Enter a username and email address.

2. If everything went well you should see a confirmation.

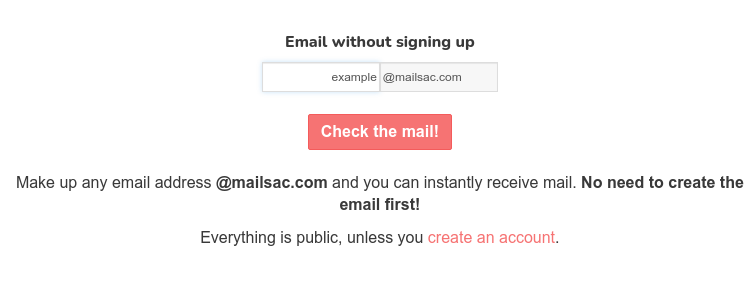
3. Check the inbox of Mailsac address you send to using the form on https://mailsac.com

4. Verify the message you sent has been received.

Automated Testing Using Selenium

To automate UI testing a few different components are required:

  • Selenium WebDriver: Automates input into our web application’s form
  • Mocha: Test framework to run the tests
  • HTTP Requests Module: To interact with the Mailsac API
  • Assert Module: Validates if a given expression is true
  • Webserver: Runs our web application

All of these components are installed when running npm install

Configure Mailsac API Key

To interact with the Mailsac API an API Key is needed. To generate a new API Key sign in to Mailsac and go to the API Keys Page.

An API Key is available for free to all registered users of Mailsac.

Configure the test to work with your API Key by adding it to the following line in ./test/test.js

const mailsacAPIKey = ""; // Generated by mailsac. See https://mailsac.com/api-keys

Run the Test

Before running the tests your Mailsac API key needs to be configured in ./test/test.js and SMTP settings configured in app.js.

The tests can be executed by running npm test from the command line.

npm test

> [email protected] test /home/user/repos/selenium-js-example
> mocha


  http-server
    register new user
(node:838754) [DEP0066] DeprecationWarning: OutgoingMessage.prototype._headers is deprecated
      ✓ sends email with link to example.com website (1383ms)


  1 passing (1s)

The last line in the above code snippet 1 passing (1s) shows our test passed. If the test failed, an error message will be displayed.

If you are using a browser other than Firefox you will need to add an environment variable when running the tests (eg SELENIUM_BROWSER=chrome npm test).

Using Mocha and Selenium to Automate Tests

This section will cover how Mocha and Selenium work together in this code example to test email delivery.

The integration tests are located in ./test/test.js. The tests are written in Mocha, which uses a behavior driver development model. This allows for the description of tests in easy to understand language.

Mocha Test Introduction

In the following example, the describe block includes a description of what is being tested. The it block describes the expected result. assert is used to test the for truth. If the expected statement is not true, there will be an exception, and the test will fail.

describe("tests truth", () => {
    it('true equals true', function() {
        assert(true); // assert checks for truth
    });
    it('false equals false', () => {
        // assert equal checks the first and second parameter are equal
        assert.equal(false,false);
    });
})

Mocha and Selenium

This section is a line by line explanation of the Mocha tests in the example. The code example is available on GitHub.

Mocha is used to call the Selenium WebDriver to perform actions on the example Web Application. The describe block shows we are going to be testing the process of registering a new user. The it block tells us what we expect to happen.

Inside the it block Selenium WebDriver is instructed to:

  • open a web browser using the webapp’s localhost URL
  • find the html element with the id username and enter text in the field
  • find the html element with the id email and enter specified text in the field
  • find the html element with the id submitUserCreation and click on it
it("sends email with link to example.com website", async () => {
  await driver.get(webappUrl);
  await driver.findElement(webdriver.By.id("username")).sendKeys("webdriver", "ExampleUser");
  await driver.findElement(webdriver.By.id("email")).sendKeys("webdriver", signupEmailAddress);
  await driver.findElement(webdriver.By.id("submitUserCreation")).click();
...

Our webapp will then email the address submitted by Selenium.

There is a for loop, following the Selenium commands, that uses the Mailsac API to fetch the mail from the specified email address. If an email isn’t found, it will retry 10 times waiting about 5 seconds between tries.

let messages = [];
for (let i = 0; i < 10; i++) {
   // returns the JSON array of email message objects from mailsac.
   const res = await request("https://mailsac.com")
           .get(`/api/addresses/${signupEmailAddress}/messages`)
           .set("Mailsac-Key", mailsacAPIKey);
   messages = res.body;
   if (messages.length > 0) {
      break;
   }
   await wait(4500);
}

If no messages are received from the Mailsac API after 10 tries, assert will create an exception and throw the error Never received messages!. The contents of the email are checked to see if the link https://example.com is in the email. If, the link is not found, an exception is created stating Missing / Incorrect link in email

assert(messages.length, "Never received messages!");
const link = messages[0].links.find((l) => "https://example.com");
assert(link, "Missing / Incorrect link in email");

Next Steps

This example can be modified to automate your team’s UI testing procedures. For another example of Mocha tests using Mailsac see the Integration Tests Blog Post.

Our forums are a great place to discuss usage of Mailsac’s API.

Github repository for all source code in this example:
https://github.com/mailsac/selenium-js-example

Write Integration Tests Using Mailsac

Mailsac has a REST API that can be leveraged to validate emails are being received with the correct contents. This can be useful for web applications that send customized emails to customers.

This example will demonstrate how to send an email via an SMTP server and validate the email was received. The code used in this example is available on GitHub.

Setup Project Directory

Node version 12 or greater is required for this example due to the use of async and await.

Begin by creating a directory for the project.

mkdir mailsac-tests
cd mailsac-tests
npm init # enter project information, for test command use 'mocha'

Verify package.json looks something like this. The most important part is "scripts": { "test": "mocha" }

{
  "name": "mailsac-integration-tests",
  "version": "1.0.0",
  "description": "",
  "main": "index.js",
  "directories": {
    "test": "test"
  },
  "scripts": {
    "test": "mocha"
  },
  "author": "",
  "license": "ISC"
}

Installing a Test Framework

The test framework for this example is Mocha. It is a test framework for Javascript applications. A test framework will allow us to write tests against our code.

Setup Test Directory

These directions are inspired by the Mocha Getting Started Guide.

cd mailsac-tests
npm install --save-dev mocha
mkdir test
$EDITOR test/test.js # or open with your favorite editor

Write a Test to Test For Truth

This section is for people who are new to Mocha and test frameworks. Skip ahead if you know how to write tests.

Mocha follows a Behavior Driven Development (BDD) model of testing. This allows for human readable descriptions of software behavior. The first line of the code shows exactly what the following tests will test (ie describe("tests truth"). The following lines state the expected outcome of the test (ie it(true equals true).

This test uses Node’s built in assert. The first parameter passed to assert() is checked for true. If it is true, the assert passes. If the value is false, it throws an exception. In this example, we assert that true is true and that false is equal to false.

Create a describe block in test/test.js
describe("tests truth", () => {
    it('true equals true', function() {
        assert(true); // assert checks for truth
    });
    it('false equals false', () => {
        // assert equal checks the first and second parameter are equal
        assert.equal(false,false);
    });
})

This code can be run and the test should pass. Run the test with npm test . Confirm the test passed.

Congratulations! You have a working test.

Write an Integration Test

In this example, an email will be sent to Mailsac using the ubiquitous Javascript SMTP library NodeMailer, then the test framework will call Mailsac to validate that the email was received.

Install Dependencies

There are a few Node modules that will make sending an email and interacting with the Mailsac REST API easier. NodeMailer will be used to send the email via SMTP. SuperTest will be used to call the Mailsac API.

npm install

Integration Test Example

Back in the text editor, open / create the file test.js in the test folder. Copy and paste the following code or see GitHub for the complete example.

Import required modules
const assert = require("assert");
const nodemailer = require("nodemailer");
const request = require("supertest");
Configure SMTP settings and Mailsac Credentials
// Generated by mailsac. See https://mailsac.com/api-keys
const mailsacAPIKey = "";
// Mailsac email address where the email will be sent
const mailsacToAddress = "[email protected]";
// Username for smtp server authentication
const smtpUserName = "";
// Password for smtp server authentication
const smtpPassword = "";
// hostname of the smtp server
const smtpHost = "";
// port the smtp is listening on
const smtpPort = 587;
Create wait Function

The test will contact the Mailsac API multiple times while waiting for the email to arrive. This function will be used later in a for loop while waiting for the email to arrive.

const wait = (millis) => new Promise((resolve) => setTimeout(resolve, millis));
Add a Describe block with Timeout and Test Cleanup

The describe callback describes in human readable terms what the test is going to do. The increased timeout is required because the default timeout for Mocha is 2 seconds. The test email will likely not arrive that quickly. The afterEach section is used to delete all messages after the test runs. This prevents a leaky test.

describe("send email to mailsac", function () {
  this.timeout(50000); // test can take a long time to run. This increases the default timeout for mocha

  /* delete all messages in the inbox after the test runs to prevent leaky tests.
       This requires the inbox to private, which is a paid feature of Mailsac.
       The afterEach section could be omitted if using a public address
    */
  afterEach(() =>
    request("https://mailsac.com")
      .delete(`/api/addresses/${mailsacToAddress}/messages`)
      .set("Mailsac-Key", mailsacAPIKey)
      .expect(204)
  );
});
Add it block and NodeMailer Configuration

The it interface describes what the test will do "sends email with link to example.com website“. The transport variable is used to store the configuration of the SMTP server.

result = await transport.sendMail({… Attempts to send the email and capture the result.

describe("send email to mailsac", function () {
...

  it("sends email with link to example.com website", async () => {
    // create a transporter object using the default SMTP transport
    const transport = nodemailer.createTransport({
      host: smtpHost,
      port: smtpPort,
      auth: {
        user: smtpUserName,
        pass: smtpPassword,
      },
    });
    // send mail using the defined transport object
    const result = await transport.sendMail({
      from: smtpUserName, // sender address
      to: mailsacToAddress, // recipient address
      subject: "Hello!",
      text: "Check out https://example.com",
      html: "Check out <a href https://example.com>My website</a>",
    });

    // logs the messageId of the email, confirming the
    // email was submitted to the smtp server
    console.log("Sent email with messageId: ", result.messageId);
});
Add Loop to Check Mail

This section of code uses a for loop and a http library (supertest) to check if the message has arrived at Mailsac. The test uses the Mailsac API endpoint /api/addresses/{email}/messages which lists all messages in an inbox.

describe("send email to mailsac", function () {
...

  it("sends email with link to example.com website", async () => {
...
    // Check email in the inbox 10x, waiting 5 secs in between. Once we find mail, abort the loop.
    let messages = [];
    for (let i = 0; i < 10; i++) {
      // returns the JSON array of email message objects from mailsac.
      const res = await request("https://mailsac.com")
        .get(`/api/addresses/${mailsacToAddress}/messages`)
        .set("Mailsac-Key", mailsacAPIKey);

      messages = res.body;
      if (messages.length > 0) {
        break;
      }
      await wait(4500);
    }
  });
});
Add Assertion to Check for Link in the Message

assert is used twice. First, to check to see if any messages were fetched from the Mailsac inbox. This checks the length of the messages array to see if any messages were received. The second assert is used to check for a link to http://example.com .

describe("send email to mailsac", function () {
  // ...
  it("sends email with link to example.com website", async () => {
    // ...
    let messages = [];
    for (let i = 0; i < 10; i++) {
      // ... await get messages from mailsac
    }
    assert(messages.length, "Never received messages!");

    // After a message is retrieved from mailsac, the JSON object is checked to see if the link was parsed from the email and it is the correct link
    const link = messages[0].links.find((l) => "https://example.com");
    assert(link, "Missing / Incorrect link in email");
  });
});
Run Test

At this point the test code is complete and can be run using npm test. If all went well the following output is written to the console.

npm test

Run Test Using GitHub Repository

If you are having some trouble with the tests, I recommend downloading the code from GitHub and running it.

git clone https://github.com/mailsac/mailsac-integration-test-examples.git
cd mailsac-integration-test-examples
npm install
$EDITOR test/test.js # or open with your favorite editor

Edit the test.js and fill in your SMTP settings and Mailsac API key

const mailsacAPIKey = ""; // Generated by mailsac. See https://mailsac.com/api-keys
const mailsacToAddress = "[email protected]"; // Mailsac email address where the email will be sent
const smtpUserName = ""; // Username for smtp server authentication
const smtpPassword = ""; // Password for smtp server authentication
const smtpHost = ""; // hostname of the smtp server
const smtpPort = 587; // port the smtp is listening on

Run test running the command npm test in your terminal.

Next Steps

The example above can be used as part of your team’s quality assurance process. A real world example would be validating password reset links to customers. This test could be used to validate that when a customer requests a password reset an email is sent to them containing the correct password reset link.

If you have any questions about this example or want to talk about other implementations reach out to our community at https://forum.mailsac.com .

Multi-User Login using API Credentials, For Team Collaboration

Update: April 2021 – Multi-User login is now called “Sub-Accounts”

Named API Keys can now be used as website authentication.

Custom domains and Private Addresses have been great for quality assurance teams to conduct end to end automated testing of email. But sometimes interacting with an REST API can be a lot of overhead for non-repeating tasks. API Credentials can now be used to login to the website.

All private addresses and custom domains associated with the primary account will be visible from the website for API users. The permissions for API users are the same as API keys.

Quality assurance teams often share credentials of test accounts for the web application they are testing. These test accounts might to be associated with an email provisioned by their IT department or the QA tester’s personal email. Mailsac private domains allow the test accounts to be created in an an environment all members of the QA team have access to.

This feature allows teams to work together in the Mailsac platform. There is no longer a need to for each person to have their own Mailsac account. A named API Key can be created for each person. That API key can be used to interact with the REST API and the website. As a result, password resets and transaction emails sent to a Mailsac private domain can be accessed by any member of the QA team.

“Internally we have used Mailsac for collaboration. Being able to share a private address or domain allows my team members to see exactly what I am seeing. This feature allows our customers to do the same with their own private domains and addresses” Michael Mayer – Member – Forking Software LLC

Getting started is as easy as provisioning a new set of API credentials and enabling the website login on the API Key. This can be done the the Dashboard and selecting API Credentials & Users

Enable Website Login

We will be rolling this feature out to our Business and Enterprise Plans in the next couple weeks. If you have an immediate need for this feature we can enable it on your account. Contact [email protected] to get early access to this feature on you Business or Enterprise Plan.